Tuesday, January 23, 2024

Linocut in Progress: It's time for the M word...

And what's the M-word? Masking, of course. When I typed a title for this post I realized that I have a bit of a knee-jerk reaction to the word "mask," here in what we could call the sort of post-pandemic period. 

But the type of mask I refer to is made of newsprint, not filter paper, and it doesn't have strings attached. Not literal ones, anyway. 

Reduction printing involves applying all the colors of an image from (often) a single block, layer by layer. But sometimes one doesn't need a particular color to print over the entire image, so little feats of acrobatic fussiness can be employed in the form of masking.

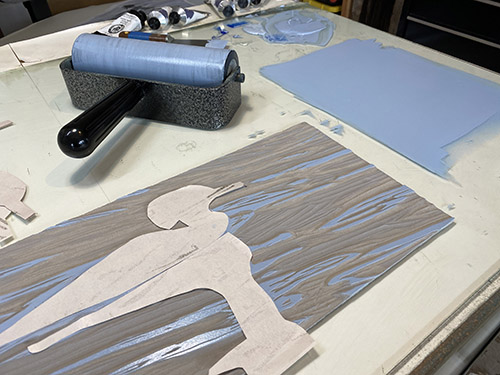
For example... here we are at Step 4 of the current linocut in progress. I'm adding another blue to the water, but it's not a color that's necessary in the body of the bird. I rolled ink over the entire block, but I also covered up some areas with bird-shaped pieces cut from newsprint. These newsprint "masks" prevent the ink from transferring to the print in those areas.

Reduction linocut in progress: Step 4 rollup and newsprint mask in waiting.

Hm. Sometimes I explain that better. (This is not an example of exemplary explanation. Say THAT three times fast.)  I also didn't take a photo of the block on the press with the mask in place. (Honestly, Sherrie. Get with the program here!) But here's the print at this stage:

Step 4 printed

See? No darker blue ink in the bird shape. It's still gray, as it was in the previous step. Clear as mud? Good, because there's more of this sort of thing to come. 

Step 5! 

Step 5 rollup and masks

Here is another blue (another!) which I don't want in the bird OR in its reflection. So I cut two mask shapes from newsprint and set them in the appropriate spot(s) on the inked block. 

Step 5 printed

Et voila! Except, oh dear. Lousy photo. This was a late night print session, so overhead artificial light reflected strongly on the wet ink. However, I think you can see that the bird and a portion of the reflection did not print this darker blue.

Now it was time to think about some wee bits of color that need to go into the body of the bird, NOT into the water. For this step I'll do some spot inking combined with masking. 

Step 6 spot inking and mask

The breast of the bird needs to be a sort of brick color and the bill is an orangey red. (It looks super orange in this photo!) I used small brayers to roll this ink only in those two areas, and this time I placed a mask around those shapes instead of on top of them. This created a little window for the color to peek through and transfer to the prints in only those areas. 

Here is the block on the press, with the mask in place, ready for the print to be placed face-down on top of it.

Step 6 ready to print

Step 6 printed

The bird's head also needed to be green, so there was another round of spot inking and masking to apply that color. No photos of the green mask, but here's the result.
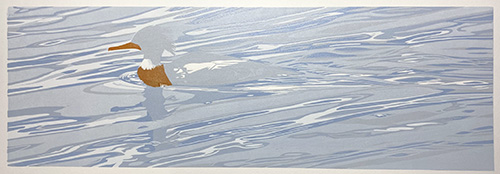
Step 7 printed

Things are moving right along now, and it seems quite clear what our subject is! All this bright color will be toned down in the next steps, but so far so good!

Wednesday, January 17, 2024

Linocut in Progress: New year, new energy

Happiness is... first ink on fresh paper. All images slightly embiggenable with a click.

Well. It's been a while since ol' Brush and Baren has seen much action. 2023 was a challenging year for me in a lot of ways and my good intentions weren't enough to balance the energy scales. 

2024 is off to a better start, and I'm determined to move forward in all kinds of good ways. The first of those has been getting a linocut started. Finally. 

So let's get... rolling!

Linocut in progress: Step 1 rollup

Despite all my efforts to come up with a composition that wasn't long and skinny, here I am, working on something long and skinny. I actually love this format, but it can be a tricky one for people to find place for on their walls. And let's face it, I do have to think about those sorts of things. Ah, well! Long and skinny it is. And a very pale blue to start because, let's face that, too... it's almost always the case.

I need to say something about ink, however, especially since it was part of my difficult 2023. Longtime readers might notice that for a first color, the rollout above seems remarkably opaque. 

For decades I have worked my prints similarly to watercolors... by layering very transparent colors to create a number of effects. I did this by using boatloads of transparent (non-pigmented) ink with just a smidge of pigmented ink mixed in. 

During the peak of the pandemic I couldn't get the brand of transparent base that I usually use, so I bought a different one. I've used other brands before, no problem... so I carried on as usual. What I didn't realize was that the formulation of this "new" base was significantly different from those I had used previously. Using high quantities of it turned out to be a bad idea, but I wasn't to discover this until months later. 

It turns out that the new-to-me brand contains linseed oil which, when stored in the dark (such as in a flat file, as all my pieces are) undergoes a chromatic shift. Which is a fancy way of saying all the prints turn yellow. Think of old oil paintings, which were often varnished with linseed oil. 

So, yes. Entire editions of work... basically everything I did last year, and a couple of pieces from the year before that, have discolored. Oddly, the color will eventually change back when exposed to light... but that's pretty much the antithesis of the usual thought about preserving work. I put UV-blocking glass on my work, and I've noticed that one of the pieces in question from last year, which is also on the least-light wall of my sitting room, has discolored under the glass, even though it was never stored in the drawer. Sigh.

I've pulled the questionable images from circulation... luckily I hadn't exhibited any of the really horribly affected ones from last year, so none went out into the world. But it was a demoralizing blow, to be sure. 

Which is a lot of words to say I am learning to work a new way... learning to balance the use of white ink with transparent base. Who says you can't teach an old dog new tricks?

Reduction linocut in progress: Step 1 printed

So, blah blah blah INK blah blah blah. Here's the first step printed. A nice pale blue. Interestingly, I found it easier to get an even tone with a little bit more opacity to the ink. Lots of transparent base was always a challenge to get applied evenly on the block.

On to Step 2! Oh look! Some things never change. Here's another light, slightly grayed down, blue.

Step 2 rollup

Again, I was pleased with how nicely the ink was rolling out. Technical problems when I was already feeling wobbly about working would have been no fun at all.

Step 2 printed

I bet that birder-types will already recognize the species here!

Things are moving right along. Time for a definite gray, rather than blue.

Step 3 rollup

And, voila! It's official. I am back to work. 

Whew.

Step 3 printed


Linocut in Progress: The Third Act

Time to wrap up this linocut ! And we are wrapping at warp speed (see what I did there?)... because there are deadlines. Exhibition deadline...