Well.
Despite the uproar that is the holidays (even for those of us grinches who don't necessarily feel celebratory), I have been spending a little time in the studio. I have three subtle color passes with which to catch you up (wow, that was a sentence), and if you don't have time to read a narrative right now the summary goes like this: Step 4: Okay, Step 5: Disaster, Step 6: Back on track. Hopefully.
It's a mildly cinematic arc, and from time to time I wonder if I shouldn't turn Brush and Baren into a vlog, but for now you're stuck with old skool still photography. And honestly, hair-pulling isn't one of my better looks, especially on video.
STEP 4!
Time to get away from subtle grays and engage the subtle blues. Yep, it's time to work on the water. The overall tone of this image is going to be soft and subtle all the way through to the end, I think, so we're sneaking up on these next stages.
As you can see in the upper edge of this photo, it took a little bit to find a blue that felt just right, but I got there eventually.
On the press you can barely see that the block has any color on it...
And the resulting print stage is similarly... um... not dramatic.
 |
| Reduction linocut in progress: Step 4 printed |
In fact, in this photo you can barely tell there's any blue at all... but, trust me.
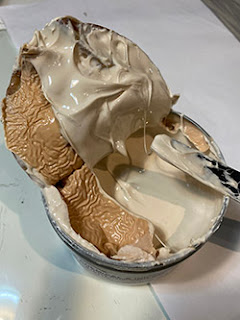
This step was achieved before the winter solstice, and the prints hung on the drying rack for about a week before I could get back to them. When I finally did... disaster struck.I use a LOT of transparent base in my ink mixing. For probably close to a decade now I've been using the Graphic Chemical 1911. It's not a relief printing ink, specifically, but it can be worked to a good consistency, and it has served me well. From time to time, however, I've received a batch that might have been a bit old... and took a lot more effort to get into shape.
At the conclusion of Step 4 I had used up the last bits of my open can of 1911, so for Step 5 I cracked a new one, from a shipment I received maybe a month ago. I was alarmed to see that there was some discoloration and skinning along one edge, but thought I could work around it. This turned out to be a bad decision. |
| Second can. Worse than the first. |
And yes, I did open a second can of 1911. And it was worse.
I cleaned up and turned out the lights and walked away.
Here's what the linocut looked like at the end of Step 5, though. Mostly.
 |
| Step 5 printed. Painfully. |
The next day I went back to carving, because that's what one does. But it was clear I needed to solve my ink problem. I do have a third can of 1911... but it's from the same order and I have no reason to believe it's going to be any better.
I dug around through all my ink stash, and voila! I found a small tube of Cranfield's transparent base. I bought it to try some time last year, but had never used it.
The base is very loose right out of the tube... much softer than I ordinarily like, but it mixed well with my pigmented inks (some of which are also Cranfield, so no surprise there) and rolled out nicely. And in fact the entire color pass went off without a hitch. Whew.
 |
| Step 6 printed. Without problems. Whew. |
So. The good news is that I seem to have a solution for my problem. The bad news is two-fold. First... I don't have any more of the Cranfield base, so forward motion is stalled. (But I do now have some on order.) The second problem is that the Cranfield product is almost twice the price of the 1911. (sigh) But what price does one put on lowered anxiety levels in the studio, eh?
There are some small details of the birds' beaks that will require some spot inking and masking, so probably this will be a good time to turn my attention to that step... and of course I need to carve for Step 7. Yes, I'm going to experience some more delay with this piece, but it could be much, much worse. And I'll start the new year with a new solution for my transparency needs, so that's a positive!
So, friends of linocuts, Brush and Baren, crazy studio antics, and... well... me... Thank you all for sticking with me through the last couple of very strange years. Here's hoping that the new year brings us all more opportunities to see each other in person and to share some joy and laughter and beauty. See you in 2022!


