I think we're all familiar with registration that goes awry, even if we don't know what to call it. Probably most of us at some time or another have picked up the Sunday paper and found our favorite comic strip distorted... perhaps the blue ink is improperly aligned and all the images have an offset blue ghost. That's bad registration.
There are probably as many ways to approach registration as there are printmakers, with some techniques better suited to hand-burnishing and others to press printing. I thought it might be helpful to show you 1) what I've used for hand-printing, 3) what I now use for press-printing, and 3) some links to other techniques that you might find helpful.
When I was hand-rubbing all my prints I worked on mounted blocks and over the years developed a jig system that worked really well for me. I wrote a post about it several years ago which you can find here: The Linocut Jig.
 |
| Two sizes of registration jigs for hand-rubbed prints, mounted blocks |
But everything changed a year ago when I brought home Presston, an etching press. It is possible to print mounted blocks on an etching press, but I didn't really want to mess around with type-high rails and trying to figure out how to register a mounted block.
I tried a couple of different ideas before I hit on the pin-and-tab system I'm using now. It has its limits, but so far I'm content with it.
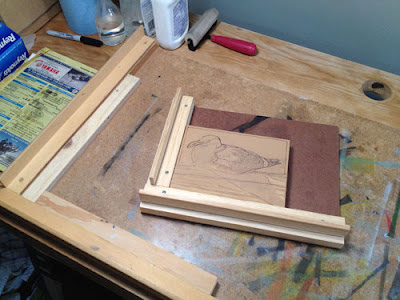
1) The jig: I cut a piece of matboard with an opening the size of my unmounted lino. The mat itself is wider on one end to accommodate the pins and still allow for a good paper margin.
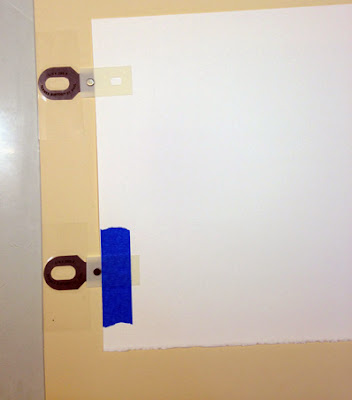
2) The pins: About a million years ago I worked in a commercial print shop. I set type and did layout via the paste-up method... yes, I am that old. My pasted-up layouts then went to the camera room, where the camera guy made film negatives of them and then "stripped them up" for exposure to metal lithographic plates. And guess what? He used pins and tabs just like these to do the job.
There are several references for pin-and-tab systems on the interwebs. Some will tell you to secure your lino to bookboard, but that seems like a clean-up headache to me. I also know of instances where printmakers adhere the pins directly on to their lino. This works really well for bleed prints (image goes over the edge of the paper), but at the moment I like making prints with nice, clean margins.
(Note: Ternes-Burton sells pin-and-tab sets, but I found that I wanted shallower pins than the ones included in sets. I'm using the 1/4" x .055 size)
3) The tabs: The slightly tedious bit in this system is setting up the paper (and then taking it all apart again when the prints are finished). Once I have all my paper trimmed to size I turn each sheet face down on the jig, snug up to the pins. I affix tabs to the pins, and then tape the tabs to the paper with blue painter's tape. So far the blue tape stays stuck through the entire print process... it does pull up some paper on the back when the prints are finished and the tabs are removed, but I allow for this with a wider margin on one edge of the paper.
And, voila! We're ready to go. I was worried at first about running the metal pins through the press, but I haven't had any problems because 1) I'm using the most shallow pins which, even attached to the mat, are not any higher than the lino block, 2) before I run the print through the press I place a stiff cutting mat over everything including the pins, and 3) I'm using the lightest possible pressure setting. I get NO embossing of the paper. But I'm keeping a watchful eye to make sure there are no problems over time.
Other techniques:
McClain's Printmaking Supplies has a very helpful one-page PDF describing the Japanese kento technique here, and another page about using their registration board here. The registration board is something you could easily make yourself with their description. (McClain's has all SORTS of great instructions that they include with their products.)
Maurice Fykes III has an extensive description of a pin-and-tab system available as a PDF here.
Three different techniques are described in Michael Merry's Introduction to Printmaking blog here. The blog appears to be the website for an entire printmaking course, so there are lots of other useful links there as well.
Northwoods Trekker has an interesting modification for a pin-type system made from an inexpensive hold punch on My Printmaking Journey, and there's another similar version in a thread on the Wet Canvas Printmaking Forum.
If any readers have links to other systems that they'd like to share, I'd love to see them in the comments.


Hi Sherrie — This is enormously helpful! I've been printing my mounted linocuts by hand and on an etching press for the last few years (doing both multiple color blocks and reduction prints) using a plywood chase of the same height, cut in a "U" shape. This works *most* of the time, but I was just now looking for a more precise method and also thinking of abandoning mounting the blocks if it would gain me better registration.
ReplyDeleteAnd then your excellent post here popped up! Perfect timing and a great resource. I'm also an old(er) old-school graphic designer from the wax paste-up days, and also worked a stint in a print shop. Going to order some of those pins & tabs right away, and grateful they're still actually making them! Thanks a bunch! :-)
I've only managed to properly register a print when only using 2 colours lol need to experiment since I want to combine lino prints with etching prints
ReplyDeleteI think that I'm older than you because I also worked in graphic business long, long, ago. I remember working with rubilith film! And I was there working, in the transition to computer, with Ventura, PageMaker and Quark-Xpress and CorlDraw !
ReplyDeleteBut I'm a real beginner in linocut, my fisrt video where I saw a registration jig was from "LindaCoteStudio" youtube channel. Of course I have no press yet. And I work with that kind of jig since. My very first linocut was a four colors reduction print. I won't tell you all the troubles I went through.. But I learn a lot, and in 40 prints and four passes, I think, I had two good prints...! (hahahahaha)
The links are:
https://www.youtube.com/watch?v=cVUJQnfRqI0
https://www.youtube.com/watch?v=0RUKTlsT9_8
Gaëtan.
Hi Holly... yes, I started out trying to make a chase and just couldn't get it to work for me. I like the pin/tabs a lot! I will say this about unmounted lino in the press, though: Make sure you're using the lightest pressure possible. My blocks are sometimes a little smaller than the mats and in the early days of figuring out this system I had problems with either the lino or the paper, or both, stretching.
ReplyDeleteI do run in to this once in a while on larger pieces, too... at least I think that's what is happening. It's weird... everything registers until the last inch or so of a big block... and then one corner on one color pass might print a hair longer than on all other passes.
Aw, c'mon, Jen... I bet you can do at least three! ;-)
Thanks for the links, Guepar! I searched a bit for some registration video links to share but didn't find anything I liked. (There was one that was so horrible I couldn't imagine why anyone would post it!)
And I tended to use amberlith rather than ruby...;-) I also was working in layout when the computer "revolution" happened. Was a proud user of Pagemaker 1.0 on a monochrome monitor.
(so I have to be careful to seat them in the mat the same way every time)
I began my studies as a cartographer before the days of the computer revolution, So I know what you are talking about! In the past couple of years I started taking printmaking classes at the community college and used your method of pin and tab during the last semester. I was making a multiple color reduction print of my dog, ha, which was more suited to multiple blocks instead. However your system saved the print!! I ended using masks also. Learned a lot! And BTW I kept my old pins too. I kept asking the teacher isn't there a way to register using the pins and of course not being as old as me, had no idea what I was talking about! LOL. Thanks so much for your site and you're generosity!
ReplyDeleteI do need to practice since I want to combine lino with etchings so registration would have to be right. so maybe I will try 3 colours...if I feel like going insane ;)
ReplyDeleteJen, as long as you avoid council house lilac, I think you'll be fine. ;-)
ReplyDeleteAnd Carrol... yes... when did we become "retro" in our approach to such things? I was delighted to find pins are still manufactured and used by... someone other than us?
I really like the mat board with a hole cut for the linoleum. I have a set of pins, and a giant hole punch that I can use to punch paper or aluminum plates. When I have run blocks through the press, they seem to slip and tear the paper away from the pins. Your idea of the hole cut in mat board should eliminate this problem.
ReplyDeleteThanks for sharing
Hi Justin... I'm finding it works a treat, even when the block isn't exactly the same size as the mat opening. Which is good, because I ordered a stack of 12 x 18 precut unmounted lino and none of it is square. By the time I square it up it's more like 11.75 x 17.75... annoying as heck. It still works, although I have noticed a few times that the lino might be stretching a wee bit on the trailing edge.
ReplyDeleteI thought maybe it was the paper stretching, but if that were the case I think the color passes would be coming up short on the trailing edge rather than long. Is that right? It's barely noticeable so challenging to troubleshoot.
Thanks Sherry for this post! I was understanding what you were telling me about adapting to the etching press but now I see it clearer than mud:) I was trying to picture how you managed the red tabs under the press roller. Great explanation. Congrats on the Coors sales!!
ReplyDeletePatty
Thanks for the detailed registration post! I make a handheld press and this concept will help me create a registration setup. I thought folks had to hole punch their paper, but now I see they make these stripping tabs.
ReplyDelete