Tuesday, March 30, 2021

Linocut in Progress: Mask-er-aid

My process can best be described as creating a problem, finding a solution to it, and then finding a solution for the new problem I just created. If it sounds like I am joking, then you are either not a printmaker or you are a printmaker who is way better at this than I am. 

While linocut at its most basic is pretty straightforward, there are two aspects of my process that combine to create what sometimes feels like an infinite number of non-ideal situations. 

The first is that I work in reduction. This means all colors of an image are produced from a single block. At each stage I remove more material from the linoleum block, "reducing" the printable surface. If I make a mistake and remove material from the block too soon... well... depending on the seriousness of the error I can either live with it or consider options like using another block. 

The second is that I use a lot of transparent ink, layering colors as one might layer watercolor washes. 

Put these two things together with all the other variables... such as the order of carving and the way ink, paper, and lino behave on any given day...  Yep. It's a recipe for magic or disaster or (usually) some combination of both. 

The major hurdle for this particular image is the darn background, which I want to be a rich, consistent blue. This can be technically challenging in lino, especially when working at a larger scale. I started to write an explanation of all the issues I am juggling in my head when trying to work out the order of carving and printing here... but it just kept getting longer and less comprehensible and more likely to put you to sleep. So I'll try to just address things as they come up.

Step 6 rollout

After Step 5 (more blue for the background) I needed to mitigate some of the blue in the branches on which the bird is perched. After much hemming and hawing I decided that I could go ahead and remove the background areas in the lower area of the image, between the branches. Even on a flat blue day the sky is generally a little paler towards the horizon, and the only other way to confine a non-blue color to the branches would be to cut a bunch of tiny newsprint masks. Or wipe color from the branches for every print. Either method would be time consuming and difficult.

I could, however, cut a mask to protect the upper portion of the image without too much difficulty. So that's what I did. You can see above that I didn't roll ink in the upper portion of the block where it wasn't needed, and in the photo below you can see the mask on the block, allowing the color to print on the main branch but not the bird or the background.

Step 6 mask

And here's the result. So much to talk about here. 

First of all, you might have noticed that the color on the block looked like a pale, pale brown (it was). It was also more opaque. I used a lot of "mixing white" to create the color, which is not completely opaque, but I didn't want the color to go too "chalky" at this stage, which can happen with more opaque white. 

If you remember your basic color theory, colors that are opposite on the color wheel tend to gray each other out... so... a pale (we could say orange-y) brown over a blue? It's gonna go gray. I knew that, but wanted to at least nudge things in the right direction. 

The other thing you might notice is that there appears to be a line/slight color change in the blue in the lower third of the image. This is an issue that cropped up early on... let's see if I can explain it. 

In an ideal world one would roll out ink using a roller that is both wider than the longest dimension of the block AND of a diameter large enough that one revolution would cover the entire surface of the block. 

I'm not sure I've explained that well, but if you've ever painted a wall with a roller you might know what I mean. The first revolution of the roller leaves the heaviest layer of paint, but the second time it goes around there's less paint to deposit.

The same thing is true when rolling out ink, and on large, flat areas it's easy to get lap (overlap) marks. I didn't notice them on the first, very pale, layers that were printed, but on several prints the issue magnified as more ink layers were added. 

Enough prints had the problem that I decided to go ahead and print one more transparent blue layer... with a little stippling (carved dots) through the area where the lap mark occurred to visually disguise it. 

Step 7 detail

Capisce? 

Stippling would hopefully work for the lap mark problem, but I don't want this blue to go everywhere, so it's time for more masks! Thankfully I saved the cutouts from the previous mask for the bottom of the block, and I cut an additional rough bird shape to fit over... the bird. Of course. I didn't have to be too precious about this, because the edges of the bird will ultimately be (mostly) dark... and I knew it would be better to cut the mask too small than too large. 

Step 7 masks in place

Here's the rollup. Even though I had the mask for the bottom portion of the branches, I didn't bother to ink that area. Slightly less area to clean up? Works for me.

Step 7 roll up


As a result of the funny mask this poor osprey (for that's what it is, if you hadn't guessed by now) looks like an overgrown finch rather than a raptor, but never fear, the proper shape of the beak will appear later.

The stippling fix worked better than it appears in the photo... there's just something about digital photography (in questionable light) that tends to bump up contrast where it's not wanted. And of course there's wet ink glare, but you get the idea.

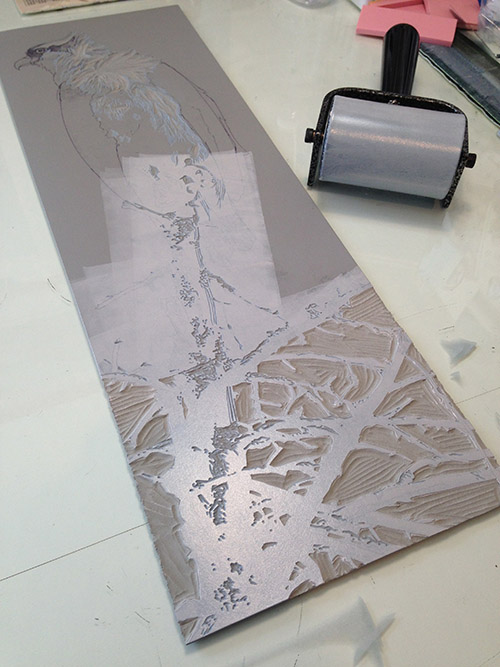
Now, thank goodness, aaalllllll the background material can come out and I can focus on the branch and bird. I think the shadowed areas have gotten too dark, and the branch is too dark, also, so I see some more ink mixed with white rather than transparent base in the immediate future. 

All this carving will be quite satisfying, and I'm looking forward to getting the rest of the image resolved soon.

Thanks for sticking with this weirdly long and wordy post. I hope at least some of it made sense. If you made it through, give yourself a gold star for today and eat an extra cookie as a reward. You deserve it, after all.

Thursday, March 25, 2021

Beyond Artworks: Artists & Their Stories at the Woodson Art Museum


Long time readers of Brush and Baren have no doubt heard (read) me wax poetic about the delights of the Woodson Art Museum. I have been fortunate to have my work juried in to the Woodson's flagship international exhibition, Birds in Art, a dozen times, and honored to have several pieces later accessioned to the museum's permanent collection. It's probably easiest to tell you about the breadth of the collection by quoting from the museum's website: 

The Leigh Yawkey Woodson Art Museum collection began with birds and then took flight to encompass and embrace the art of the natural world. The 1976 inaugural exhibition, Birds of the Lakes, Fields and Forests, set the stage. Today, more than 14,000 works of art, including paintings, drawings and field sketches, graphics, photographs, and sculpture, celebrate the essence and spirit of birds from around the world. The collection also includes decorative arts: more than 125 Victorian glass baskets, early twentieth-century utilitarian and decorative glassware and porcelains, nearly 100 Royal Worcester porcelain bird figurines designed by Dorothy Doughty, and a survey collection of historic and contemporary glass vessel forms and sculptural objects.
Like most public institutions around the world, the Woodson spent several months of the last year closed to visitors. They are delightedly welcoming the community through their doors again, and doing so with a new exhibition curated from their collection. Beyond Artworks: Artists & Their Stories celebrates the paths of artworks from creation to acquisition.... and includes sculptures, paintings (and two linocuts!) by past and present masters of wildlife art (and me!). Although I'm not able to be at the show in person, the museum sent along installation photos and, OH! if you are at all in the neighborhood I think you need to check it out. It looks beautiful. 

Show continues through June 6, 2021. 

Wednesday, March 24, 2021

Linocut in Progress: Where were we?

For reasons unknown, the beginning of Garrison Keillor's weekly "Lake Wobegon" monologue just popped into my head... "It's been a quiet week in my hometown...." 

Perhaps it's precisely because it hasn't been a quiet week here. In fact things are starting to feel... well... sort of... not really normal, but certainly more positive. With the increase in available vaccine and the decrease in virus cases, summer exhibitions and workshops are able to be scheduled with more optimism, and possibilities are appearing on the horizon. (Read: Lots of emails and calls and Zoom meetings to discuss!)

Which is why I've been a bit lax about keeping you up-to date with the current linocut in progress. And yes, progress is being made, although still rather erratically.

But here we are at the rollout for Step 3: 

Step 3 rollout

Oh, look! It's blue. How many times have early print stages been blue? A lot of times. But hey! At least we're not stuck in Fifteen Shades of Gray like we were with the last image. 

Steps 3 and 4, printed

I am a bit embarrassed to admit that I am not entirely sure what color was printed for Step 4, since I didn't take a photo of the rollout. Short term memory... it's really a bit hazy these days. I think it was a transparent gray, because I am trying to drag the tree bark back in that direction. Yes... that's a tree snag with a bird perched on top. Does that help you sort out the species yet?

If not, I'm not going to be able to give you much more help on the next step because, again, I apparently didn't take a photo of the rollout... nor did I take a photo of it printed and hanging straight on. I am really falling down on the job here! 

I can tell you that Step 5 was a slightly more opaque, brighter blue, and show you an oblique image of the resulting prints on my drawing table as I was preparing to print Step 6. Hopefully I did a better job of documenting that particular phase, although it happened way yesterday ago and I can't possibly be expected to remember back that far. 

Step 5 printed and having a nice nap on the drawing table.

So, un-informed as you may feel, visually you are more or less caught up. 

Part of the reason for inconsistent recording of the process might be that I have been distracted by technical issues, especially here at Step 5. I don't know if it's the changing weather (we've been warmer and a bit more humid as we finally move more or less into spring), but I've had problems keeping the press pressure consistent. As a result of fiddling around with it at this stage I trashed at least 4 prints... so frustrating! I think I've got things evened out now, but we'll see. This might just end up being "one of those prints."

Monday, March 15, 2021

Observations in the Clearing at Ann Korologos Gallery


It is with great pleasure that I announce my work is currently featured in the exhibition "Observations in the Clearing" at Ann Korologos Gallery in Basalt, Colorado. I am delighted to be showing my work alongside that of Ewoud de Groot, Paula Schuette Kramer, and Mike Weber, who share my love for wild (and domestic!) creatures great and small.

The show opened March 11 and continues through May 15. The Korologos Gallery is open for in-person viewing or you can see the show online here

Wednesday, March 10, 2021

Summer Workshops at Hog Island, Maine!

Well! It's been a long time since I've been able to announce an in-person workshop schedule. With improved and improving coronavirus and vaccine news, venues have started to make plans for amended summer programming. Yep, it's a spot of light at the end of the long, tedious tunnel.

Long-time followers will know that the highlight of my summers, long before I moved to Maine, was teaching at the Hog Island Audubon Camp. Summer camp for grown ups has run here every year since 1936, except for one summer during World War II...

... and last year.

So it's with delight that I announce the opening of registration for this summer's camp programs. There will be lots of changes, of course... participant numbers have been cut in half, masks and distancing will still be required. But the island will still be beautiful and even at arm's length the camaraderie and learning will be great.

I'll be on the instructional staff for Arts & Birding week, June 20-25. This year I am particularly excited that not only will I be working once again with the fabulous Jean Mackay, but we've also been able to add good friends and fabulous colleagues Barry Van Dusen and Sean Murtha to the team. The phrase Dream Team might be overused, but in this case it's totally appropriate.

Also new this year are "day camp" programs. If you're not yet ready to join a residential camp experience, but would like to visit Hog Island, I'll be leading a one day on-island sketching adventure on June 10! We'll start out with some skills practice and then roam the island filling sketchbook pages. 

I've got a few more workshops and demos in the works, so watch this space for announcements of firm dates. Yippee! Let's go draw outside this summer!

Thursday, March 4, 2021

Linocut in Progress: Starting another one!

Step 1 printed
There are sure signs of spring here on the Maine coast. While the weather remains erratic, and there is still snow on the ground, we are also enjoying more daylight and the tuning-up of the avian chorus. "My" chipmunks came out of their cozy dens this past week and are tearing around the yard and the wood pile in a frenzy of activity. 

There is promising news on the vaccination front, as well, and light at the end of the long, dark tunnel that has been this pandemic. Tentative plans are being made for summer workshops and exhibitions, which I find to be a huge relief. 

And, hey! Not to brag or anything, but my 2020 taxes are all calculated, paid, and filed. (With help, of course, from my fabulous accountant!)

With all that optimism I found myself more excited about starting a new linocut than I have been for a long time, so here we go! 

I told myself I was going to stop obsessing about this 3:1 proportional format for a while, but that only lasted for the duration of the plover print. This time, however, I have turned the composition in a vertical rather than horizontal aspect, creating a 24" x 8" image.

That decision has led to a couple of minor challenges... most notably the mechanics of carving. Twenty-four inches is a long way to reach to carve the top of the block, and a bit awkward on my drawing table. I've been alternating standing up at the drawing table with turning the entire block upside down and sideways. 

And of course these long, skinny things are even harder to photograph in my questionable lighting situation, so keep in mind that this first printing stage was not a blended ink roll. It's a flat, transparent, ochre-y color. Top of the photo is a pretty good representation, but you should ignore the bottom.

Unfortunately I don't have a photo of the ink rollout, because I was doing this print pass at 4:00 am (!!) and just didn't think of it. We had a big wind storm earlier this week, and the roaring sound buffeting my house was not conducive to sleep. I gave up, got up, and had this color pass done before breakfast. 

Reduction linocut in progress, Step 2 rollout

Step 2 printed

Bird geeks might have already identified the species that is the subject of this image, even with the limited amount of information available in the first color pass. If not, well, the second pass isn't going to do much to help you. But don't worry... it's more fun to try to figure it out as we go along, isn't it?

You might notice a difference between the color of the ink in the rollout above and the color as it appears on the print. I've warned you about poor photography, but that's not the entire explanation. See how transparent that turquoise-y color is on the glass? Remember that it was printed on top of a more yellow ochre-y color... and then ask yourself, "What happens when you mix sort-of yellow and sort-of blue?" You get sort-of green, of course! 

The reason for this greenish color will, I hope become more clear with the next color pass. Then again it might not. That's just how things roll around here. 

I hope to make some good progress on this piece through the weekend, since I have a commitment that will take me out of the studio during much of next week. There are a few important exhibition deadlines looming, so I'd like to finish this before the end of the month to see if it might be a contender. 

In the meantime, I hope things are looking brighter where you are, as well. Stay the course, stay healthy, and.... (ahem) press on!

Linocut in Progress: The Third Act

Time to wrap up this linocut ! And we are wrapping at warp speed (see what I did there?)... because there are deadlines. Exhibition deadline...