Tuesday, February 28, 2023

Linocut in Progress: Birdy bits

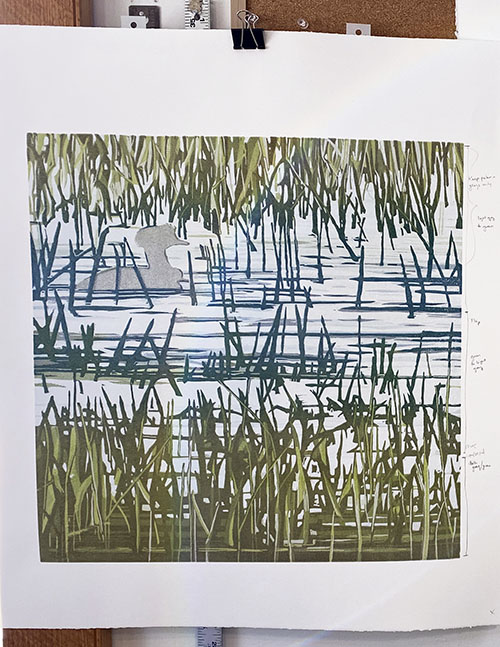
Linocut in progress: Step 12? Maybe?

So here's the thing....

I have been doing so many passes on this current linocut... most of which have involved various iterations of gray and blue and green... that I have completely lost track of where I am. For example, I have this photo of a rollup with grays and blues... but I'll be darned if I can figure out if I have a photo of the result of this color pass. I might have forgotten to take one.

Obviously, it's beyond time to take a break from all these crazy grasses and start doing something with the inhabitants of our weedy pond.

There are some fiddly little bits to work on, and while this sort of work is usually something I tend to avoid, I am ready for some steps that take less time to envision and execute. 

So let's spot ink a few bits of birds! The adult bird has a wee bit of yellow in her bill, and the chick(s! Yes, there are two of them!) have some sort of buffy color in the lower half of their faces. 

Linocut in progress: Mini-step 13 spot inking

Easy enough to roll up, but this messy sort of inking will affect the ink layers to come, so I will also need a mask.

This one is cut from plain newsprint. It's not too fussy, just enough to get that color roughly where it needs to be while protecting the rest of the print. The ink lines on the paper are guides to show me where to place the mask each time. 

Mini-step 13 mask

Here's a detail of the result:

Mini-step 13 printed detail

And a look at the print overall:

Mini-step 13- printed

Now that I am committed to making some progress on the birds, things are going fairly quickly. I think there was gray color pass that went over the entire block... but maybe not. As I said, I've lost track. I do have photos of some of the little "mini-passes" that have started to build up the birds:

Mini-step 14

Aha! You thought I was joking when I said there were two chicks in this image, but I would never joke about a thing like that. Now we can at least see where they are! We can also see a few "halos," places where inexact masking let some color creep into edges where it's not wanted, but I didn't worry about this when I was printing earlier stages because I knew that the later details of these birds would cover those halos with dark ink in another color. You'll just have to trust me on this one.

Now that I've mapped out the basic shapes of these birds (specifically, where the beaks, heads, and eyes are), it's time to figure out how to suggest some details. 

In real life I think that merganser chicks this small have some whitish spots on them... but I've made the rather controversial (in my own mind, at least) decision to leave them out. At this size and this (implied) distance I don't think they would be easily seen in the wild, and in the print I think they would only confuse things and look like mistakes rather than field marks. 

ANYWAY... The next mini step made me laugh... since the small mask I used on the female's head looked like a bad wig. Her crest needs to be more brown than gray, so why let extraneous gray in to that area?

Mini-step 15

Whew. That's enough for one day, don't you think? In truth I've already done a couple more of these mini-passes, but you don't expect me to show you everything all at once, do you? Where's the fun in that?

Stay tuned....

Monday, February 20, 2023

Linocut in Progress: Okay... what, now?

Progress continues to be slow on the current reduction linocut, but there IS progress. 

I'm still struggling with the balance of blues and greens, so of course for the next color pass I went all out...  There's a bright green blended to blue in the lower third, a straight blue across the middle, and a gray-to-blue blend in the upper third of the image.

Reduction linocut in progress: Step 10 rollup

All that bright color looks SO alarming in the rollup!  But remember... these are transparent colors, so they will be affected by everything else underneath them.

Like this...

Step 10 printed

Okay, phew. I think we're finally getting somewhere. I think the grasses are close to being finished, which is good because I really need to get those birds sorted out!

But not yet. Here's the rollup for Step 11. Yes, eleven, and I'm still messing around with the grasses. But at least the color is getting more simple. A straight blue and a straight gray...

Step 11 rollup

Step 11 printed!

Yes, I think the background is really getting close now. The upper third is 95% done... maybe just a few more tiny darks at the final stage, but I'm going to take most of the material out of that portion of the block now. The grasses in the center third are mostly done, also... it's just that I still want to get the darkest bits of the water to look a bit more blue.

The bottom third will have a few more darker shapes, but it, too is getting close. Which is a good thing, because 11 layers of ink are a LOT. Many layers of ink can add unwanted texture to a print, which can make it hard for subsequent layers to adhere. Also... drying times can get soooooo slow... subsequent passes can slide... or reject... or even pull up bits of paper if ink is too tacky. 

Which is why I have been doing a lot of stripping.

Wait, what? 

Yes, stripping. When I print a new color pass, I immediately take a sheet of clean newsprint, place it over the wet print, and rub it with my palm. This lifts excess color but doesn't remove it entirely. It does tend to lighten the newly-printed color a bit, so the contrast is less strong, but it speeds up drying time and evens out the print surface a bit. I don't always do it, but on this particular print I started using the technique after maybe the third color pass. One more step to an already-many-stepped process, but you do what you have to do, eh?

So. Goals for the next color pass: Finish the water. Finish the grasses? Define some details of the birds! There are a few light shapes that will probably have to be masked in before I can get to the details, which will be mostly gray and brown. Onward!

Wednesday, February 15, 2023

Linocut in Progress: Creative cliffs and carving confusion

Nope, I haven't fallen off the face of the planet, although some days it definitely feels like I'm hanging on by my fingernails. It certainly doesn't help that I feel like I'm on a printmaking cliff with the current reduction linocut in progress. I move a little bit forward and then spend a long time pacing back and forth, staring into the abyss.

Which seems a bit dramatic for something that ultimately will be just ink and paper, but, hey. It's where I'm at right now. 

Part of my utterly convoluted path is driven by attempts to accomplish somewhat conflicting tasks with each color pass. I've already mentioned the challenge of horizontal shapes of one color that intersect with vertical shapes of another color. I'm also trying to increase contrast and color in some sections of the block (namely the lower third) while keeping the color and value range quiet in other sections (namely the upper third).... while also keeping it all coherent. I don't want the finished image to look like a parfait of unrelated color bands. 

(sigh) Remember the good ol' days of single color prints?

Linocut in progress: Step 8 rollup

So here we are with the rollup for Step 8, a good example of me getting in the weeds. Literally. 

In the top of the image I want to add another subtle value without adding color. Okay. A transparent gray. But I will ultimately want the bases of those same grasses to have a little more color and contrast to help them settle into the whole image, so I want to keep them in a green range. That's a blend for the larger roller, gray-to-green, which can then be flipped around to cover the middle section.

In the foreground I want a little more contrast and warmer color, so that calls for a more browny-gray rolled across the bottom edge. Separate brayer.

Add of course I'm still masking the birds. 

Step 8 printed

Okay, onward.

At this point I REALLY wanted to get that last dark blue into the water so I could take out all those horizontal shapes in the middle and be done with them. So I decided to just be brave and mix up a dark blue, as well as a darker dull green.

It was a disaster. 

When good color goes bad

I hated everything about this. Nothing to do but clean up everything and start over. Block. Rollers. Ink slab. More than an hour to reset it all.

Step 9 rollup

I decided that I needed to get those green grasses across the center established more before I could move on to the final blue. Ugh. Will this never end?

The warm gray/brown color from my previous attempt was just too dark, so I added more transparency. I also made rich olive-y green that I blended with it on the larger brayer. Rolled across the top, then flipped to roll across the bottom. Plain green on the smaller brayer across the middle.

Step 9 printed

Okay. It's better, color and value-wise. Surely I'm making some progress now, although of course it all still feels too green. 

But look at the block now. It is a confusing mess. How am I going to keep track of what I need to carve away next?

Do you know what I'm supposed to carve out now? Me, neither.

Aha! Have I ever shown you a MAP?

People ask me all the time how I keep track of what I am supposed to be carving, and my answer is usually that I make it up as I go along. (Which is true.) I have a drawing on the block... I look at what I've printed so far... I look at my reference drawings and photos and whatever else I'm using and I make decisions about what to carve away next. 

But every once in a while that seat-of-my-pants method comes back to bite me in... well... the seat of my pants. Or what is IN the seat of my pants. You know what I mean.

It's at times like this that I am super happy to put a little technology to work for me. I take a photo of the print at its current stage. I download it to my computer and flip the photo horizontally so I am looking at the current stage of the print in the orientation of the block. Because, remember– The print itself is a mirror image of what I'm carving on the block.

Making a carving map

My flipped photo is then computer-printed (not printmaker-printed) onto paper. The color doesn't usually match that great, but it doesn't matter. I get out the colored pencils and draw on my printout... and since I'm adding darker marks to the page, these bits that I am drawing indicate the parts of the block that I will KEEP for the next stage of printing. Everything else will get carved away. 

Whew. I hope that makes sense!

On we go. Will I finally get to add some blue in the next color pass? It's a mystery to all of us, quite frankly. A real (ahem)... cliffhanger. Stay tuned.

Linocut in Progress: The Third Act

Time to wrap up this linocut ! And we are wrapping at warp speed (see what I did there?)... because there are deadlines. Exhibition deadline...