Well... heck.
It's been a super long time since I've posted anything to Brush and Baren. There's been a lot going on, and I have just needed a break!
I'll be getting back in the saddle here soon, promise.

Well... heck.
It's been a super long time since I've posted anything to Brush and Baren. There's been a lot going on, and I have just needed a break!
I'll be getting back in the saddle here soon, promise.
 |
| Reduction linocut in progress: Step 10 |
 |
| Step 11 detail |
 |
| Step 11 printed |
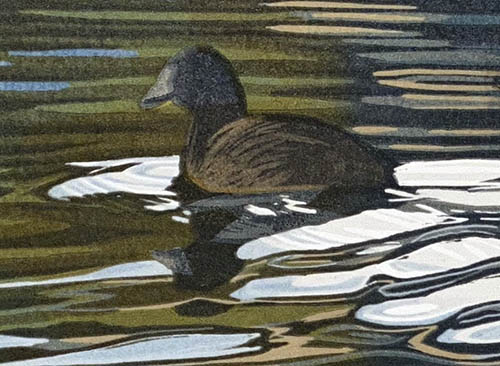
So NOW I can really start try to resolve the creator of all these lovely reflections. An American coot has a dark gray body and a black head, but I wanted to suggest at least a little light hitting the bird, so I left some lighter gray-brown areas when I rolled out... Another transparent gray. Darker this time. But still gray.
Here's a detail:
 |
| Step 12 detail |
Okay, so close now! I think one last dark transparent gray... not quite black... will do the trick.
But first, the overall image at Step 12:
 |
| Step 12 printed |
 |
| Step 13, final |
So there you have it... "After Effect," reduction linocut, 12" x 18" in an edition of 15. It's even up on my website already. Wait... before it was officially finished? Well, yes, because: deadline.
The only question left now is.... what's next?
When last we checked on the current linocut in progress, we had just stepped away from a lovely, harmonious color palette and started to stir things up. Prepare yourself... because we're still on that path!
 |
| Step 7 rollup |
Okay, okay... yes. This going back to blue, so maybe not TOO wild, but it is definitely a big blue after the much more quiet tones of the first few color passes. This composition is really all about the contrast of the wake and ripples behind the bird, so we might as well start cranking it up to 11.
I'm not ready to do much with the bird itself yet, though, so that will get a little newsprint mask to keep it clear of additional ink layers.
 |
| Step 7 printed |
But, hey... look at the cool color that resulted from putting this rich blue over the top of the orangey ink laid down in the last color pass! Nifty, eh?
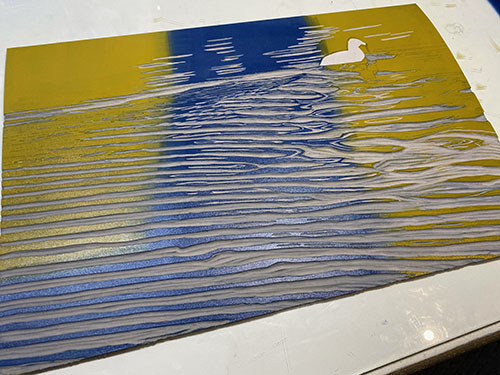
It's all still very blue, though, and what this image really needs is some greens. Of course mixing a green or two and applying it would be one solution, but you know me... let's try something a little more... um... Well... A little more.
 |
| Step 8 rollup |
This is definitely more. More blue, plus a big ol' bright ochre-y yellow. That ought to do something, right?
 |
| Step 8 printed |
And, indeed, we can call that... something. It's a nice green... sort of olive-y, but bright. Plenty of room here for adding some more subtle greens without ever actually using green. How about some gray, for example?
 |
| Step 9 rollup |
At this stage you can see that I've decided to start letting some of this color influence the bird, so there's no mask. Just a transparent gray... and if you look closely you might be able to tell that I didn't roll it all the way down the block. Maybe just halfway?
 |
| Step 9 printed |
I feel like I have a fair sense of where the image is going at this stage. I think perhaps one or two more gray passes to sort some more subtle details in the water, and then of course the bird needs some serious attention. Stay tuned!
Okay! The "easy" part is over... all of the related and harmonious blues are in place. Time to start making things more complicated. Why? Because that's how I roll, silly.
 |
| Linocut in progress: Step 5 spot ink |
 |
| Step 6 rollup |
But, here! Here's a rollup that you can see! Interesting color, eh? This is also something that won't be prominent in the final image, but I just felt like it needed to be in there. I want to contain the color through the middle of the block, but I don't want to create a hard line, sooo... let's cut a mask, shall we?
 |
| Step 6 mask |
Okay, two masks, really. Just a sort of random wiggly, watery shape.
 |
| Step 6... printed! |
Fun, eh? I quite like this from an abstract perspective. In some ways it seems a shame to cover most of this nice color up in subsequent color passes, but that's what I'm going to do. Onward!
As I teased in my previous post, it was time to step away from the confusing linocut that might or might not have been finished and start something new. In part I needed to get some perspective on it, and in part I needed to deal with an impending Big Deal deadline.
So... new piece of lino, new image, new format. And an often-explored bit of subject matter, hopefully expressed in a new way.
Three guesses what I'm after, and the first two don't count.
 |
| Reduction linocut in progress: Step 1 |
The photo looks weird and blotchy and kind of pink, but trust me... it's just a light transparent gray.
 |
| Step 1 rollup |
And from here I was definitely in more comfortable territory. Let's do some light transparent blue!
 |
| Step 2 rollup |
 |
| Oops. Wet ink glare. But you know where we're going. Step 2 printed. |
Already I felt better about this image because it has a strong graphic composition, even in this early stage. So why not do some more blue layers? I tweaked the blue slightly for each of the next two stages.. and apparently decided that the rollup looked similar enough not to bother you with it, since I didn't take any photos.
 |
| Step 3 printed |
 |
| Step 4 printed |
Whew. It's a good start, and although the deadline drumbeat is still pounding away, the additional pounding in my head has backed off a bit. Time for some sleep, and then we'll see what's happening at the next stage!
Okay. At this point I was super aggravated with this linocut and ready to be finished. Plus... truth be told... there was a major exhibition jury deadline approaching and I could hear the beating of the drum. Let's just wrap this up, shall we?
 |
| Step... hm... 18? rollup |
I decided that I would spot ink one more dark in the birds, and then, hopefully, just one more dark overall and the piece would be finished. There's not a whole lot of material left on this block, so things will need to be resolved soon!
 |
| Step 18 printed |
The changes are so subtle here that probably no one will notice them except me. The camera certainly doesn't. For all the 80 zillion pixels (of COURSE that's the actual amount) involved these days, there are some things a digital camera just can't deal with well. Or at least it can't if I am the one doing the photography.
One more dark.
 |
| Step 19 rollup |
See what I mean? There isn't much left here to accept ink.
 |
| Aaaanddd.... Step 19 printed |
Okay! Finished.
I guess.
Maybe.
I dunno.
It's a funny thing, attempting to stretch outside one's comfort zone. I tried to do something different, and I did. But is it successful? I'm not sure. I can't tell. It's just... different. Some folks who have seen it like it a lot. Some, like me, are less certain. I suppose that's image-making for you... not everything appeals to everyone.
Or maybe it's not finished. Maybe I need to push things even further. Get a second block going and overprint some areas and see what happens. That could be interesting.
It could also take time, and right then time was not something I had. Deadline, remember? So I did the only thing I could be sure about in the moment: I put these prints aside and....
|
| Something totally new. Step 1. |
I started something completely new, a little bit smaller (12 x 18 inches), and more within the creative comfort zone. At this point I had maybe three weeks to the deadline, and I had already spent two months on a piece that just confused me. Which is part of why I stopped making blog posts! The last thing I needed was more pressure. I'll get back to the other piece later, but right now.... focus! Deadline. Deadline. Deadline.
It was really nice to be getting the birds resolved in this linocut, but dangit! Already I've made a problem for myself.
The good news is that most of the makers I know agree that making is really just one long series of problem solving. The bad news is... making is just one long series of problem solving.
The problem now? The female's crest, while still brown, tends to be a bit more golden than what I had going on at this stage.The good news is there's a solution: Pochoir!
 |
| Mini-step... 18? |

 |
| The print after Mini-step18 |
And speaking of grays. How about a gray-brown, just to cover all the bases?


Neither have I been run over by a truck, nor succumbed to a dread disease, NOR given up on the linocut that was in progress 'way back in February.
What HAS happened is that I got in a right tangle over it, and with a deadline looming I shifted gears and went to work on something else entirely. And, honestly, I got overwhelmed by many personal and professional things happening simultaneously, so I pulled away from the internets and tried to focus on the tasks at hand.
I think the best plan will be to return us to the program already in progress before I take you down the side road. Spoiler alert: The "completion" of this current linocut will leave a loose end or two (or three). You'll see what I mean when we get there.
So let's get back to it, shall we?
****************
It's nice to spend some time working in just a small area... rather than over the entire 18 x 18 block, since it takes less time to feel like I'm actually getting somewhere.
Then again, female mergansers are mostly just brown, which makes them more challenging to represent than their flashy male counterparts. Big, graphic shapes are great for a big, graphic medium. Small and subtle shapes... perhaps not so much.
But for this stage, at least, I dropped a nice medium brown over the birds, a female and two chicks.

 |
| Mini-step 16 printed |

Maybe rescue is too strong a word. I didn't think I was in (too much) trouble yet. Let's just call it the next logical step in the development of the image, shall we?
Yes. Let's go with that.
Here's what it looked like after "Mini-step" 17:
 |
| Mini-step 17 printed |
 |
| Linocut in progress: Step 12? Maybe? |
So here's the thing....
I have been doing so many passes on this current linocut... most of which have involved various iterations of gray and blue and green... that I have completely lost track of where I am. For example, I have this photo of a rollup with grays and blues... but I'll be darned if I can figure out if I have a photo of the result of this color pass. I might have forgotten to take one.
Obviously, it's beyond time to take a break from all these crazy grasses and start doing something with the inhabitants of our weedy pond.
There are some fiddly little bits to work on, and while this sort of work is usually something I tend to avoid, I am ready for some steps that take less time to envision and execute.
So let's spot ink a few bits of birds! The adult bird has a wee bit of yellow in her bill, and the chick(s! Yes, there are two of them!) have some sort of buffy color in the lower half of their faces.
 |
| Linocut in progress: Mini-step 13 spot inking |
Easy enough to roll up, but this messy sort of inking will affect the ink layers to come, so I will also need a mask.
This one is cut from plain newsprint. It's not too fussy, just enough to get that color roughly where it needs to be while protecting the rest of the print. The ink lines on the paper are guides to show me where to place the mask each time.
 |
| Mini-step 13 mask |
Here's a detail of the result:
 |
| Mini-step 13 printed detail |
And a look at the print overall:
 |
| Mini-step 13- printed |
Now that I am committed to making some progress on the birds, things are going fairly quickly. I think there was gray color pass that went over the entire block... but maybe not. As I said, I've lost track. I do have photos of some of the little "mini-passes" that have started to build up the birds:
 |
| Mini-step 14 |

 |
| Mini-step 15 |
Whew. That's enough for one day, don't you think? In truth I've already done a couple more of these mini-passes, but you don't expect me to show you everything all at once, do you? Where's the fun in that?
Stay tuned....
 |
| Reduction linocut in progress: Step 10 rollup |
All that bright color looks SO alarming in the rollup! But remember... these are transparent colors, so they will be affected by everything else underneath them.
Like this...
 |
| Step 10 printed |
Okay, phew. I think we're finally getting somewhere. I think the grasses are close to being finished, which is good because I really need to get those birds sorted out!
But not yet. Here's the rollup for Step 11. Yes, eleven, and I'm still messing around with the grasses. But at least the color is getting more simple. A straight blue and a straight gray...
 |
| Step 11 rollup |
 |
| Step 11 printed! |

Yes, stripping. When I print a new color pass, I immediately take a sheet of clean newsprint, place it over the wet print, and rub it with my palm. This lifts excess color but doesn't remove it entirely. It does tend to lighten the newly-printed color a bit, so the contrast is less strong, but it speeds up drying time and evens out the print surface a bit. I don't always do it, but on this particular print I started using the technique after maybe the third color pass. One more step to an already-many-stepped process, but you do what you have to do, eh?
So. Goals for the next color pass: Finish the water. Finish the grasses? Define some details of the birds! There are a few light shapes that will probably have to be masked in before I can get to the details, which will be mostly gray and brown. Onward!
Okay, let's wrap this thing up, shall we? How much more can there be? There's almost nothing left on this block! The background is ...


