Showing posts with label bufflehead. Show all posts

Wednesday, February 24, 2016

Linocut in Progress: Ugly duckling stage!

Work continues on the female buffleheads, with a couple of new brownish ink passes achieved by a combination of spot inking and masking. For readers who might be new to Brush and Baren, this time I remembered to take a couple of photos of what I'm talking about!


It's probably overly generous to call this "spot inking," because I've been pretty sloppy about it. It's more like "messy blob inking" than "spot." In this case it's okay, because I'm going to keep those messy blobs from interfering with the rest of the print by putting a paper mask over the block before printing. Like this:


After printing this tan-ish color the prints looked like this:

Bufflehead linocut in progress: Step 9

Coming along, although I find this stage rather nerve-wracking. The color harmony of the first few layers is disrupted, and it all looks awkward. (The ugly duckling stage.)

Some more carving, some more "messy blob inking," another mask, and a slightly darker brownish color brought the print to this:

Bufflehead linocut in progress: Step 10

The female ducks finally started to gain a little form and settle back down into the water, rather than looking like flat light shapes floating through space.

I think the next step will be to try to bring some of the harmony back with an overall transparent gray. Birds, water (the areas that haven't yet been carved away), everything. Hopefully this will give me a sense of where everything is value-wise. With luck I'll be able to accomplish that tomorrow.

Monday, February 22, 2016

Linocut in Progress: Going from dark to light

Most of the time in the reduction printing process I apply color layers from light to dark, but not always! It's true that darker colors cover lighter ones more readily than the other way around, but sometimes it's desirable (or just plain neccessary) to put a light color over a dark.

Enter the female buffleheads in this image. Overall the females are brown, but on their breasts and bellies they are light gray, almost white in some places. Up to this point every color pass has been very much on the blue end of the spectrum, and I want to warm things up a bit. I could have, and probably should have, masked some of this blue out in earlier stages, but I was so involved in thinking about the water that I just let it slide.

Now I have to contend with that decision.

I cut a newsprint mask that would cover every part of the block except the two female birds and the beaks of the males. I inked only the birds before printing, but the mask helped to keep extraneous color from going where I didn't want it, AND it protected the prints from the uninked areas of the block.

This pass was a solid white.

Bufflehead linocut in progress: Step 7

You might be saying to yourself, "Um... I thought she said she printed white?"

I did, but I didn't want to apply the ink too heavily (I've got at least three more colors to put on these females) so the thin layer of white looks gray. I thought it would be okay, but I was out of the studio for a couple of days and when I got back I decided it was a little too dark. And still too blue.

So I hit those same areas again with a white that had just a little brown added.

Bufflehead linocut in progress: Step 8

THAT's the tone. Not much of this will remain, except in beaks and the breast of the lower female, but it's a good undertone for the light brown bits that will come next.


Wednesday, February 17, 2016

Linocut in Progress: Contemplating water

One of the biggest challenges of reduction printing, for me, is judging color value (lightness or darkness). I can't tell you how many times I've put down colors that looked strikingly different from each other, only to have them look like the exact SAME color two or three passes later.

If I were printing multiple blocks... or better yet, if I were a painter, I could go back and "fix" the offending color. But with reduction printing, once I've gone on to the next step I can't really go back.

In some cases I've been known to cut a second block, but most of the time I just do a lot of scowling and try to figure out how to live with the problem. Remember that when I show you where we are now with this bufflehead linocut.

Bufflehead linocut in progress: Step 5

At Step 5 things are looking pretty good. This pass was just a transparent light gray; my intention was to both darken the underlying colors and to tone down some of the brightness. Yep, that worked.

And then came Step 6. I really like the feeling of transparency in the water, but I want to build some more depth. After another carving session I put a little more black pigment in my existing transparent gray ink and made a print pass:

Bufflehead linocut in progress: Experimental step

Whoa! WAYYYYYY too dark! This might be okay in a few areas, but not everywhere like this! Ugh. Scrub off the block, remix the ink. Try again.

Bufflehead linocut in progress: Step 6

Unfortunately the photo doesn't really seem to show much difference between steps 5 and 6 now, but maybe you can tell the some more of the brightness has been taken out of the darker areas.

So now what? I'm on the fence about the water. It seems to me that it could use a wee bit more dark in some places, especially once the darkest bits of the male birds are in place. (Male buffleheads are pretty strikingly black and white.) But I don't want to overpower the birds, either. Ugh. What to do?

I need to cogitate for a little bit, but I think what I'm going to do is go ahead and turn my attention to the birds. This will require a bunch of fussy masking that I wanted to avoid, but I don't see a better way to handle it at this point. Wish me luck!

Thursday, February 4, 2016

Linocut in Progress: Slowly

Today's progress was the printing of a transparent blue-to-green blend. The green seems a little bright, but most of this will be covered by one more darker layer. Which of course means more water carving. I love carving and printing water... but right now I'm starting to get a little impatient for faster progress. And I'm getting nervous about the ducks.

Linocut in progress: Buffleheads, Step 4

I think that once the water is resolved I'm going to need to overprint white on all the birds. Or at least on the females. Eek. Don't know. Will have to give it some serious thought... but I know there's going to be a rather intense ugly stage. (Ugly duckling stage, of course.) Stay tuned, could be a choppy ride.

Thursday, January 21, 2016

Linocut in Progress: All the stuff that comes before

This evening I had a brief text message exchange with a friend who is working on a boat off the coast of Florida. It sounds so romantic, but even from his few short words it was clear that there was a bunch of decidedly UN-romantic drama going on out of the public eye.

Which of course made me think of linos. (Full disclosure: Most things make me think of linos.)

No, really. Because right now I'm in the decidedly un-romantic preliminary stages of a new piece. No carving. No ink. No lovely thick paper. And I realized I haven't shared this portion of my prep in a while, so lucky you! Here it is, from the beginning....


It starts with a walk. (A lot of things start with a walk.) This time of year our small Sands Lake is host to a much wider diversity of waterfowl than it is in the summer. Among our winter visitors are several pairs of buffleheads, which I love for the males' striking black-and-white plumage and their spunky attitudes. I have a fair number of photos and a few sketches of them... but I also remembered a great image my friend Tony took several years ago of a female with a little crab in her bill. Armed with this reference (and Tony's permission to dig through his photos), I fussed around until I came up with a design I liked. I showed you a corner of this preliminary drawing last week as a bit of a tease.

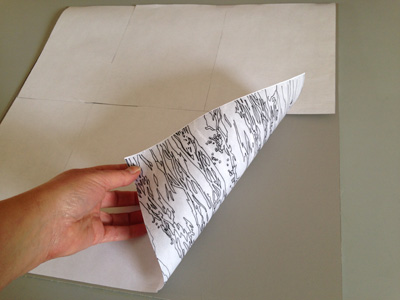
Once I had the drawing sorted out I scanned it to my computer and enlarged it to the 18 x 18 format I'm using for the image. I printed it out in sections on a laser (toner) printer, and pieced it together.


Here's a questionable photo of the trimming and taping together in progress.


And now for the stinky part. Because I printed this out on a laser printer I can transfer the image to the lino using a Chartpak blender marker. This is un-pigmented, straight-up xylene. Nasty stuff. Open windows required (or use it outside), don't inhale too much, and dispose of all the remnants IMMEDIATELY. I don't always use this method, but for an image this complicated it saves me having to draw and re-draw and re-draw. It goes like this:


Tape the toner-printed drawing face down on the lino.


Rub the back of the paper with the blender pen. I also stop from time to time and burnish the whole thing with something like a bone folder. The pen dissolves the toner and transfers it to the lino. Sometimes it works better than others... it depends on how dark the toner is, and sometimes how fresh it is. It's okay, I'm not going for perfect here.


Very bad photo of the finished transfer. It was better than it appears here... not perfect, but good enough for the re-draw. The nice thing is that the image is now reversed without me having to think about it. And the marker-soaked paper went directly to the outside trash.


And this is what I've been doing today. Going back over the image with Sharpie pen... refining some shapes. The toner transfer would probably hold up for at least the first color pass without doing the Sharpie bit, but I don't want to take the risk of losing it when I clean up.

After I get the drawing done I'll scrub the whole block down with mineral oil and probably a little green cleaner to avoid having the Sharpie lines transferring to my prints. It's going to be fun (I hope!)... you know me and complicated water... can't get enough of it. And four birds... that's a new one. I'm anxious to get the first ink layer down on paper, but ARGH! I have to do a boatload of framing the next couple of days, so it will likely be next week before I can get it underway.

Linocut in Progress: Did You See That?

Put on your deerstalkers and get out your magnifying glasses, because we're back to trying to sleuth out the order of operations on this...