Saturday, August 27, 2022

Linocut in Progress: Remember when this was going to be a simple single-color image?

Yeah, it was a thought, anyway. 

But that ship has left the harbor, as they say, so there's naught to do but complicated it all a bit more before wrapping things up. 

I think by now you can see there has been an intense amount of carving to this point. It's a lot to keep track of! But here we are, ready to print Step 6 (colors, um.... 12 and 13, I think). 

Step 6 rollup

In this photo the dark value for the rockweeds looks very blue, which indeed it was. After I took this photo I corrected the color a bit and toned it down before I pulled any more prints. Here's how it all looked after that correction:

Step 6 printed

I'm feeling good about the rockweed, but the crab is a bit behind because of printmaker neglect. (Although notice how even though the color looked intensely orange on the rollup, the crab now looks a light peachy color. That's the effect of putting a bright transparent color over a semi-transparent white that was printed over gray. Are you confused now?) 

What else should I fuss over? Oh, of course. The periwinkles (little sea snails). There are a few in this image, but they've gotten lost. I'll try the semi-transparent white ink trick again to see if I can't lighten them up.

Here's the roll up, spot ink only, on the press:

Step 7 spot ink (colors 14 and sort of 15)

You can probably tell I was doing this late at night (note the dark window behind the press), which is no doubt why I didn't take a photo of the print at this stage. And of course I forgot to go back and do it in the daylight before I went on to the next step. 

Not much changed, although the periwinkles became alarming. Fingers crossed I can tone them back down in the next pass.
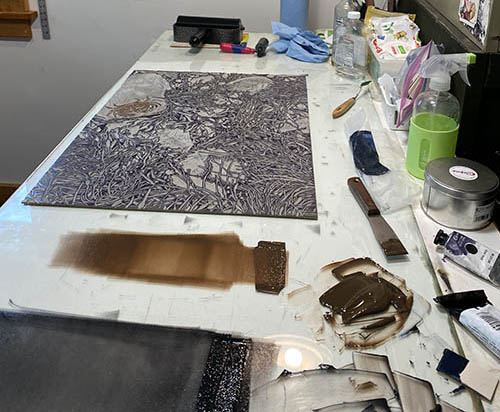
Step 8 rollup

Which iiiiiis... press pull Step 8 (colors 16 and 17). This time it's a nice crabby brown and a dark gray made from sepia and leftovers of the previous too-blue dark. (Always save and use your ink leftovers. They can create a tasty color!)
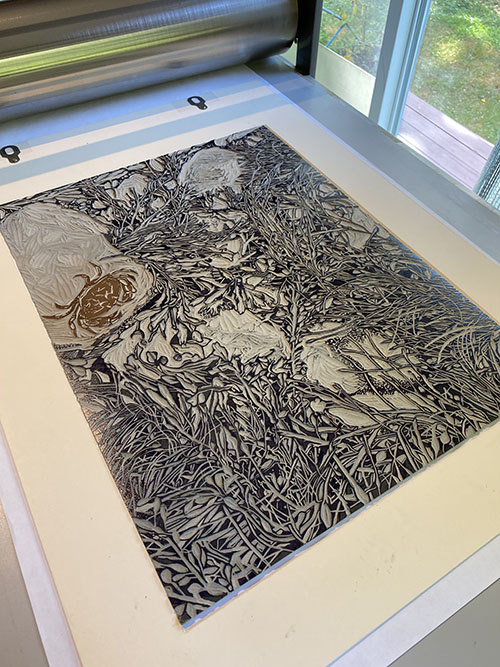
Step 8 on the press....

You can see here that the areas of the block that define the rocks have been mostly carved away by now. I'm thinking this will be the final stage of dark for all of the image except the crab. 

Step 8 printed

We're in the home stretch now! I'm still not thrilled with how the periwinkles are standing out (even more predominantly here), so they'll get spot inked with one more dark. 

Step 9 (color 19) rollup

Aaaaaannnnndddddddd.....

All done! This image slightly embiggenable with a click.
As-yet-untitled reduction linocut, 24" x 18" Edition of 10.

Whew. That was definitely more than I thought I was headed for, but I'm not mad about it. In fact, I am weirdly inspired to jump in to another piece with similar subject matter. I'm a huge fan of an intertidal zone, and there is so much to explore!

But first I think I need a nap.

Friday, August 26, 2022

Linocut in Progress: The Saga of Just One More

So this supposedly simple thing has, as is typical for a certain printmaker you know, gotten somewhat less simple. A single-color linocut idea has turned into a multi-color reduction lino epic, and we're not finished yet.

Step 4 rollup. Tasty, if I do say so myself

But seriously. When one gets a chance to mix and use these yummy colors, how can one refuse?

All the purdy step 4 colors

In terms of individual passes through the press this image is at Step 4, but color-wise we are on colors 7, 8, and 9.  My attempt to try something radically different from my usual process has run right off the rails, EXCEPT for one thing. In my usual process it's likely I would be on a press pass of 7 or 8, because I would have made a point in the early stages to mask areas and ink more selectively. For this image I have done zero masking, and have let colors overlap where they will. This has led to some parts of the image having... what shall I call it? Not really color bleed. More like color creep

I am, indeed, allowing color outside the lines. 

Which is all to say that while this isn't drastically different from my usual process, it does represent at least a little relaxing of my (ahem) control issues! 

Here's where things stood after the application of some greens, reds, and more gray.

Linocut in progress: Step 4 printed

I suppose it might have worked to stop at this point, carve for a final black pass, and call it done... but I was teetering dangerously on the fence. Have I gone too far in the addition of color to be able to jump to a single final pass and have it be successful? Am I at the point at which I need to abandon all pretense of trying to keep things "simple?"

Step 5 rollup

I decided I needed a mid-dark value so the jump to a final dark wouldn't be too harsh. Plus... I had unfortunately been ignoring the crab, too. It had gotten a bit too dark and needed lightening.  But surely after "just one more" color pass I'd have a good feel for where I was. Right?

I rolled up a nice olive green for the entire block, and ran a semi-transparent white over the crab.

Step 5 printed

At this point I felt we were at the good news/bad news stage. The good news was that I was starting to feel quite optimistic about the image overall. The bad news was that the "keep it simple" line definitely had been crossed. Plus there's the problem of the crab that needs resolution. Yep. It's anybody's guess how this finishes now!

Tuesday, August 23, 2022

Linocut in Progress: Back into the studio!

Goodness. 

I knew it had been a while since I posted anything here, but good grief! More than two months? That is rather appalling, and it doesn't seem possible.

But then, that's summer. It always seems to disappear in a morass of busy-ness punctuated by stretches of lethargy when it's too hot and humid to move or even think. 

A couple of weeks ago the weather, my schedule, AND my attitude started to improve, and I got myself back into the studio. I've been feeling for some time that I wanted to try something a bit different, so I dug out a large piece of lino (18 x 24 inches!... about 46 x 61 cm) and drew up a complex image that I (ahem) intended to print in a single color.

If that quote about roads and good intentions just popped into your mind, well.... you're not wrong.

It took less than a day for me to stray from the path and wonder if perhaps a little color wouldn't hurt. I decided to carve for white and then print a layer of rough color... nothing special or careful... and then I would carve for the "final" black layer.

Step 1 rollup

Sure. Why not? I mean, if I hated it, I could always just finish the carving and print as straight black-and-white. Right? Right?

Step 1 printed

I slapped some color on to the block willy-nilly and printed it. Okay. Interesting, sort of. Any edition I might come up with will be variable, but I don't hate the idea. 

Althooooooough.......hm.

This color seems a little too sketchy. It would probably be distracting under a single black layer. "One more" random color pass to even things out couldn't hurt, could it?

Step 2 rollup

I carved the block some more, darkened the leftover inks from the first color pass, and did a second haphazard roll-up.

Step 2 printed

In general I felt better about that decision, but the color overall seemed a little too bright. Too yellow. (Which is hard to tell in this photo... the light has been terrible for photography lately.) If I were to go ahead and carve the entire image and then plop straight black over this...well... I don't think it will look as nice as it might if I tone things down a bit. 

(You can absolutely see where this is going now, can't you?)

I carved some more, telling myself the entire time that I could still print a "plain old black-and-white version" because I hadn't crossed the threshold of removing material from the block that would create awkward visual holes in the image. I mixed a color that was very greenish, and another slightly warmer gray... and printed a third layer.

Step 3 printed

Okay.

That's more like it. I can go ahead and just cut the whole block now for a final pass. Four steps... that's more than I expected, but okay. This is a BIG block. It's taking a long time to carve even for these not-very-intricate stages. It will be good to just focus on carving for several days and be done with it.

Except that, of course, that's not what I did. Because as the prints sat there staring at me with their mottled ochre-and-gray attitudes, the little voice in my head started suggesting that the color could be just a bit more interesting if I stopped and did "just one more" stage. 

Sure. Just one more.  

Linocut in Progress: Out of the blue.... and back again!

 Okay, then! Progress is happening, but this week it feels a little bit like that "one step forward, two steps back" sort of situa...