Showing posts with label equipment. Show all posts

Tuesday, April 19, 2016

Not-so-high-tech drying rack, AKA The Flexible and Useful Clothespin Stick

I've written a couple of times about my funky little DIY print drying rack, but there's been some interest in it again so I thought it might be time for a more detailed explanation.

I've used this basic clothespins-attached-to-a-stick idea in a number of different ways to accommodate different working situations. If you don't print very often you can even just make a "clothespin stick" and lay it across the tops of two chairs when you need it. When you're done, prop it up in the corner of a closet and put the chairs back in the kitchen.

Materials for your clothespin stick:
  • 1" x 2" x whatever-length-works-in-your-space lumber
  • Wooden clothespins
  • Screws of a diameter to fit through the spring of the clothespin and long enough to go through the width of the clothespin and into the 1 x 2 (I think mine were about 1" long.)


My pins are attached about 2.5" apart, which gives me room to maneuver and lets air get in around the prints. In the earliest iteration of this system I suspended the "clothespin stick" from the ceiling with plant hooks and a pulley so the rack could be raised and lowered to keep it out of the way.

The "original" rack hanging from the ceiling.

And now raised up and out of the way via pulley. There's a coat hook
on the wall to hold the pull string in place.

In my current working situation, however, I am not able to attach anything to the ceiling. My space is very small, so I needed to come up with something that wouldn't take up too much space but would also be movable.

Enter the garment rack.

This is not the exact same model as mine, but it's similar in design and price: $20 (USD).  (This one from Home Depot.)


I attached a "clothespin stick" to the horizontal bar on the garment rack by winding around both with (blue painter's) tape. Something about the way the two braced together made them really sturdy. I thought the tape was only going to be a temporary solution, but it's been on there for more than two years now. If it ain't broke, don't fix it.


Later I suspended a second clothespin stick below the first with string. First I put eyelet screws in the top of both ends of the stick.


I tied one end of a long piece of string though the eyelet and tied the other end around the horizontal bar of the garment rack. I did this twice, of course, once on each end of the stick.

The strings are long enough that I can lower the second clothespin stick and accommodate large prints top and bottom.  If I'm working on smaller pieces (as I am now) I can raise the stick up by looping the strings around the end of the garment bar a couple times. Like this.


From the end it looks like this:


I'm sure there are plenty of ways to tweak this design, but it's been working great for me. After... him... at least 8 years... some of the clothespins have broken and need to be replaced, but that's the extent of maintenance. So go out and build yourself a clothespin stick and then MAKE MORE PRINTS.

Friday, April 8, 2016

Parting is such sweet sorrow


Longtime readers may remember that a few years back I acquired an old Challenge proof press from friends who were moving out of the country. I named her Presszilla.

I had big plans for her. I was going to clean her up, get her inking assembly working again, and launch into a sideline of artist's books. Sure, I'd have to buy some type. And some book-binding materials. And....

But time went by and I discovered I had neither space nor time to get Presszilla in order. She's been languishing in storage and my guilty feelings have multiplied.

Yesterday, however, she took off on a new adventure. She's on her way to a new home with folks in Virginia who will love and cherish her. Fare thee well, Presszilla! I can't wait to see what rolls off your press bed.


Saturday, October 18, 2014

First tests on the new press!

FINALLY I got to spend some time mucking around with Presston this afternoon! Presston, if you haven't been following along, is a 30 x 60 Takach etching press, acquired just last week.

Up to this point I've been printing my linocuts entirely by hand-rubbing with a baren and spoon. I've got a reliable system down and I enjoy fairly consistent results. But in the last year I've started to have some rather serious pain in my wrists and neck from all this repetitive motion and pressure, so it was time to do something different. Serendipity brought Presston and I together, and now it's time to get to know each other better.

To be honest, I've been a bit nervous to start. I've only made two small reduction relief prints on an etching press before and I don't really know what I'm doing. What if, after all this effort and expense, I find I can't make it work for me?

But this afternoon I finally quit stalling (and finally got far enough along in an illustration job that I don't feel guilty walking away from it for a bit), and made my first foray into press-assisted print.

Ooooh. Fun.

I was delighted to find it really easy to get the roller calibrated, and even more delighted to find both sides completely synchronous.

I considered starting with a single color print, and that probably would have been smart... but I was more excited to print than carve, so went ahead and jumped on in to a reduction piece. It was a good and not-so-good decision.

The good news is that my very first pull was perfect!  Even ink, correct pressure, beautiful impression. The press bed has a nice grid and guides on it, so I thought I'd just try to tape off some registration marks and eyeball it. Why not? I pulled 20 lovely first colors in pretty short order.


You might be able to see a ghost of the drawing here... something I didn't anticipate but can correct in subsequent prints. I draw my images on the block with a Sharpie permanent marker, and usually when hand-rubbing I have very little transfer of Sharpie to the print. With Presston's firm hand I had lots of transfer, but in the future I think that if I draw the image and sand it down a bit before inking it should help.

Encouraged by this initial success I thought I'd go ahead and try out my seat-of-the-pants registration system.

THIS is going to need more thought.


I pulled 8 prints and only got one in good alignment, so clearly I need a more thoughtful registration method. I have another 12 first color prints on the rack, but I'm undecided about carrying on until I can sort out something a little more efficient. I think I'd like to try a pin system, but I haven't ever used one and don't quite know how to set it up. But I'll figure it out! I'm really excited about the possibilities once I get a new routine in place.

So time out for some more research. This first experiment was with unmounted lino, which I think will eventually be the mainstay. But my hand-rubbing registration jig requires mounted blocks, and I have a goodly pile of them that will need to be used at some point. (Plus I have some large single-color images on mounted blocks that I never finished editioning because I needed to give my wrists a break. Presston will make short order of them once I get a system in place.)

It felt really good to work in my "new" space today... so far the set up seems completely functional. As always, I wish I had more horizontal work space, but one does what one can in the space available. A sign of how much fun I was having? I totally forgot to stop and eat dinner.

Stay tuned for future experiments.

Saturday, October 11, 2014

The Epic of Presston

Mission accomplished! After an epic journey that despite flawless execution somehow took two days longer than expected, Presston is settled in his new home.

I had intended to take loads of photos, but there are only so many view-out-the-front-of-the-moving-truck shots that one can tolerate. My picture-taking started out well enough:

I so rarely fly west, it was a surprise to find myself over
my own valley. That's Twin Lakes and the Forebay
in the center, and I think the controlled burn at O'Haver Lake
in the background.
And yeah. Snow.

My intrepid companion in adventure and I left Salida at oh-dark-hundred last Monday and drove to Woodland Park to leave my car and catch a ride to the Denver airport. From Denver we took a bare bones flight to Las Vegas ($57!), where we were met by the indomitable Suzanne Hackett-Morgan of the Goldwell Open Air Museum.


Suzanne and the Barbie Jeep drove us to Pahrump, Nevada to pick up a very large rental truck, and then we were off in to the Mohave desert to collect Presston and some other equipment. At this point I think G started to wonder just what he'd agreed to.

The schlepping team: Suzanne, David, Greg, oh SHOOT, 
I forgot his name, Dane, and Richard.

In Beatty Suzanne rounded up some help and we moved Presston, two tables, a cabinet, a drying rack, a hot plate, and other miscellaneous stuff into the truck. This is a far simpler statement than it was an activity. Presston alone weighs over 400 pounds and it was 90 degrees in Beatty... a cooling-off for the locals, but an abrupt return to summer for someone who had just left snowy peaks.

Last light from the Barn, click to embiggen
 But we managed to finish up and to get some other items schlepped out to the Goldwell Barn, just as the last light disappeared from Death Valley.

Suzanne treated us to dinner at the Sourdough Saloon, where we met some local characters and where I found the coolest door latch in a women's restroom in a bar ever. Well, maybe not ever. But certainly in a long time. Not that I spend much time in bars. Or in bathrooms in bars. Oh, nevermind.


We stumbled to bed (from fatigue, not bar offerings), and the next morning saw oh-dark-hundred AGAIN. Gas station coffee and breakfast sandwiches in hand we headed east. It looked like this:


And a little while later, it looked like this:


The good news is that those thin clouds became thicker clouds and we had overcast skies for the next two days of driving. Not so picturesque for photography, but certainly nice and cool for desert travel.


We ended up driving for almost 15 hours on Tuesday, arriving in Albuquerque, New Mexico well after dark and unfortunately also after they closed northbound I-25 for construction. Tired and cranky AND having to find a new route across town in a 16-foot truck? Definitely a trip low point. But we made it, found a place to stay, and were satisfied to only have a 4.5-hour drive the next day.


Wednesday we were in Colorado in time for lunch in Alamosa, and then the final push for home. G and I unloaded the tables and made some decisions about how to set up the living-room-now-studio-space, and then gave up for the day. (I had a plan, but of course it completely changed once we had the actual equipment.) Thursday it rained all day, but we finished sorting equipment and studio, put some items (like a huge drying rack that I can't fit in my space just now) in to storage, and welcomed a cadre of young men from the Salida High School cross-country team to help schlep Presston into place. (The scariest moment for me.)

Definitely NOT the hot, dry Mohave. Headed to Colorado Springs
for the last steps of the journey.
We were not quite finished yet, though. Yesterday (Friday) I had to pick up my car on the way to returning the truck in Colorado Springs and a piece of equipment that we brought with us for Colorado College had to be delivered. And of course I had to go cheer for the cross country team at their District meet in CaƱon City on the way home. I owed them that, at least.

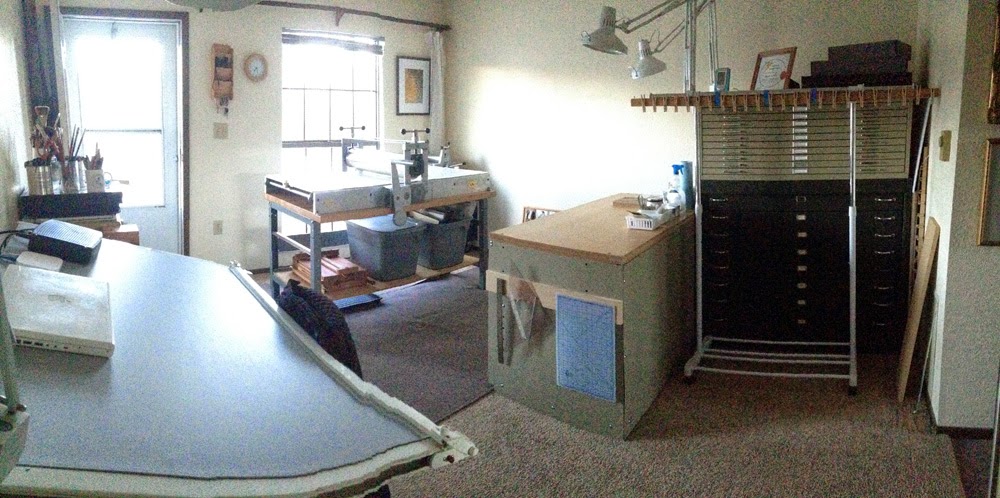
So now it's Saturday, and although there are still some shelves to install and some lighting to sort out, the studio space is looking good. Presston dominates the scene, of course, as he should.

click to embiggen these funky phone-camera panoramas


Presston!
For me the rest of today will be about post-trip bookkeeping, email triage, and a desperate trip to the grocery store. (And probably a nap.) But from time to time I'll get up and wander to the studio... find a little more dust to clean off of Presston... and start to find my way to a new working method. It's a new era for this printmaker!

OOPS! I almost forgot to mention that Presston made at least part of his journey on the infamous Route 66. The one photo I have from the trip that isn't from the window of the truck! (It's from the gift shop of our stop for Second Breakfast, but hey...)

Monday, October 6, 2014

P*-minus 48 hours and counting! (*Press)

An older field drawing to keep you company.
By the time this posts on Monday morning, my friend G and I will be on our way to the airport and our rendezvous with Presston.

It's a complicated journey: drive to Colorado Springs to leave a vehicle (2 hrs), catch a ride to DIA (2 hrs), fly to Vegas (2 hrs), catch a ride to pick up the rental truck (1  hr), drive another hour to Presston's current location to load up. Hopefully we will sleep like logs and then begin the 1,000-mile drive back to Salida Tuesday morning. We'll unload here, then continue back to Colorado Springs to drop off additional equipment and return the truck. And THEN back to the car and home to settle back in to my space and try to figure out how to work a whole new way!

In theory we'll be back in Salida just about 48 hours after we leave, but it's hard to say. This sort of epic road trip seemed a lot easier 20 years ago. I already want more sleep. But...ooooooh! I'm getting a PRESS!

Tuesday, September 30, 2014

The effort before the reward

Sands Lake at sunrise, Salida

I've said it before, and I'll say it again: I may not like getting up early in the morning, but I do like being up. A few days ago a friend dragged me out for a walk at dawn, and while I might have grumbled about it I definitely appreciated the chance to experience a morning like the one pictured above.

And now I appreciate it even more, because it gives me a nice metaphor for the current state of life in general: I'm not particularly enjoying the lead-up, but I know I'm going to love the result. Ladies and gentlemen, drum roll please... I have an announcement to make!

I'm getting a Big Girl Press! 

I realize this isn't the first time you've watched me get all twitchy about a press. Back in 2011 I brought Elvis (Press-ley), a Richeson baby press, into the studio. Elvis has his moments, but he's no precision machine and he's limited to prints smaller than 9 x 12 inches.

Then there was Presszilla, a lovely chunk of 1940s-vintage proof press. Unfortunately, for all her handsome steel bulk, Presszilla won't do much larger than 9 x 12, either, and she needs some TLC. Sorry to say she's still living in storage... but one of these days....

So I've continued to hand rub 99% of my prints, and found that my physical limits top out around 12 x 18 inches. In fact these days my physical limits are even more limited: I've developed some rather alarming problems with my wrists and it's been clear for some time that I need to do something different. Plus DANGIT, I want to work larger.

I've been half-seriously shopping around for an etching press... doing the Google thing every once in a while to see what turns up... but nothing has come of it. And really... where would I put it? I've been back to working in my "spare" bedroom and things are tight as it is....blah blah blah.

So went the mental conversation, until a couple of weeks ago when I stumbled quite by accident upon a great deal on a great press. In Nevada. There was a lot of hemming and hawing, mostly about minor details like money and space, but finally with the counsel and support of some really good friends I went ahead and said YES!

Of course that was the easy part. Now I have to rearrange my small apartment to accommodate a 30" x 60" (!!!!) etching press, get myself and a friend to Nevada, rent a truck, and haul the thing home.


The rearranging part started yesterday. This is the mess that used to be my living room but will now be the studio. I'm losing a sofa, but gaining a press. I had considered using this space as the studio when I moved in here just six months ago, but I couldn't figure out how to make it all fit (and the sofa wouldn't get through any door other than the front one).


 Once it was clear that the sofa would have to go, moving my "sitting room" and office to the bedroom was a little easier. It looks huge here in this iPhone-generated panorama photo, but the room is just under 10 x 12 feet. You can not imagine the headscratching that went on trying to fit all these darn bookcases in here. I'd like to find some other cushy reading chair for this room (now that I will be sofa-less), but for the most part it's feeling like it will be a nice, cozy space.

 Needless to say, there's not much printing in the forecast for this week or next. The Big Road Trip will begin next Monday, and in the meantime I need to find a home for the sofa and get the studio space prepped for the arrival of.... PRESSTON!

(PS: I almost forgot! I managed to save ALL of the sunset linos! Whew! Dodged that disaster, I did.)

Wednesday, February 1, 2012

Studio Redux

Well.

You may recall that back in September I delightedly moved my printmaking operations to an out-of-house, dedicated studio. I really enjoyed having a space to go to that was entirely about making prints, but there were some less than ideal aspects to the situation. The first was that to get to Studio V required navigation of a long (26 steps and 2 landings) stairway, which meant I couldn't get things like my flat files up to the work space. (Presszilla* was out of the question.) Most of my reference books and sketchbooks and my drawing table also stayed home (where I continued to work on illustration projects)... so "poking around" developing new prints couldn't really happen at Studio V. I had to arrive at the studio with a plan, and once the plan was accomplished, head back home again. Finished prints had to be carried home to store... Not so efficient.

There were other details that weren't working out, either (let's just say the building didn't have the right vibe), so in the end I decided to bring everything back to the home studio. The challenge was to figure out how to integrate the new door-turned-workbench into the old space! After much headscratching and some judicious rearranging space was made and last week the workbench and Elvis came back home.


Things are pretty cramped in here, but I'm delighted to discover that the time spent working elsewhere help me develop a new system for working here. The priorities for this space have changed... An 80-inch-long workbench demands that the bulk of the room is now focused on printmaking, but there's still just enough space for illustration and design and the administrative tasks that have to be done here. I'd still like to have a dedicated studio that's not in the house, but it needs to be the right space. The greatest thing about the last few months in Studio V is that I learned more about what the right space should be.

I've already done some printing here, tweaking the space as I go. You can see in the image above that there's something big happening, but I'm not ready to share it just yet. I did pull a number of just-for-fun prints that I'll post later this week... There's a little celebration about to happen!


(*Presszilla still isn't here, but I think we've worked out a plan for her that will benefit more than just me. Details as they become available.)

Monday, January 16, 2012

Linotype: the film

Sometimes you just need a little film about "obsolete" printing technology to get your day off to a great start.


"Linotype: The Film" Official Trailer from Linotype: The Film on Vimeo.

One more example of how I was born several decades too late. I did typesetting on another now-obsolete machine, but it wasn't nearly as fun as a Linotype.

So far the screening schedule for this film seems confined to the coasts. Seriously? That can't be right.

Friday, October 28, 2011

Meet Presszilla!

She's big, she's heavy, stalwart and strong. I haven't noticed if she has atomic breath (I hope not), but she definitely has some spiny bits that shouldn't be underestimated.


Meet Presszilla. (Challenge Proof Press, K Series)

Presszilla's previous caretakers are headed to new lives south of the border, so she's come to live with her Aunt Sherrie. Well, sort of. At the moment she's living in the garage of her Aunt Susan and Uncle Richard, but some time soon we hope for a consolidation of the family. (Elvis needs to meet his cousin, after all.)


Yesterday Printmaker Extraordinaire, friend, and former Presszilla-keeper Nancy and her husband Mark came to The Garage to help the DM and I reassemble Presszilla and get a tutorial in her operation. A little cleaning, a little lubrication, and we were ready to run some tests.


It was a tad chilly (we had snow on the ground, after all), so we kept it short. I brought an old block from a previous reduction print just to practice with... I learned how to lock a block in to the bed, how to lift the roller and lower it to engage the print. My lino blocks are not quite type-high, so a little fussing will ultimately be in order to get the pressure just right, but once everything's set up it should be great fun to run. (My test prints were rather light, and I didn't get any pix, sorry.)


A few other visitors stopped by during the proceedings and we had a good chuckle about being among "our own kind," which at the moment meant "people who like heavy old industrial machinery." All who saw her agreed that Presszilla is a thing of beauty. All she needs now is for me to make some prints worthy of her.

Tuesday, October 18, 2011

It's.... another press!

When I added a musician to my household I learned about an ailment common to the breed: GAS, or Gear (or Guitar) Acquisition Syndrome. I've enjoyed rolling my eyes at conversations about mixers and amplifiers and the equipment minutiae typical of musicians. I shake my head and chuckle, "Musicians!"

Which is not to say I don't have my own art gear foibles. I have a zillion daypacks and bags because none is ever perfect for all iterations of travel with sketching gear. I have many tubes of ink and paint, scores of drawing implements, drawers of paper and sketchbooks. But until recently the common feature of all of it has been that I could move it myself. Well, except for the paper storage cabinet... but that's another story.

And then something started happening. Back in February the stork brought me a Richeson Baby Press, now affectionately named Elvis (Press-ley). Elvis weighs about 65 pounds and I can schlep him around a bit, but he's pushing the envelope.

Of course I then needed a steel tool cabinet for Elvis to sit upon, which arrived in April. This I could NOT move by myself, but the DM and I teamed up to haul it up the stairs to Studio V with a modicum of huffing and puffing.

With the move to Studio V it became clear that I needed a new work surface. The solid-core door which is now the table top is also a two-person shift. As is the new stall mat. Rut ro.


But as of this morning I have now officially gone 'round the bend, having taken custody of an old Challenge proof press*. Well, I've taken partial custody of it, as it's in temporary storage in the garage of friends nearby. At several hundred pounds of awkwardness there's no WAY the three strong young men and we two middle-aged printmakers and our significant others could have gotten this thing upstairs to Studio V. So yeah, I'm already hunting for new studio space. (sigh)

Suddenly I'm shaking my head and chuckling not at musicians but at myself... the proud caretaker of a behemoth about which I know nothing and for which I have no permanent home. Printmaker's Gear Acquisition Syndrome? 'Fraid so. But it's a thing of beauty, ain't it?


(*To my surprise, I'm finding it difficult to locate information about this press online. Challenge proof presses were originally supposed to be competition for Vandercook models, but Vandercook won a legal action against Challenge and they stopped manufacturing them. Could be the name "Challenge" will be more appropriate than is comfortable. We'll see.)

Tuesday, October 11, 2011

Epic printmaking

Lookit my new-today taller work surface! Sawhorses and a door.

Little by little I get more organized in Studio V. It's a slower process than I expected (or hoped), but it's getting there.

Yesterday was the big test of what the priorities are for the space. (Read: I had to get a lot of printing done.) You might recall that I decided to participate in the Barenforum 50th print exchange, which requires the delivery of 101 tiny prints by the end of the month. You may also recall that I decided to experiment with woodcuts. And that I did so right before moving in to a new space. Just call me the Queen of Too Much at Once.

Last week I thought I had an image sorted out. Something simple and single color.

Four discarded blocks and one winner!
It was a disaster. I carved four different blocks, and worked each of those multiple times. I even switched to back to the comfort zone of lino instead of wood. Nope. All I got was a pile of black and white prints that I didn't like.

A small portion of last week's Epic Fail. Magpies everywhere.
After several frustrating days my frantic brain finally conjured up Peter Jackson and Philippa Boyens talking about a beloved scene that they couldn't fit into the edit of "The Lord of the Rings." They tried it in the front of the film, in the middle, in the end. Couldn't make it work. Ultimately it was abandoned because Philippa said, "If you're having that much trouble it probably means the scene isn't right for the film as a whole."

If I was having that much trouble making the print work, then apparently it wasn't right for the project. On to the cutting room floor with it! Do. Over.

A scramble through my sketchbooks and photos brought me a new idea.. simpler design, but slightly more complex printing because it needed color. I printed the "rainbow" roll last week... and yesterday I spent eight straight hours printing the second color... 134 times!

100+ tiny prints on the new workbench! Phew!
Now if they'll only dry in time.
I printed lots of overage because the rainbow rolls were pretty variable. Not the end of the world, but I'd like the latitude to cull the extremes from the edition.

After eight back-tweaking hours yesterday it was VERY clear that a taller work surface was in order, so today I went down the street to the lumber yard and visited with "my" shop carpenter. Ves is a fabulous fellow who has helped me more times than I can count... cutting blocks and sifting through scrap wood to find me parts for building jigs and all sorts of things. Today he scored an old solid-core door and cut some 2x4s so I could make this (inexpensive!) workbench. The DM helped me haul everything up to the studio and put it together, and tonight it's a drying rack for all those little prints. Later this week it will be a printing surface! Hooray!


Tuesday, October 4, 2011

Welcome to Studio V


For more than 25 years my home has been my studio... painting in the living room, rubbing linocuts on the drafting table in the bedroom. Somewhere along the line I moved in to a two-bedroom apartment and got in the habit of dedicating a room to graphic design work and art-making.

When I moved to Salida (almost ten years ago), working at home became a full-time operation, and the "spare room" became studio AND office. It's a situation that has served me reasonably well, and I'm thankful that I've been able to make it all work.

But that's part of the problem. It's ALLLLLLL work. And it's all jumbled together. If I want to make prints I have to put all my paints away. If I'm in the middle of painting a big contract illustration I can't print. And the darn computer is there either way... insistent and tyrannical.

I started daydreaming about studio space OUT of the house more than a year ago. There have been all sorts of practical reasons not to get a separate studio (cost being chief among them), but I've found myself less and less productive in the home studio. I've been too distracted by my "to do" list, by the myriad house tasks and business tasks and, yes, by the musician in this household for whom this place is also studio and office.

So this week I took a deep breath and rented a space that I intend to dedicate to printmaking... Sherrie's fine art space is now separate from her commercial art space and her office!

The new space isn't perfect yet. I need taller work surfaces and more storage, and a carpet on the very noisy wooden floor. I'm upstairs in an old Victorian-era building in downtown Salida, just two blocks from home, so an easy walk back and forth. I've had two days there now, and I feel like a klutz with creative amnesia. The automatic work routines of the old space don't apply to the new and I keep discovering little things I need that haven't made it down the street yet. But I'm getting there.

I consider it all an experiment. Thankfully I'm in a situation that doesn't require a long term commitment, so if I crash and burn here I can haul everything back home and try again later.

More news from Studio V (for that's what it says on the door) as I get going!

Monday, August 22, 2011

Building a low-tech block print registration jig

One of the many events during the upcoming Birds in Art weekend at the Leigh Yawkey Woodson Art Museum is "Artists in Action." Eight of the artists whose work was selected for this year's exhibition will be "doing their thing" up close and personal on Saturday morning, September 10.

Guess who's one of the eight?

Because we are headed to the Wisconsin event by air rather than by car I decided it would be a good idea to ship my tools and materials ahead. Going through airport security with a bag of carving tools? Not too likely.

The complicating factor is that my handy-dandy, home-made, low-tech registration jig is BIG– the base is about 18x24 inches and can accommodate blocks almost that large. We've only got about 90 minutes for our demonstrations, so I plan to work on a small 5x7 block. My "Big Jig" is overkill, AND expensive to ship.

Hmmmm.... This calls for the (last minute) construction of a little, portable jig!

Simple materials for a registration jig

Profile view of the "outside corner" molding. They didn't do a good job
of cutting this, did they? No problem. I made sure this was placed to not interfere.

Step 1: Assemble materials. A quick trip to the local lumber yard produced the necessary wood parts from their scrap bin, cut to perfection by the carpenter-in-residence. Total cost for materials and shop labor: $5.00.

1/4" tempered Masonite board, 9x12"
2 pieces of 1x2 (pine or whatever)
2 pieces of 1" outside corner molding

Also required: wood glue, flat head screws, clamps, drill/screwdriver, and a 90-degree triangle or other squaring tool.

Glue and clamp 1x2 strips to base.

Make sure it's square as you glue and clamp!

Step 2: Glue the 1x2 strips to the edges of the Masonite board. Clamp. I did mine one at a time so I could make sure they were square and not slipping. (Step 2.5: For extra strength you can countersink flathead screws from the underneath side. I didn't do this.)

Make sure molding is flush with inside edge.

Glue and clamp!

Step 3: Glue the corner molding on top of the 1x2 strips. Make certain the molding is flush with the 1x2 on the INSIDE edges (towards where the block will be) are flush, not the outside edges. (See above.) Check for square. Clamp.

Gap? What gap? Doesn't matter.

This funny little gap at the corner doesn't matter. If you wanted to be fancy you could miter the corners, but it's not necessary.

If you're not planning to heave this thing around, you can probably stop at this point and have a completely serviceable jig. But this one's going in a box and bouncing across the country, so I added some screws for extra strength.

Flathead screws with countersink to make them flush with the top of the molding.

Step 4: Counter-sink some flathead screws to secure molding to 1x2.

You're done! There are a few other little "finesse" things you could do.. like the mitered corner mentioned above, or ripping down the corner molding so it doesn't stand up quite as high along the outside, but I don't have tools for those details and they're not critical.

5x7 block in the little jig, with shims. Ain't it cute?

Here's my little 5x7 block in the jig with some shims to create the wider margin I want on these prints.

Piece of paper checks the width of the side margins. Perfect!

With a piece of paper set on top you can see how the shims let me adjust the side margins.

Ready to go!

Whew! I hope this all makes sense. It's not a perfect system, but it has worked great for me for many years. You can check out this earlier post to see a description of my larger registration jig in action.

Linocut in Progress: The final step... twice. No. Three times.

 Okay, let's wrap this thing up, shall we? How much more can there be? There's almost nothing left on this block! The background is ...