Showing posts with label Presston. Show all posts

Monday, August 20, 2018

Workshops everywhere, and some linos, too!

Whew! July and August... what happened to them?

After two weeks of workshops on at Hog Island Audubon Camp and a short workshop at Maine Coastal Islands National Wildlife Refuge I immediately... led more workshops!

The first week of August I was joined by eleven fun and inspirational women for a week-long field sketching adventure, hosted by the Farnsworth Art Museum in Rockland. Naturally it was a week of record heat and humidity, but we were fortunate that our class met mornings and we were able to avoid the worst of the oppressive afternoons. We spent time at Owls Head Light, the Rockland South Beach, and in the garden (complete with chickens!) of one of our group members.

Sketching at Owls Head Light

We spent the hottest morning inside the museum, first drawing from Ai Wei Wei's Circle of Animals gold zodiac heads, and then taking a close look at the preliminary drawings for a number of Andrew Wyeth's paintings. Fun!

Sketching in the Ai Wei Wei exhibit at the Farnsworth Art Museum

The group had such a great time that we've scheduled a "reunion" sketch date next week in Rockport Harbor. I'm looking forward to seeing everyone again and filling a page or two of my own this time!


I thought I'd be getting back in the studio the following week, but I was called to sub for some workshop sessions back on Hog Island for Family Camp. This time I was sketching with kids and parents and grandparents...

Sketching in the gardens on Hog Island


Whew! All done now, right? Not quite! I had a pile of framing, packing and shipping to do for upcoming shows at Ann Korologos Gallery in Basalt, Colorado and Oh Be Joyful Gallery in Crested Butte, Colorado. It was the first time I had to manage all that in my new place, so it took extra time to figure out new working systems. But I got it all done, and I know at least some of the work has already made it to its destination.


At long last I got into the studio last week, to work on two small linocuts for Project Postcard, coming up during the Birds in Art exhibition at the Woodson Art Museum in Wisconsin. Carving went well, but the morning I set up to print... disaster!!!!

If you've been following along since my move you might know that Presston, my lovely 30 x 60 Takach press, came out of his 6-month storage adventure with a buckled laminate surface on the bed. After some panicked correspondence with the good folks at Takach I was just about to order a new press bed when my neighbor asked if he could take a look at it. 

He pronounced it fixable, and proceeded to help me pull up the loose portions of the laminate and re-adhere them. Hoorah! I got a couple of editions through the press in between the chaos of workshops and workshop prep and kept my fingers crossed.

Unfortunately, no doubt encouraged by our two weeks of record heat and humidity, the portions of the laminate that had been intact in June decided to pull up, creating a big bubble on half of the bed. There was enough flat space for me to print the two tiny (4 x 6) pieces I was working on, but once again I was dead in the water for anything else. 

This time when my neighbor came by we agreed that the best thing to do would be to remove the laminate across the entire press bed... including the areas we had fixed in June... and stick it all back down again. 

As you can imagine, this was a multi-hour, multi-day project. The old adhesive came up fairly easily, but the new stuff we put on in June? Ooph. We finally finished it yesterday. So far it all seems good... so tonight I tore down some paper and started to prep for a new, largeish lino! What a relief. No pun intended.

As for the little pieces created for Project Postcard, I'm afraid I can't show them to you. At least not in full until after the event. But I can make a silly warped image of them...


Assuming I don't run into any more press-related disasters I expect to have this new piece underway tomorrow, so hey! It looks like we might be getting back to our regularly scheduled... schedule. Stay tuned!

Saturday, May 19, 2018

Trouble in Paradise

Well, I suppose it was a little optimistic to think a move of this magnitude would happen without a few hiccups.

Go ahead, embiggen this image with a click.
Oh, that we could enlarge spaces with a click in real life.

Thursday was the epic last push to get the studio moved in to the new house. With just a small pickup truck and one friend for most of the day it took a couple of trips and several hours to get the flat files disassembled, moved, and reassembled. By the time we had more helpers and were shifting Presston (the press) it was nearly 10pm and very dark.

But we got it done. I untied the cord and fabric we had used to bundle Presston up before the journey, made sure the adjustment screws were loosened, and left him to acclimate to the new space while I went to bed.

Yesterday afternoon I gave Presston a quick dusting and then did a little test-roll of the bed to make sure everything was functioning. I was met with a funny little crunching noise. Uh oh.

Eek! Peeling laminate! No linocuts happening today...

The bed has a plexiglass cover on it, so at first I thought the plexi had warped in storage. (An easy, if not inexpensive fix.) Alas, no. When I pulled up the plexi I discovered that the adhesive holding the laminate top on to the bed had failed along one edge and the laminate is now buckling.

Swearing ensued.

Presston is almost 20 years old, and moving him from a dry climate to a damp one wasn't without risk. It's possible the adhesive would have failed even if we stayed put in Colorado, but it's certainly not a welcome problem.

It looks like the center of the bed might still be smooth enough to work on small prints, which I had anticipated doing while I get used to working in the new space and climate. I don't know if it's possible to re-adhere the laminate or if my best bet will be to try to peel it all up and have a bare-naked metal bed. (But how to get rid of laminate residue?) The Takach mothership has been consulted via email. I'll see what they have to say on Monday. Keep your fingers crossed I don't need a replacement bed.

In the meantime I still have plenty to do to get the space functional, AND I have to frame some work for delivery to a show next week, so it's not like I'm twiddling my thumbs! And despite this bump, I'm still happy with the road I'm on. It feels great to have all my belongings in one place again and to be moving forward, even if it's not as smoothly as I'd like. And hey! The box of tiny prints that was missing all winter has finally turned up! Stand by for the repopulating of website and Etsy stores.

Friday, June 24, 2016

Linocut in Progress: Blue, blue, blue

And then more blue.

The image I'm working on is inspired by a photo I took several winters ago on the Phantom Canyon road below Cripple Creek. I like the pattern of light and dark in the photo, but the camera recorded the shadows as a single, flat blue. Okay in a photo, boring in a linocut.

So my goal is to print some variety, but I'm scratching my head over which bits to take out when.

Step 2, easy enough:


Looking okay, but the blue feels a little bright. For the next pass I took the scraps of this color and added some burnt sienna (color turned greenish) and purple (back towards a grayed-down blue).


As you can see, the ink is very transparent. Just in case you haven't noticed yet: I love transparent color.

Step 3 printed:


I definitely like the color and value of this pass, but I'm still not ready to chop out huge sections of shadow. So I carved out a few more small areas, added a wee bit more violet to the existing ink, and printed again. Step 4:


This particular pass was done in front of a live studio audience... sort of. I needed some new process shots for a presentation I'm doing next month, so a friend came over to take some photos while I worked. I rather liked this "reveal" image with a little Instagram filter effect. (Which... surprise! Is now in my Instagram feed.)


Reduction linocut color pass #4 reveal
So what's next? More blue, I'm afraid. But first I have to frame up some wee Bitty Birds for this weekend's Salida Art Walk. Yes, I DID do some before now... but the gallery just sent a message that they sold a couple today, so I need to replenish before tomorrow night. A good problem to have!

Monday, October 27, 2014

Linocut in Progress: Entering the ugly duckling phase

Carrying on with my first piece on the new press, I've realized that I should have given a little more thought to what to do if the process actually worked. I assumed it would take me a little longer to sort out this temporary registration system than it did, and now I'm seven passes in with no particular plan about where it's all going.

Oh, well. Some things never change.

I had errands to do yesterday, so the prints had a day of rest. I had two ideas about the next step, neither of which I pursued. Instead I printed one more brownish tone.

Sparrow linocut, Step 6

Most of this will get covered up, but I wanted to add a little subtlety to the face and underparts of the bird. Mission accomplished.

When everything seems to be working so nicely it's hard to head into the "ugly duckling" stages that often follow. From here I need to start working the background before the darkest bits are added to the bird, which means all the lovely harmonious tone is about to get disrupted.

Sparrow linocut, Step 7

Rather than continue to emerge, our little bird is now pushed back in to oblivion. But I shall endeavor to a) remain calm and b) try to figure out where to go from here. I started carving a few shapes in to the lower portion of the image and am somewhat regretting that decision, but I'm committed to it now.

There's another small hiccup in the forward motion department. For probably the last ten years I have used Daniel Smith oil-based relief inks exclusively, and DS has announced that they will only sell paint from now on. By the time they made the news public some colors of ink, most notably white, were already sold out. And as of today, I'm out of white, too.

A printmaking colleague has recommended the Handschy (now Hanco) opaque white, which I have on order, but which hasn't yet arrived. I think I should be able to move forward without it, but it's one more "new" variable to add to the learning process. Yippee.

In the meantime, expect things to get uglier before they get prettier. But also expect me to continue my happy dance, because I'm having oodles of fun getting to know Presston.

AND, I want to give a shout out to the fine folks at Takach Press, Presston's mothership. I've been using Takach brayers for a couple of years and love them, but before I went out to Nevada to pick up the press I sent ecstatic and probably delirious-sounding emails asking for moving advice. They responded quickly and generously with suggestions and offers for continued help once I got settled.

I have discovered that one of Presston's pressure settings goes out of adjustment more quickly than the other, so late on Saturday night I sent off another email, not expecting to hear anything until the work week began again today.

Nope. At 9:30 on Saturday night I received a detailed message diagnosing the problem and offering clear options for fixing it. Seriously. Presston is 15 years old this month. When was the last time you contacted a company about a 15-year-old piece of equipment and had a response other than "Sorry, we don't support that [model, product, version, software, manufacturer] anymore."? So refreshing. Thank you, Takach, for your professionalism. It is very much appreciated.

Friday, October 24, 2014

Press experiments: Registration, Part 2 - Pins and Tabs

Not being able to print when there's a 450-pound wheedling child in your living room is some unique form of torture, I think. Deciding to try a pin-and-tab registration system is one thing. Having to wait for aforementioned pins and tabs to arrive in the post is another thing entirely.

I had just about settled on carving some single-color images so I could at least play with pressure settings and paper when a happy little parcel arrived with today's mail. Hooray!


About a million years ago I worked in a commercial print shop. I set type and did layout via the paste-up method... yes, I am that old. A good friend of mine was our shop stripper, which doesn't mean what you think it means. The stripper took my pasted-up layouts, shot and processed film negatives of them, and then "stripped them up" for exposure to metal lithographic plates. And guess what? He used pins and tabs just like these to do the job.

There are several references to using pin-and-tab systems on the interwebs, this one by Maurice Fykes III is available as a PDF download on the McClain's website. It's a good explanation, but I didn't particularly like the idea of having to secure my lino to bookboard for the entire printing process, mostly because it seemed like clean-up between each color would be a pain in the neck. I also know of instances where printmakers adhere the pins directly on to their lino. This works really well for bleed prints (image goes over the edge of the paper), but I want to find a way to make prints with nice, clean margins.

So.

Enter Registration Experiment #2. I have a mat with an 8 x 10" opening, the size of my unmounted lino block, to which I have adhered the pins. Like this:


The mat should have been wider so the tabs would fall farther from the top of the block and give me a wider paper margin, but for the purposes of this experiment it will be fine.
Once the pins were stuck to the mat board (with clear shipping tape, nice and strong), I started attaching tabs to paper. This is a little tedious, but not horribly so.


Once I had twelve sheets of paper taped up I was ready to print. I started over with a whole new block and all new paper, just to make things easier on myself.

So imagine, if you will, going back and printing the two steps I showed you the other day all over again. And then imagine my initial dismay when my first attempt to print the second color with this new system FAILED. Ugh! Seriously? Is this not going to work?

But I stayed calm and tried the next sheet. Perfect. And the next one? Perfect. In fact that first sheet was the only one that gave me problems, so I suspect some wretched pilot error on that one. Second color a success, so on to the third!


Great. All of these worked, no problem, so I think I'll give colors 4 and 5 a go tomorrow if I can.

The matboard jig is okay, but I don't think it's a long term solution. The board will wear down and eventually the block won't sit as squarely. I'm used to the feel of particle-board-mounted-lino against pine, but don't really want to continue with the thickness that I've been using for handprinting.

Luckily the carpenter at the local lumber yard is accustomed to my odd requests and will happily let me dig around in his scrap pile until an alternate idea presents itself. There are lots of ways to do this, and I just need to find the one that suits me best.

Saturday, October 18, 2014

First tests on the new press!

FINALLY I got to spend some time mucking around with Presston this afternoon! Presston, if you haven't been following along, is a 30 x 60 Takach etching press, acquired just last week.

Up to this point I've been printing my linocuts entirely by hand-rubbing with a baren and spoon. I've got a reliable system down and I enjoy fairly consistent results. But in the last year I've started to have some rather serious pain in my wrists and neck from all this repetitive motion and pressure, so it was time to do something different. Serendipity brought Presston and I together, and now it's time to get to know each other better.

To be honest, I've been a bit nervous to start. I've only made two small reduction relief prints on an etching press before and I don't really know what I'm doing. What if, after all this effort and expense, I find I can't make it work for me?

But this afternoon I finally quit stalling (and finally got far enough along in an illustration job that I don't feel guilty walking away from it for a bit), and made my first foray into press-assisted print.

Ooooh. Fun.

I was delighted to find it really easy to get the roller calibrated, and even more delighted to find both sides completely synchronous.

I considered starting with a single color print, and that probably would have been smart... but I was more excited to print than carve, so went ahead and jumped on in to a reduction piece. It was a good and not-so-good decision.

The good news is that my very first pull was perfect!  Even ink, correct pressure, beautiful impression. The press bed has a nice grid and guides on it, so I thought I'd just try to tape off some registration marks and eyeball it. Why not? I pulled 20 lovely first colors in pretty short order.


You might be able to see a ghost of the drawing here... something I didn't anticipate but can correct in subsequent prints. I draw my images on the block with a Sharpie permanent marker, and usually when hand-rubbing I have very little transfer of Sharpie to the print. With Presston's firm hand I had lots of transfer, but in the future I think that if I draw the image and sand it down a bit before inking it should help.

Encouraged by this initial success I thought I'd go ahead and try out my seat-of-the-pants registration system.

THIS is going to need more thought.


I pulled 8 prints and only got one in good alignment, so clearly I need a more thoughtful registration method. I have another 12 first color prints on the rack, but I'm undecided about carrying on until I can sort out something a little more efficient. I think I'd like to try a pin system, but I haven't ever used one and don't quite know how to set it up. But I'll figure it out! I'm really excited about the possibilities once I get a new routine in place.

So time out for some more research. This first experiment was with unmounted lino, which I think will eventually be the mainstay. But my hand-rubbing registration jig requires mounted blocks, and I have a goodly pile of them that will need to be used at some point. (Plus I have some large single-color images on mounted blocks that I never finished editioning because I needed to give my wrists a break. Presston will make short order of them once I get a system in place.)

It felt really good to work in my "new" space today... so far the set up seems completely functional. As always, I wish I had more horizontal work space, but one does what one can in the space available. A sign of how much fun I was having? I totally forgot to stop and eat dinner.

Stay tuned for future experiments.

Saturday, October 11, 2014

The Epic of Presston

Mission accomplished! After an epic journey that despite flawless execution somehow took two days longer than expected, Presston is settled in his new home.

I had intended to take loads of photos, but there are only so many view-out-the-front-of-the-moving-truck shots that one can tolerate. My picture-taking started out well enough:

I so rarely fly west, it was a surprise to find myself over
my own valley. That's Twin Lakes and the Forebay
in the center, and I think the controlled burn at O'Haver Lake
in the background.
And yeah. Snow.

My intrepid companion in adventure and I left Salida at oh-dark-hundred last Monday and drove to Woodland Park to leave my car and catch a ride to the Denver airport. From Denver we took a bare bones flight to Las Vegas ($57!), where we were met by the indomitable Suzanne Hackett-Morgan of the Goldwell Open Air Museum.


Suzanne and the Barbie Jeep drove us to Pahrump, Nevada to pick up a very large rental truck, and then we were off in to the Mohave desert to collect Presston and some other equipment. At this point I think G started to wonder just what he'd agreed to.

The schlepping team: Suzanne, David, Greg, oh SHOOT, 
I forgot his name, Dane, and Richard.

In Beatty Suzanne rounded up some help and we moved Presston, two tables, a cabinet, a drying rack, a hot plate, and other miscellaneous stuff into the truck. This is a far simpler statement than it was an activity. Presston alone weighs over 400 pounds and it was 90 degrees in Beatty... a cooling-off for the locals, but an abrupt return to summer for someone who had just left snowy peaks.

Last light from the Barn, click to embiggen
 But we managed to finish up and to get some other items schlepped out to the Goldwell Barn, just as the last light disappeared from Death Valley.

Suzanne treated us to dinner at the Sourdough Saloon, where we met some local characters and where I found the coolest door latch in a women's restroom in a bar ever. Well, maybe not ever. But certainly in a long time. Not that I spend much time in bars. Or in bathrooms in bars. Oh, nevermind.


We stumbled to bed (from fatigue, not bar offerings), and the next morning saw oh-dark-hundred AGAIN. Gas station coffee and breakfast sandwiches in hand we headed east. It looked like this:


And a little while later, it looked like this:


The good news is that those thin clouds became thicker clouds and we had overcast skies for the next two days of driving. Not so picturesque for photography, but certainly nice and cool for desert travel.


We ended up driving for almost 15 hours on Tuesday, arriving in Albuquerque, New Mexico well after dark and unfortunately also after they closed northbound I-25 for construction. Tired and cranky AND having to find a new route across town in a 16-foot truck? Definitely a trip low point. But we made it, found a place to stay, and were satisfied to only have a 4.5-hour drive the next day.


Wednesday we were in Colorado in time for lunch in Alamosa, and then the final push for home. G and I unloaded the tables and made some decisions about how to set up the living-room-now-studio-space, and then gave up for the day. (I had a plan, but of course it completely changed once we had the actual equipment.) Thursday it rained all day, but we finished sorting equipment and studio, put some items (like a huge drying rack that I can't fit in my space just now) in to storage, and welcomed a cadre of young men from the Salida High School cross-country team to help schlep Presston into place. (The scariest moment for me.)

Definitely NOT the hot, dry Mohave. Headed to Colorado Springs
for the last steps of the journey.
We were not quite finished yet, though. Yesterday (Friday) I had to pick up my car on the way to returning the truck in Colorado Springs and a piece of equipment that we brought with us for Colorado College had to be delivered. And of course I had to go cheer for the cross country team at their District meet in Cañon City on the way home. I owed them that, at least.

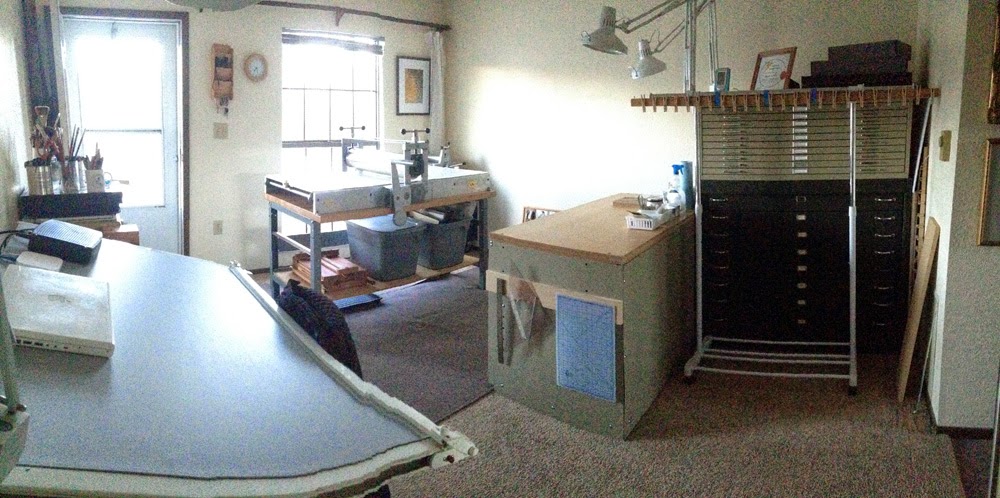
So now it's Saturday, and although there are still some shelves to install and some lighting to sort out, the studio space is looking good. Presston dominates the scene, of course, as he should.

click to embiggen these funky phone-camera panoramas


Presston!
For me the rest of today will be about post-trip bookkeeping, email triage, and a desperate trip to the grocery store. (And probably a nap.) But from time to time I'll get up and wander to the studio... find a little more dust to clean off of Presston... and start to find my way to a new working method. It's a new era for this printmaker!

OOPS! I almost forgot to mention that Presston made at least part of his journey on the infamous Route 66. The one photo I have from the trip that isn't from the window of the truck! (It's from the gift shop of our stop for Second Breakfast, but hey...)

Monday, October 6, 2014

P*-minus 48 hours and counting! (*Press)

An older field drawing to keep you company.
By the time this posts on Monday morning, my friend G and I will be on our way to the airport and our rendezvous with Presston.

It's a complicated journey: drive to Colorado Springs to leave a vehicle (2 hrs), catch a ride to DIA (2 hrs), fly to Vegas (2 hrs), catch a ride to pick up the rental truck (1  hr), drive another hour to Presston's current location to load up. Hopefully we will sleep like logs and then begin the 1,000-mile drive back to Salida Tuesday morning. We'll unload here, then continue back to Colorado Springs to drop off additional equipment and return the truck. And THEN back to the car and home to settle back in to my space and try to figure out how to work a whole new way!

In theory we'll be back in Salida just about 48 hours after we leave, but it's hard to say. This sort of epic road trip seemed a lot easier 20 years ago. I already want more sleep. But...ooooooh! I'm getting a PRESS!

Tuesday, September 30, 2014

The effort before the reward

Sands Lake at sunrise, Salida

I've said it before, and I'll say it again: I may not like getting up early in the morning, but I do like being up. A few days ago a friend dragged me out for a walk at dawn, and while I might have grumbled about it I definitely appreciated the chance to experience a morning like the one pictured above.

And now I appreciate it even more, because it gives me a nice metaphor for the current state of life in general: I'm not particularly enjoying the lead-up, but I know I'm going to love the result. Ladies and gentlemen, drum roll please... I have an announcement to make!

I'm getting a Big Girl Press! 

I realize this isn't the first time you've watched me get all twitchy about a press. Back in 2011 I brought Elvis (Press-ley), a Richeson baby press, into the studio. Elvis has his moments, but he's no precision machine and he's limited to prints smaller than 9 x 12 inches.

Then there was Presszilla, a lovely chunk of 1940s-vintage proof press. Unfortunately, for all her handsome steel bulk, Presszilla won't do much larger than 9 x 12, either, and she needs some TLC. Sorry to say she's still living in storage... but one of these days....

So I've continued to hand rub 99% of my prints, and found that my physical limits top out around 12 x 18 inches. In fact these days my physical limits are even more limited: I've developed some rather alarming problems with my wrists and it's been clear for some time that I need to do something different. Plus DANGIT, I want to work larger.

I've been half-seriously shopping around for an etching press... doing the Google thing every once in a while to see what turns up... but nothing has come of it. And really... where would I put it? I've been back to working in my "spare" bedroom and things are tight as it is....blah blah blah.

So went the mental conversation, until a couple of weeks ago when I stumbled quite by accident upon a great deal on a great press. In Nevada. There was a lot of hemming and hawing, mostly about minor details like money and space, but finally with the counsel and support of some really good friends I went ahead and said YES!

Of course that was the easy part. Now I have to rearrange my small apartment to accommodate a 30" x 60" (!!!!) etching press, get myself and a friend to Nevada, rent a truck, and haul the thing home.


The rearranging part started yesterday. This is the mess that used to be my living room but will now be the studio. I'm losing a sofa, but gaining a press. I had considered using this space as the studio when I moved in here just six months ago, but I couldn't figure out how to make it all fit (and the sofa wouldn't get through any door other than the front one).


 Once it was clear that the sofa would have to go, moving my "sitting room" and office to the bedroom was a little easier. It looks huge here in this iPhone-generated panorama photo, but the room is just under 10 x 12 feet. You can not imagine the headscratching that went on trying to fit all these darn bookcases in here. I'd like to find some other cushy reading chair for this room (now that I will be sofa-less), but for the most part it's feeling like it will be a nice, cozy space.

 Needless to say, there's not much printing in the forecast for this week or next. The Big Road Trip will begin next Monday, and in the meantime I need to find a home for the sofa and get the studio space prepped for the arrival of.... PRESSTON!

(PS: I almost forgot! I managed to save ALL of the sunset linos! Whew! Dodged that disaster, I did.)

Linocut in Progress: Did You See That?

Put on your deerstalkers and get out your magnifying glasses, because we're back to trying to sleuth out the order of operations on this...