Showing posts with label snow. Show all posts

Tuesday, October 8, 2024

Linocut in Progress: Wait. Did I really finish in fewer than 10 steps?

Carrying on with the snowy linocut in progress. I do feel like I'm tempting fate just a tiny bit by imagining fresh snowfall, but here in Maine we should still be several weeks away from such things. (Although it rained here all day yesterday and I broke down and lit the wood stove for the first time this season, just to clear the chilly damp.)

After the greens-on-top-blue-across-the-bottom of Step 4, I cleared all the remaining material from the lower two thirds of the block. So satisfying to do so... and of course it means I'm now working with only a very small portion of the block. It should all go fairly quickly now...

So let's roll up a sort of middle-value green and print Step 5.

Reduction linocut in progress: Step 5 rollup

Step 5 printed

Okay! Feeling pretty good about that, although it's really too much green. I think we can remove everything from the block now that should remain green and concentrate on the trunks and branches.  The ink rollup for Step 6 was a gray brown.


Step 6 printed

Ugh. This is a terrible photo... so sorry! Apparently it's the only one I took at this stage, and I was working at night. I tried to adjust the photo a bit but only made it worse, so you'll have to use your imagination. The brown didn't read completely brown, but it wasn't this green. (And the snow was not purple.)

I was feeling good about the suggestion of a sunny gap in the upper right of the image, but wanted to emphasize that by bringing some of the tree trunks visually forward while also keeping them in shadow. First, however, I thought I should lighten the nearest ones just a smidge, so they could show more detail when the darks were added.

Step 7 rollup

Step 7 printed

Yes, okay... this photo has a bit too much contrast, but it's better than the previous one! You can see that the lightened trunks aren't really light. But they are light-er, which will hopefully allow for some more details in those closest trees, to help them feel even closer to us.

Step 8 rollup

Back to a darker brown to bring out some details and move the cluster of trees forward.

Step 8 printed

Another nighttime photo... Too contrasty, and now radically skewed because I was trying to avoid shadows from the overhead light. I have mentioned I'm not a photographer, right? 

However.... we are super close to finished here. I think a small cluster of the closest trees needs to get hit with one more dark, and maybe that will be it. Really? In fewer than ten passes? Are we sure this is my work?

Step 9 rollup

Only those two right-most trees received ink here. (The middle brownish-looking ones are just stained from previous color passes.) 

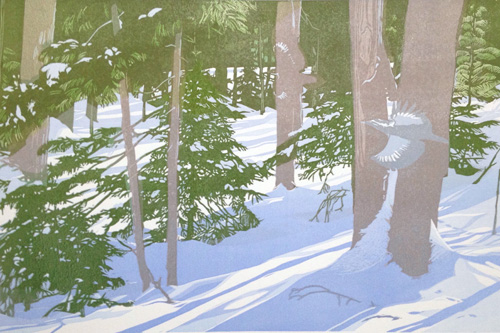
And, voila! All done. (And this one is a proper scan with good contrast and no skew!)

"Stillness," reduction linocut, edition of 18, 10" x 8"
©Sherrie York

This new linocut and more than two dozen other pieces are headed west for the opening of my solo exhibition at Blue Sage Center for the Arts in Paonia, Colorado. Show opens October 25 and runs through December 19. Do check it out of you're in the neighborhood!

Monday, October 7, 2024

Linocut in Progress: An early snow.... at least on paper

 Alrighty, then! Things have been happening in the studio! It's definitely autumn.... my favorite season of the year, and one in which I find it much easier to get things done. Summer is way too hot and humid... my brain and the paper both turn to mush. 

Of course it's getting cool enough now that lino is getting a bit trickier to carve. But never fear! A heating pad set on low underneath my carving surface will overcome that excuse-in-waiting. 

I've got a solo exhibition coming up back in Colorado at the end of this month, and I wanted to get "just one more" new little piece together for it. An 8 x 10 snow scene seemed like just the thing. 

I jumped into it so fast that I just plain forgot to take any photos of the early ink rollups, but they were pretty straightforward, so I think you can follow along just fine!

Step 1: A light blue, top to bottom. Easy peasy.

Reduction linocut in progress: Step 1 printed

Nothing much to see here.... let's carry on with Step 2. This one got a little fancier, but only a little. I printed a blended roll that went from gray at the top of the image to blue at the bottom. Like this:

Step 2 printed

And then, just for good measure, I did it again.

Step 3 printed

One of the things I enjoy about making snow scenes is that they resolve into something interesting fairly quickly. I mean.. honestly... there was a time when I would have just thrown one dark value on to this and called it a day. But those days? Long gone, my friends. I can't help myself.

By Step 4 I remembered that I should be taking photos of the ink rollup, especially since I decided to do something a bit funky. I could have removed all of the material in the snowy foreground, and indeed that was the original plan. But I decided I wanted just one more bit of subtle contrast in the very bottom of the image... and of course it was time to tackle the background trees. So... I took all the lino out of the middle and inked it like this:

Step 4 rollup

Tricky, eh? That's another blue along the bottom, but then a light-to-mid-green blend in the top that went from one side of the image to the other. 

Step 4 printed

It all looks a bit clunky now, but trust me! I have a cunning plan. Sort of. I'm going to try to suggest a bit of a sunny patch in the upper right. Stay tuned to see if I manage to pull it off.

Friday, February 1, 2019

Linocut in Progr... Finished!

I woke up yesterday morning determined to finish this linocut, no matter what. I'd been waiting a couple of days again for ink to dry, and it was testing my patience mightily.

Thankfully a friend called on Wednesday to see if I was up for the trip to Portland for the weekly tango practica. Yes! Good to dance, and good to be away from the studio, where the temptation to rush things was high. Not so good was the return journey at 10:00pm in an unexpected snow storm, but hey... that's a different story.

ANYWAY! Despite the late night I popped awake early, got the fire going, ate some oatmeal, and...

Oh, wait. We have to back up a couple of days first.

Reduction linocut in progress, Step 13

Remember? I wanted one more run of a darkish, transparent blue-black. Which was this. I was feeling pretty good at this point, and wanted to just charge ahead and finish the birds. But with 12 other ink layers underneath, it was imperative to wait for this color pass to dry enough. Charging ahead would mean risking damage to this layer and possible adhesion problems with the next.

Which finally brings me back to yesterday. The birds which have emerged to dash through the forest are pileated woodpeckers. Their bright red crests were allegedly the inspiration for the cartoon character Woody Woodpecker, but there wasn't anything funny about printing those tiny little shapes.


I wanted the bird in the middle ground to appear... well, in the middle ground. More in shadow than the foreground bird. It was a decision which required mixing two different blobs of ink, using two ink knives, two brayers. A lot of work and mess for two tiny little bits of color.

My smallest brayer is an inch wide... too wide, really, for these shapes, so I also took the time to wipe extraneous ink from the block before printing. Now would NOT be the time to get careless.

I also cut newsprint masks to cover all but the birds before printing, as added protection against extraneous color. Apparently I didn't take a photo of the prints after the red bits were applied... but honestly, there wasn't that much to see.

Reds printed, I cleaned off the block (at least that part didn't take long) and mixed up the final blue-black transparent color for the birds. This time I do have a photo of the mask... although it's on the prints, not the block:


And finally....

All done! Slightly embiggenable with a click if you want to see more details.

Whew! That was a journey and a half. It's still lacking a title... I'm thinking about something with the word "chase" in it... Chasing Shadows? Possibly. I need to sit with the happily drying prints for a little bit yet.

So... what's next? I'm not sure. Perhaps something smaller and simpler that I can finish quickly! One more snow scene, maybe– before I stop chasing shadows and start chasing spring.

Saturday, January 26, 2019

Linocut in Progress: So close, and yet.....

So far.

I really hoped to have this wrapped up before the weekend, but alas I was foiled once again by my own compulsive behavior. As you'll see....

Reduction linocut in progress, Step 11

Oh these trees and this green! Argh. I swear my next piece will have no green in it whatsoever. But before that can happen I have to wrestle this one into submission. Or perhaps it has to wrestle me. Whatever. We have to come to some sort of conclusion. The Step 11 color pass was a transparent browny-gray over the entire block. Some of the texture is starting to resolve in the foreground tree trunks, and if you click to slightly embiggen the image you might see some of the needle texture in the greens of the trees.

At this point I had to face something I had been avoiding for a couple of color passes. There were a few of the middle-ground tree trunks that were reading as too green. I had hoped that the warmer color of Step 11 would bring them into line, but it didn't quite work. So... a mask and some spot inking were my best solution.

Mask in place... Step... 11B?

Luckily, this mask was far simpler than a lot of my efforts and the areas that needed to be inked were small, so this step was relatively quick. Let's just call it 11B... okay? Sort of a half step.

11B. You probably can't see much difference, but trust me. I am happier.

And THEN I thought I was ready for the last color pass before the details of the birds. Woohoo!

Reduction linocut in progress, Step 12

Oh.
Nope.
Not quite.

It took me a couple of tries to get this color right... again it's very transparent, and it's a warmish blue-gray, if you can imagine such a thing. And it's close... oh so close... to being the last one. But I think to really push the background into... well... the background... I need just a few more darks in the foreground trees. Not so dark that they will ultimately interfere with the birds... which will be almost black... but... something.

The good news is that this means I can wholesale take out the background. The bad news is that it is darn scary to remove this much material. I mean... look:

Eeek!

That little bird's got no more cover! Totally exposed! Eek! No going back now...

Printmaking gods permitting, I'm planning to have this all wrapped up by the middle of the coming week. Keep your fingers crossed for me. I need to keep mine UNcrossed so I can get the work done.

Friday, January 18, 2019

Linocut in Progress: Sneaking up on it

So much for my belief that things would be quiet in January and I'd be able to get consistent studio time. I've been so wrong about my schedule that I am actually looking forward to the blizzard we're expecting this weekend. PLEASE let me be snowed in so I can get some work done. (But not so snowed in that we lose power, which is a potential problem if the forecasts which include sleet in our future are correct.)

Still, things are moving ahead on the current linocut, if not as quickly or smoothly as I had hoped.

After all the mucking about with masks of the last few color passes, I really wanted a couple of straightforward steps. This is challenging because of course I'd like to keep too much green out of the tree trunks and too much brown out of the tree needles.

But my masks haven't been precise (they never are), and things were starting to look a bit scattered, so I wanted a color pass that would be unifying without destroying the color temperatures. Hmm. What about a nice transparent gray?

Reduction linocut in progress, Step 9

Yes! That will do nicely. Browns are still brown, greens are still green, and it all seems more coherent again.

Now what?

I would really like to resolve some of these trees better.. and soon... but I am on the fence about the background. Will I get a better effect from keeping the darkest darks in the far distance... or should I leave the distance sort of middle-value and the foreground trees darker? Decisions, decisions.

And since I still couldn't decide, I took a risk with the next overall color pass and mixed a lovely gray-green.

Transparent gray-green rollup

Purdy, isn't it? It looks alarming on the block, especially over the tree trunks, but it's very transparent and I crossed my fingers that basic color theory would be my friend. The existing trunk color is a sort of reddish-brown. Transparent green over that should become more brown... shouldn't it?

Reduction linocut in progress, Step 10

Oh, whew! That worked.

So now it's back to the carving table. I think the focus now will be on the trunks... to get some of their texture established. I'm on the fence (again) about what the next color pass should be. I really want to wrap this up soon, so I'm considering one transparent brown pass... or maybe gray? Or maybe blue-gray. Or....

Wednesday, January 2, 2019

Linocut in Progress: Begin as you intend to continue

Happy New Year! 

Begin as you intend to continue. I can't remember who first shared that idea with me, but it's always my mantra for the first day of a new year. So how did I spend January 1, 2019? Watching birds, enjoying the sparkling, windswept day and taking a walk along the coast with friends. Taking care of a little administrative work, answering a few emails. Bringing in more wood for the stove and tidying up...

And carving and printing lino, OF COURSE!

But let's back up a day or two first...

I'm at the stage when progress becomes a headscratching exercise, thinking inside out and wrongside 'round more than usual as I try to sort out questions of warm vs cool colors, transparency vs opacity.

I like to keep my inks as transparent as possible for as long as possible. It's a habit left over from my watercolor painting days, and I really enjoy the luminous quality one can achieve when light gets to bounce off paper. But in practice this makes for some headaches. To wit...

I was ready to put down a middle-value green, but didn't want it to exert too much influence in some areas, particularly the larger foreground tree trunks. So I cut a stack of masks that looked like this.

Masking for Step 7

Not the most intricate masks I've ever cut, but having to align four pieces of newsprint for every print pulled just adds time and tedium to the process. But what else are ya gonna do?

Here's Step 7 printed:

Reduction linocut in progress: Step 7 printed, embiggenable with a click

Okay. Not bad. Not orderly and harmonious anymore, but at least moving forward in a good way. But, ugh. What to do from here? Another green? That risks getting too dark too soon, and putting too much green in the background tree trunks. So. Of course I had to cut another set of masks... essentially the opposite of what I cut before.

Step 8 masks

This as actually a modified version of the masks at this stage. There were originally two more, but I decided that was overkill and was so near to the border of ridiculousness that it was only not ridiculous by virtue of... Well, let's face it. It was just plain ridiculous.

So there are five paper shapes instead of seven, and a semi-opaque light brown ink. Yes, I know it looks sort of... puce... but trust me, it's a brownish ink if ever I mixed one.

Step 8 printed

See? Told you so.

So where to go from here? That's a good question. I THINK the next color will be another green, and I THINK I will try to avoid masking, lest the whole thing becomes a visual train wreck. Well, I'll probably mask the birds. But that's all. Except maybe a couple of trunks. But nothing else. Except I do like some of this color in the background...

Yeah. You and I will both just have to wait and see what happens. Beginning 2019 the way I'd like it to continue? Let's just say that some things will change, but some things, like my work process, will remain absolutely the same.

Tuesday, December 25, 2018

Linocut in Progress: No, really. Progress.

Progress on this linocut continues to be slow, but not for lack of effort! At the end of last week I was able to finally move away from blue ink and tone some things down with a transparent gray.

Reduction linocut in progress, Step 5

That subtle little change was exciting, because it started to pull the trees away from the ground. And, hey! It's just one color, applied over fairly dry prints. I should be able to print again in a day or two, right?

Hm. Wrong. For reasons I can't quite fathom, this color pass just didn't want to dry. On Sunday the gray still felt tacky, but since I was just going to be spot inking a light green and using a newprint paper mask I thought I could go ahead.

Disaster! Some of the prints were drier than others (why this should be, I have no idea)... and although I printed the first three without mishap... on the fourth one the mask stuck to the print, and even though I did my best to peel it back slowly and carefully I had to spend the next 30 minutes picking little bits of newsprint out of wet ink. I never did get it all... so that print gets rotated to the front of the line as a sacrificial color tester from here on out. (sigh) Not wanting to risk more prints, I cleaned up... and then hauled the entire drying rack out in front of the wood stove.

Unconventional print drying methods

Now, one would think that a wood stove would make short work of stubborn ink, but one would be mistaken. That rack has been there for two days! And I even went through and hand-stripped some of the tacky ink! I really don't understand it, BUT... onward.

This evening I crossed my fingers and tried it again.

Transparent green rollup

Since I only need this lighter green in a few areas of the trees that are hit by sunlight I only inked half the block and then put in place the newsprint mask.

Mask in place on the inked block, on the press

Whew! There were two or three prints that tried to grab onto the mask a bit, but not so much that it couldn't be easily pulled free. The rest of them printed just fine.

Linocut in progress, Step 6

This is always a bit of a stressful moment... when the previously-harmonious-looking image moves in to the ugly duckling stage. Not a lot of this lighter green will remain, and my next question will be whether the next few color passes will address the tree trunks (grays and browns) or the darker green of the trees... or whether I will be working back and forth between the two. (Most likely.)

So... it's back to carving (and waiting for ink to dry). Such is the glamorous life of the printmaker!

Monday, December 17, 2018

Linocut in Progress: Dashing through the snow...

Well... maybe not dashing. Carving for what should be the last blue color pass took a loooooonnngggg time, but I finally got to put ink on paper today in the form of a light-to-dark(ish) blended roll.

Linocut in progress - Step 4. Embiggenable with a click.

Outside the studio it looked a lot like this, only without the contrast provided by sun. So okay... I guess it didn't really look a lot like this other than the fact that there was snow on the ground because it was actively falling from the sky. Forget I mentioned it.

I'm feeling pretty good about things at this stage. There's a temptation to do one more blue pass to deepen the shadows under the trees but I'm going to reign in that impulse. The next color pass will instead be a transparent gray, which might serve the same purpose as more blue in those areas. And honestly, the idea of finally getting to hack out large swathes of lino is so appealing after a couple of days of this kind of thing:


Of course this hasn't been the only project I've been working on... but it's the time of year when certain things just have to be kept secret.


All will be revealed in the next week, but until then... remember we only have 4 more days until the Winter Solstice. Why am I working on a snow scene when summer is on its way?

Friday, December 7, 2018

Linocut in Progress: The subtle steps

It's been a frustrating week of bureaucratic headaches, so studio time has felt extra precious and restorative. All the "stuff" of life– particularly the stresses of a self-employed life– can really crank the volume on the self-doubt up to eleven. Going to the studio can sometimes feel futile or worse, frivolous.

But if I can push past all that and pick up my tools...  Well. Let's just say it's interesting how the frustration can dial back to the level of background noise.

Progress on the current linocut continues to be subtle, but that will change soon. Here's the second step, another transparent blue, just a bit darker.

Reduction linocut in progress: Step 2

This seems pretty good overall, but you know me. I have to complicate things as least a little or it doesn't feel like I'm working hard enough. I decided a graduated blue, light to dark, top to bottom, would add more interest and allow me to do more subtle things with the shadows in the foreground.

Reduction linocut in progress: Step 3

I am continually frustrated by trying to photograph blues, but hopefully you get the idea. Both of these images have been uploaded a little bit larger than they appear in the post, so if you click on them you can flip back and forth between them in a larger format and get a better idea. Or not.

The next step? Whew. Lots of carving. Almost all of the snow shadows have to come out now, including lots of small bits between tree branches. There are also a couple of surprises getting ready to emerge from the background, and I'll be trying to work out my next color choices. Stay tuned!

Monday, December 3, 2018

Linocut in Progress: Oh, those happy beginning stages.


There are few things more satisfying than starting a new linocut. Well, I suppose there might be more or different things for other people, but this weekend starting a new linocut was the most satisfying thing for me. And since this is my blog... oh... whatever. Let's just get on with it.

Since this new image is..... (drum roll) a snow scene, there was a lot of carving to accomplish before ink could roll. And before the carving there was a lot of drawing. Did I mention I found this satisfying?

This morning ink did roll, the first color was printed, and the new linocut is officially in progress. Even though this first color pass was quite pale (in fact I beefed up the contrast for this photo so you could actually see something) it already defines a lot of what's going on.

Reduction linocut in progress, Step 1


Fun, eh? What's even more fun is that there's a little surprise in this forest. I don't think it will be visible at the next color pass... maybe the one after that. But first... back to the carving table. Which is satis... oh, never mind. Just stay tuned.

Wednesday, December 13, 2017

What's It All About Wednesday: Midwinter Debris, Underfoot Series

"Midwinter Debris," reduction linocut © Sherrie York

Our first real snow of the season came to my new stomping grounds in midcoast Maine this week. It was a dozy! Here at my temporary digs on the Pemaquid Peninsula we had about 8" of heavy white stuff. I know it was heavy because I had to shovel it off the deck four times. Once when the snow stopped falling, but three times more after the sun came out and huge melting sheets sloughed off the roof and right on to the porch. (Note to self: When you finally find your own place, be sure it doesn't have a steep roof right above the front door.)

If you've been following Brush and Baren for any length of time you're aware that I like to wander around outdoors... and that I divide my time between staring down at my feet and gazing up at birds when doing so.

The "looking down" behavior prompted an ongoing series, Underfoot, to which I add another image or two each year. This piece, Midwinter Debris, was one of the earliest linocuts in the series. It was hand-rubbed on Hosho paper, during a time when I was still using mostly opaque inks. (Unlike my current practice of using transparent color almost exclusively.) This view included the needles and cones of the ponderosa pine, a signature tree of my former home in Colorado. When I look at this piece I am reminded of montane slopes, bighorn sheep, Steller's jays.

Here in Maine there are no ponderosa pines. No bighorn sheep or Steller's jays. Instead I'm learning to identify white pine and red spruce, their seed structures very different from my western trees. I also have deciduous trees! In this area the woods are dominated by oaks whose first names I've yet to ascertain. Yes, the landscape underfoot is quite different. Plenty of new material for when I can get back to work... which I hope will be soon!


Thursday, September 1, 2016

Linocut in Progress: Race to the finish, and the winner is....

Me? Maybe.

After a couple of days of headaches I made two important decisions. The first was to let everything sit an extra day (for mental health as well as drying reasons), and the second (after the wait) was to not do any more stripping and see what happened.

The next color was a straight-up green. Pthalo green mixed with yellow ochre. No transparent base, no white, no modifiers. Just ink. (From the stash of no-longer-manufactured Daniel Smith inks.)

Snow scene reduction linocut, Step 12

Yeah. Perfect roll out, perfect coverage, nice and thin, no problems. Have I mentioned how annoyed I am with Daniel Smith for discontinuing their ink?

Now a second green made by adding burnt sienna and more yellow ochre to the previous green.

Snow scene reduction linocut, Step 13

Okay, good! Some of the variations in the blues seen to be washing out a bit visually, but not much to be done about that. The subtleties are still important. (Plus digital camera struggles with blues.)

Next, adding more sienna to make a rich olive brown. On the paper it looks mostly brown, but okay.

Snow scene reduction linocut, Step 14

Nearly there now. One more color to go, and a fine example of why it's called reduction printing. Take a look at the block:

Final stage of reduction block

Just a few more darkest darks and then, Whew! It's done. The darkest bits are so small here that in the photo you can't really tell they're there. But... trust me.


Finished in time for today's deadline. Of course you can guess what happened last night. That deadline? It was postponed another two weeks.

Guess I have time to get another one started! With no white ink. None. Nope. Uh uh. Not. One. Drop. At least I hope not!

Linocut in Progress: Theatrical Cut

Director's Cut: The movie the way the Director actually wanted it, but the studio said no. Extended Cut: Really the thing I ALWAYS wan...