Showing posts with label trees. Show all posts

Friday, September 18, 2026

Fieldwork Friday: Flashback

In 2025 I was delighted to be awarded a place in the Maine Master Naturalist Program student cohort. It's not an easy gig to get; the course is only taught in one or two locations in the state each year, and those locations change. One of the two 2025 courses was given in Falmouth, about 90ish minutes away and the closest the program ever gets to me.

The MMNP involves 10 months of intense study, with a new topic (or two or three) introduced every class meeting. Insects, wildflowers, winter tree ID, birds, skulls, tracks, reptiles, geology... It was a LOT. But learning is fun, and learning alongside other nature geeks even moreso. AAAAAAND  learning alongside other nature geeks while also being obliged to keep a nature journal is the best kind of fun there is. 

Each month we had homework related to the current topics, and a lot of it was recorded in our journals. We also had ongoing projects: a study site that we visited at least one hour each month, ditto an "adopted" tree. 

The program was coming to an end at this time last year... but I was tickled to pick up my journal and find entries from a year ago this week. These two pages are also a good representation of the variety of observations we recorded each month. 

Click to embiggen!

Study Site: Nash Pond sits in the mainland portion of Audubon's Todd Wildlife Sanctuary in Bremen, Maine. The 30-acre property was once a farm, with Nash Pond serving as irrigation holding. I chose it as my study site partly because I knew I'd be there often throughout the year (the dock at the bottom of the hill is the crossing point to Hog Island and the Audubon camp, where I coordinate some programs), and partly because it's a beautiful spot. And I wanted frogs and turtles in my study area! I ended up with a lot of tadpole drama... a big hatch, then loss of water, and then an invasion by hungry young turtles!

Study Tree: This Black Cherry is a cluster of young-ish trees in my yard, leaning to one side because of encroachment by branches of a maple. This poor tree suffered a lot during the year... bugs and fungus and getting crushed by falling limbs from the aforementioned maple. It seemed to fare a little better this year, but I admit I didn't keep close tabs in the way I did last year.

New Topic: Fungi! One of our September assignments was to find, identify, and record a certain number of fungi species. We'd had a dry summer, so this was a bit challenging, but eventually I found everything I needed.

In the future I'll share some more current pages with you, and maybe a few more flashbacks as the season warrants. I doubt that every Friday will be a Fieldwork Friday, but I'm sure they will pop up from time to time. 


Friday, October 11, 2019

Linocut in Progress: A fix and a re-think

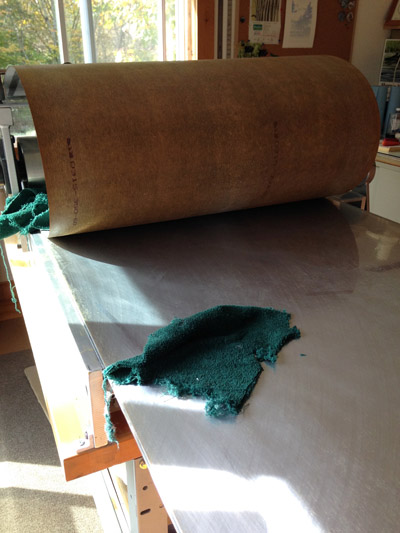
Three cheers for my fabulous neighbor, who saw my grumpy face when he stopped by to bring my mail and promptly dropped everything to help me try to fix my press bed. Again.

Since the bubble was right in the middle of the bed and the rest of the adhesive we applied last year seemed to be holding (for now), it would have been a complete pain in the neck to try to pull up the laminate without breaking it.

We opted instead to pull the entire bed out from between the rollers and flip it over. We had only fixed the "top" side last year, and I knew that the original 20-year-old adhesive had also failed on the bottom.  Flipping the bed and dealing with the easier-to-peel-up side saved us a lot of time, elbow grease, and anxiety.

Laminate lifted up to clean the bed and prepare it for new adhesive.

It took the entire afternoon, and the wretched contact cement surely killed a few of our brain cells, but we got 'er done. The next morning I got back to work... which involved a little blue-to-gray blend on the lower third of the block, to get the horizon between sky and water sorted out.

Linocut in Progress, Step 4.5

Finally it was time to get away from the blues. I mixed a sort of olive-y, ochre-y, semi-transparent color and... voila!

Reduction linocut in progress: Step 5.

Except, hmmmm. There's a problem. The sky bugs me. To be honest, it has bugged me from the beginning, but now that there is a color printed that contrasts with the blues, it REALLY bugs me. I'm not satisfied with the shapes of the clouds. I tried to make them billowy, but they just look clunky. Argh. What to do?

Yesterday I considered bagging the entire thing and starting over... something I haven't done in ages. But it has also occurred to me that I might be able to do something interesting with a second block overlapping some transparent shapes in the sky. It's worth a try, anyway! I'll let the prints dry for a day or two and then sacrifice a couple in the name of experimentation.

In the meantime there are plenty of other things to do. In fact the list is overwhelmingly long... so maybe I'll just go take a nap instead!

Tuesday, October 8, 2019

Linocut in Progress: Well, SOME progress... and a set-back

With just one more workshop on the horizon before year's end, I have really been looking forward to some concentrated time in the studio.

So it was with much excitement that I set out to put the next color pass on the linocut that's been languishing for a couple of weeks. I mixed up another transparent blue, checked the press pressure, stacked the dry prints and got started.

And had problems. My matboard registration jig didn't seem to want to lay flat on the press bed, and I was having some minor registration issues. I kept fussing with it all, and then, with a sinking feeling, realized what the problem might be. I pulled the stack of padding paper and jig off the press, and sure enough, there in the middle of the bed, was a bubble.

You might recall that about a year and a half ago, when I finally found a place to live in Maine and got my studio set up, I discovered my press bed had become delaminated while in storage. After much anxiety, and a few false starts, my neighbor and I were able to pull up the laminate and re-adhere it to the bed and I was back to work.

Things have been moving along well since then, but the busy summer workshop and exhibition schedule kept me away from the press most of the summer. I did have a couple little black-and-white projects, but they didn't require precise registration and if there were problems with the bed at that time I didn't notice them.

I notice them now. It's hard to miss a big bubble smack in the middle of the bed.

Luckily the piece I'm working on right now is small enough that I can continue to use a portion of the bed that isn't warped, so I should be able to finish it. The pressure settings might need a little tweaking, but I did finish pulling this color today. I've got a message in to the manufacturer again, and I'll be making a call to my neighbor this afternoon.

In the meantime....at least we're this far:

Linocut in progress, Step 4

Friday, December 7, 2018

Linocut in Progress: The subtle steps

It's been a frustrating week of bureaucratic headaches, so studio time has felt extra precious and restorative. All the "stuff" of life– particularly the stresses of a self-employed life– can really crank the volume on the self-doubt up to eleven. Going to the studio can sometimes feel futile or worse, frivolous.

But if I can push past all that and pick up my tools...  Well. Let's just say it's interesting how the frustration can dial back to the level of background noise.

Progress on the current linocut continues to be subtle, but that will change soon. Here's the second step, another transparent blue, just a bit darker.

Reduction linocut in progress: Step 2

This seems pretty good overall, but you know me. I have to complicate things as least a little or it doesn't feel like I'm working hard enough. I decided a graduated blue, light to dark, top to bottom, would add more interest and allow me to do more subtle things with the shadows in the foreground.

Reduction linocut in progress: Step 3

I am continually frustrated by trying to photograph blues, but hopefully you get the idea. Both of these images have been uploaded a little bit larger than they appear in the post, so if you click on them you can flip back and forth between them in a larger format and get a better idea. Or not.

The next step? Whew. Lots of carving. Almost all of the snow shadows have to come out now, including lots of small bits between tree branches. There are also a couple of surprises getting ready to emerge from the background, and I'll be trying to work out my next color choices. Stay tuned!

Monday, December 3, 2018

Linocut in Progress: Oh, those happy beginning stages.


There are few things more satisfying than starting a new linocut. Well, I suppose there might be more or different things for other people, but this weekend starting a new linocut was the most satisfying thing for me. And since this is my blog... oh... whatever. Let's just get on with it.

Since this new image is..... (drum roll) a snow scene, there was a lot of carving to accomplish before ink could roll. And before the carving there was a lot of drawing. Did I mention I found this satisfying?

This morning ink did roll, the first color was printed, and the new linocut is officially in progress. Even though this first color pass was quite pale (in fact I beefed up the contrast for this photo so you could actually see something) it already defines a lot of what's going on.

Reduction linocut in progress, Step 1


Fun, eh? What's even more fun is that there's a little surprise in this forest. I don't think it will be visible at the next color pass... maybe the one after that. But first... back to the carving table. Which is satis... oh, never mind. Just stay tuned.

Tuesday, October 11, 2016

Linocut in Progress: the Finish...

Alrighty then! Here we go with the final push on this crazy aspen tree linocut.

Of course I have to start by admitting that I neglected to take a photo of Step 10, another subtle brownish/ochre-ish tone in the grasses along the bottom. Probably no one would have noticed the difference but me, but hey! There's a good reason printmakers are often viewed as a bit obsessive.

Step 11 was yet another pass of a mostly-white ink with a little more reddish-brown to knock back more of the underlying greenish tone. I don't mind a little green... the white trunks of aspen often reflect the colors of leaves and grasses around them. But too much is too much.

Step 11

I think you can see in this shot that the two trunks just behind the three foreground trees are a tiny bit darker. The overall light in this image is not dramatic but I did want to suggest a little distance, even if it was subtle.

And then the fun part finally happened. I got to work on the details of the tree trunks.


Here's the Step 12 rollup, a transparent gray. Very little of this color will remain in the tree trunks in the final image, however it was important for the last bits of contrast in every other part of the image. The thin saplings in the lower left, the slightly darker leaves in the upper right both benefitted from this pass. And after it I finally got to remove ALL of the background.

Step 12

At this point I finally started to believe the image was going to work. Whew. The temptation to keep plowing forward was strong, but everything was very wet at this stage and we all saw what impatience wrought last week.

Step 13 was a transparent brown-black. I was a little worried that it might end up reading TOO brown, but again a lot of this color would be covered up in the final pass.

Step 13

This is really the first time that all the swoopy, tangly branches became clear. It seemed a little much here, but I planned to take out those two background trees entirely before printing the final color pass. Some of their branches would go, too.

I added some more black to the transparent brown aaaaaaannnnndddddd......

Step 14, final. Slightly embiggenable with a click.

I need to take a better photo (and soon, since it's due Friday for exhibition promo), but this gives you the idea. Clicking on it will bring up a larger version and the image will be a little sharper. There are always things I wish I would have done differently, but overall I'm satisfied.

And I'd better be, because it's way past time to get the next one underway. Paper is prepped, image is drawn on the block, and the first color should be drying on the rack by lunch time tomorrow. No rest for the... um... weary? Wicked? Wobbly? All of the above?

Monday, October 3, 2016

Linocut in Progress: Lots of it now!

Last time on "Linocut, The Next Step(eration)"*....

Our heroine had tweaked her neck and back and lost of couple of studio days, but she's back at it and making progress. Slower than hoped for, but this time it's not been a physical delay. It's been a mental one. Just watch:

As soon as my gimpy-ness subsided I dove as fast as I could into the next color pass. With the success of the previous light-green-to-light-ochre roll I decided to do another. This time I rolled a darker green blended to a darker ochre. Because, you know... value changes.

Step 5, another green-to-ochre blended roll

I was feeling rather satisfied until I realized what I had just done. These large foreground tree trunks are supposed to be LIGHT. Not white, but certainly a lot lighter than they are now. I had intended to run a solid white pass on the trunks before this stage, but I was so twitchy to get back to work that I just plain forgot. [Insert bleepable words here.]

Nothing to do except print the white now. I knew it wouldn't get me where I wanted to be, but at least it would be a start. I rolled a plain white ink onto the trunks and part of the lower foreground and...

Step 6, solid white pass, masked

Like I said. Not where I wanted to be. A day or two of pacing around ensued. How the heck was I going to salvage THIS mess?

By doing what I should have done from the beginning. I slowed down and took the time to cut some masks. First step - Trace the trunk shapes onto clear acetate.


I cut the shapes out of the acetate sheet and then traced them multiple times onto newsprint and cut them out again. Voila! Custom masks.


I needed to make another white or mostly white pass, but I decided I should resolve the lower part of the image first. This meant lots of pesky masking for a couple of stages, but it's my own darn fault.

Step 7 blended roll

But, hey. Here's a weird little blended roll. I wanted some shadows below the background trees and I needed to keep the grasses light. Note that the ink is only rolled across the lower part of the block.

Step 7, inked and masked

And here are the masks in place. Foreground tree trunks and the top of the block are masked off. I decided to run the dark blue higher on one side for more variety in the background leaves.

Step 7 printed

Things were firmly in the ugly duckling stage at this point and I was trying hard not to panic. Geez. More pacing. More masking. And another brownish-to-ochre pass along the bottom.

Step 8 printed

Okay. Now we're getting somewhere. Time to try to lighten the foreground trees and create some paler trunks in the background. This pass was white, tinted with a little reddish-brown to counter the minty-green mess.  Careful inking and masking got the color where I wanted it on the block. Tedious, but necessary.

Step 9 printed

Alrighty, then. I am finally feeling like I might be able to salvage this mess. A couple of the foreground trunks will retain this color, but some of them will also get one more light pass. Before that can happen I need to resolve the grasses in the lower part of the image so I can carve all that material out and be done with it.

Trying to work light and dark simultaneously with a zillion little tiny bits to carve has given me worse brain freeze than a supersize slushy and I'm ready to move on. I hope this print is ready to come with me.

(*If you don't get it, I'm not going to explain it to you. But if you DID get it, I bet you read it in Majel Barrett's voice, didn't you?)

Linocut in Progress: Did You See That?

Put on your deerstalkers and get out your magnifying glasses, because we're back to trying to sleuth out the order of operations on this...