Wednesday, February 27, 2019

Linocut in Progress: More of this and more of that

After the printing struggles of the weekend I was a little bit relieved to wait a couple of days for ink to dry before moving on to the next color pass on the current lino in progress.

But move on I did. I kept it simple for Step 7: a transparent blue over the entire block. No mask, no blended roll, just a straight-up blue to bring some unity back to the image.

Reduction linocut in progress, Step 7

Ooh... the shadows of the birds are getting close, but there's still a lot of work to be done with them so I can't get ahead of myself. I think the goal at this point should be to finish the fence posts and the background so I know what those final values are before trying to refine the sparrows.

I feel like the shadowed sides of the fence posts are reading as too green. I'd really like their undertone to be warmer. Back to the orange again.

The good news, however, is that with a little judicious masking I can print two colors at once. A transparent orange in the fence posts, and a brighter rust color on the birds.

Spot ink and a mask... two-for-one color!

And here's the result....

Reduction linocut in progress, Step 8

Okay then! I think that's on track. I think the next pass will be another transparent blue, to create the shadows on the foreground fence posts and add another value in the background. I'll likely mask out the birds to preserve their color as it is now... and then hopefully work on them after the blue. A gray and a brown in the birds, then one final blue? That's my thought at the moment, but you know how it goes in this studio. It ain't over until it's over... or until Sherrie surrenders.

Friday, February 22, 2019

Linocut in Progress: When Good Ideas Go Bad

Insider tip: If you want the artists in your immediate vicinity to be your friends, do not... I repeat... do NOT use the phrase, "But at least you're doing something you love," in response to their frustrations. Not in response to creative struggles and certainly not to financial or existential ones. Because let me tell you, friends, there are days when love has absolutely nothing to do with it.

I think it's safe to say that many artists have compulsive tendencies... and printmakers perhaps more than most. There are plenty of days when I am driven more by anxiety and a sense of impending disaster than happy, fluffy, rainbow-colored clouds of affectionate joy. Take yesterday, for example.

Oh, wait. We have to back up another day first.

After the last color pass of brilliant (one might say bilious) green I threatened a lavender ink to tone everything down. I wasn't kidding.


Sadly I neglected to take a photo of the color rolled out, but this was a very transparent lavender-ish color mixed from a lot of transparent base and a wee drop of violet. I rolled it over the entire block and voila! Toned-down greens.

Reduction linocut in progress, Step 5

Tiny bits of bright green were still showing and I felt satisfied enough with this stage to decide to add some textural interest in the background. I spent many hours chipping away small bits of lino to create a sort of stippled effect.


It was tedious, but I assured myself it would be worth it. And besides, I had in mind one of my favorite color combinations for the next color pass. It would be glorious!

A good blend about to go bad.

See? Isn't that pretty? Lavender to ochre blend... it will gray down the greens in the upper part some more, warm up the greens below and, most importantly, warm up the sides of some of the fence posts that will soon be pushed into shadow. It's a brilliant idea.

Except it wasn't.

Bad photo of bad color pass and bad carving leading to a bad mood.

In fact it was wretched. The upper portion got TOO gray, my background stippling was distracting. The ochre was too bright, and along the left side of the image it was all too dark. It was just going to have to go. I was, in a word, cranky. That's probably not the most accurate word, but it's the most suitable for family audiences. Love this? You've got to be kidding.

So I scraped up all the ink. (Saved it, but scraped it.) Cleaned the block, the rollers, the inking slab. Ate some chocolate and went back to carving table. With my largest sweep gouge I removed all those hours of little lino chips. Well, almost all of them. I cut some new masks to preserve the color in the birds.

And I mixed some new ink. It had taken a very long time to mix the first colors because the studio was cold and the ink very stiff, but thankfully I had those earlier inks to use as the base for this new attempt, so mixing went a little bit faster. There was still a lot of anxiety and one more lost print on the way to finding what I wanted. (That's five losses in six color passes. That hasn't happened in ages.)

Second color blend. Not as pretty on the block, but hopefully better on the print.

So here we are at Step 6:

Reduction linocut in progress, Step 6

It's been a long time since I've spent 8 hours trying to get one color pass finished, but it's finally done and I can move on, even if I'm not completely pleased with it. It's all too wet to print again today, so I'll carve for the next stage and then give some attention to a few things that were neglected in yesterday's studio skirmish.

And then I'll take a deep breath and go once more into the breach. Because, after all, I'm doing something I love.

Sunday, February 17, 2019

Linocut in Progress: I know. I said no more green. But....

It's been a lovely few days here on the coast of Maine, and I am finally feeling as though I've turned the corner on this whateveritwas that had a stranglehold on my health the last two weeks. I got out for a good walk yesterday, and today managed some town errands (like laundry and groceries) and a nice printing session before I fizzled out. Hooray! Progress.

I did also have a little printing session on Friday... and, as, predicted, I did another transparent gray pass.

Linocut in progress, Step 3, transparent gray.

This served to add some more details in the fence and tone down the ochre from the last pass. So far so good.

I was feeling so confident that I jumped on in to another gray pass yesterday. Oops. Bad idea. I was trying to avoid cutting masks, and just got myself into a corner. The background got too dark, everything looked dull. Bleah. After two test prints I decided it was in my best interest (and the interest of my edition) to clean up and walk away.

But before I went to bed I cut those masks I was trying to avoid.. so I would be ready for today. Instead of gray.... let's print GREEN!

I know, I know. After the last print I swore off of green for a while... but I decided this needed some brightening up.

Inked up and masked for Step 4.

Whew! And I wasn't kidding about bright. That there green borders on fluorescent. But over gray and ochre it should be okay. Shouldn't it? It's got a boatload of transparent base in it....

Step 4 printed.

Yes, see? Not bad at all. Not much of this green will remain, I don't think... There's a lot more work to do in the fence and the birds, but I think small bits of it in the background will be nice. At least I hope so. I've gone off without a strong plan for the background... so I'll just be sort of winging it. (As usual.) Bird pun not intended.

The potentially amusing thing now is that I think my next color pass needs to be lavender. Transparent lavender. I've used this trick before to tone down greens... so stay tuned to see if I can make it work this time.

Friday, February 15, 2019

Linocut in Progress: No, really!

Despite still feeling sub-par I have been anxious to get going on the next linocut. These quiet(er) February days won't last long, and I want to take advantage of being able to prioritize studio time.

Even before the (still untitled!) previous piece was finished, I was working up this new one. It's based on something I used to see regularly on my morning walk back in Colorado, but includes a bird species seen both here in Maine and there. It seemed a good opportunity to work out the still-developing blend of my lives in both places.

Of course at the first stage there's not a whole lot to see:

Step 1: It's a solid gray, trust me.

And in this photo there's even less to see because it's lousy. On my screen it looks blue around the edges and pink in the middle. No no no. It's gray. Plain, solid gray. With a few tiny white chips out of it that you can barely see. Honest.

This new piece is slightly smaller than the previous (12 x 12 inches as opposed to 12 x 18) and I'm starting with fewer prints (20 sheets as opposed to 24), and it's amazing how much faster it all seems to go. Of course this piece isn't going to have all that ridiculous detail of trees that the last one did, either.

Second color pass was a transparent ochre-to-gray blend.

Step 2: This color is MUCH better.

Apparently my phone camera liked the combo better, because it did a much better job of catching the color. I put the ochre across the top because there are some warmer details in the birds that need to go in now to stay light enough. I'm pretty certain the next color pass will take us back to gray.

It's nice that there's a good suggestion of what's happening already. In part that is because of some Sharpie pen bleed from block to paper across the top. This sometimes happens, despite my efforts to prevent it, but I am not concerned since it will all be covered by other color.

For those unfamiliar: My image is outlined on the lino block in black Sharpie pen, a permanent marker that holds up on the block through repeated inking and cleaning. Before I start printing I lightly sand the block and give it a good cleaning to cut back on the boldness of the Sharpie. For reasons I don't quite understand, it sometimes starts releasing on to the prints... not at the first color pass, but the second. A little is okay... a lot could be problematic. Usually I rotate the worst offenders to the front of the print queue, as those prints often become color testers and not part of the final edition anyway.

So! After four days cooped up in the house with this rotten cold (or whatever it is) I do finally need to go run a few errands in town. I'm off to do that now, and then it's back home to stoke up the fire and get in the studio for color pass three. Hooray!

Thursday, February 14, 2019

Of Harlequin Ducks and Poetry Books

For more than a week now I've been contending with the worst cold-like virus I've had in ages. It just won't let go. So everything (especially me) is moving slowly and I have a serious case of cabin fever. Yes, it's true. I'm grumpy.

But there have been one or two little bright spots. Monday, when I foolishly thought I was getting better, I went for a little expedition to find harlequin ducks.

Seriously, what's not to love about a harley duck?

These critters were invented just for printmakers, I think, and I'm itching to do a lino (or ten) of them. But I had never seen "harley" ducks until I moved to Maine, and they're only here in the winter, so one has to go find them when one can.

It was a nice day, and I got some good looks at them and some nice reference photos, but Tuesday I learned the error of my ways when I woke up feeling worse. Ugh.

Enter the second bright spot! Last autumn I was contacted by a picture editor for Macmillan Publishers UK, who were interested in using one of my images on a book cover. Of course I said yes... and then was more delighted later when they came back asking for a second one to use on the back cover.

Since the books were being published in the UK, I didn't hold out much hope of being able to get them here, but was delighted when a parcel arrived from London with a couple of copies in it. Yes, linocut fans. There are linos on the cover of Walt Whitman's "Leaves of Grass." My brush with fame.

"Leaves of Grass," Macmillan Collectors Series

The lovely surprise since then is the discovery that the book is available through Amazon here in the US, which means it probably ought to be available through at least some local booksellers. Fun, eh?

I'm really hoping to get in to the studio for a little while this afternoon... keep your fingers crossed I can manage to stay upright! But if I have to go back to bed again, at least I have something new to read.


Friday, February 1, 2019

Linocut in Progr... Finished!

I woke up yesterday morning determined to finish this linocut, no matter what. I'd been waiting a couple of days again for ink to dry, and it was testing my patience mightily.

Thankfully a friend called on Wednesday to see if I was up for the trip to Portland for the weekly tango practica. Yes! Good to dance, and good to be away from the studio, where the temptation to rush things was high. Not so good was the return journey at 10:00pm in an unexpected snow storm, but hey... that's a different story.

ANYWAY! Despite the late night I popped awake early, got the fire going, ate some oatmeal, and...

Oh, wait. We have to back up a couple of days first.

Reduction linocut in progress, Step 13

Remember? I wanted one more run of a darkish, transparent blue-black. Which was this. I was feeling pretty good at this point, and wanted to just charge ahead and finish the birds. But with 12 other ink layers underneath, it was imperative to wait for this color pass to dry enough. Charging ahead would mean risking damage to this layer and possible adhesion problems with the next.

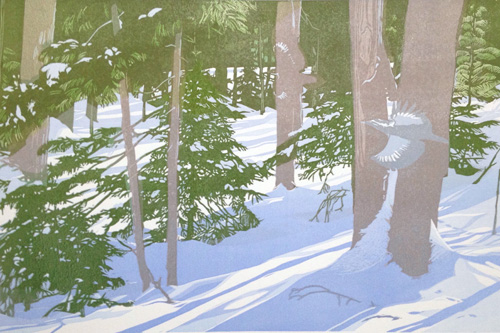
Which finally brings me back to yesterday. The birds which have emerged to dash through the forest are pileated woodpeckers. Their bright red crests were allegedly the inspiration for the cartoon character Woody Woodpecker, but there wasn't anything funny about printing those tiny little shapes.


I wanted the bird in the middle ground to appear... well, in the middle ground. More in shadow than the foreground bird. It was a decision which required mixing two different blobs of ink, using two ink knives, two brayers. A lot of work and mess for two tiny little bits of color.

My smallest brayer is an inch wide... too wide, really, for these shapes, so I also took the time to wipe extraneous ink from the block before printing. Now would NOT be the time to get careless.

I also cut newsprint masks to cover all but the birds before printing, as added protection against extraneous color. Apparently I didn't take a photo of the prints after the red bits were applied... but honestly, there wasn't that much to see.

Reds printed, I cleaned off the block (at least that part didn't take long) and mixed up the final blue-black transparent color for the birds. This time I do have a photo of the mask... although it's on the prints, not the block:


And finally....

All done! Slightly embiggenable with a click if you want to see more details.

Whew! That was a journey and a half. It's still lacking a title... I'm thinking about something with the word "chase" in it... Chasing Shadows? Possibly. I need to sit with the happily drying prints for a little bit yet.

So... what's next? I'm not sure. Perhaps something smaller and simpler that I can finish quickly! One more snow scene, maybe– before I stop chasing shadows and start chasing spring.

Wednesday, January 30, 2019

What's-It-All-About Wednesday: Homeward Bound

The snow/woods/woodpeckers linocut is SO CLOSE to being finished, but unfortunately Monday's ink was still too wet to print the last bits on Tuesday. One day. That's all I need to finish it, one day! It's very hard to be patient.

I've pulled the drying rack in front of the fire in the sitting room to try to speed things along a bit, so while we're waiting I thought we'd take a look at another favorite from linocuts past.

"Homeward Bound," reduction linocut, 8 x 10", edition of 17

You probably recognize at least a portion of this image, since it's the background of the header here at Brush and Baren. I could have called this the second print I made after I got Presston, my Takach etching press, except that my first run at this concept was a disaster and I scrapped the entire edition. I was still getting used to working with the press, and I had problems with pressure setting, bad color choices, and fumbling attempts at masking. You know... it was one of those @#$% "learning experiences" that people get so excited about. The end result was that the prints were sub-standard and they went into the scrap pile.

I walked away from the image, and didn't revisit it until a year later. I still liked the concept, and after a year had gone by I felt a little more confident in my press technique. I'm glad I tried again.

In my mind the title "Homeward Bound" has always been deliberately ambiguous. Is it sunset and are these geese going back to a lake or pond for the night? Maybe it's migration and they're headed to breeding or wintering habitat.

Or maybe it's the viewer who is headed home, watching the sky change and anticipating a cozy evening in front of the fire. (With or without a rack of linocuts.)

Saturday, January 26, 2019

Linocut in Progress: So close, and yet.....

So far.

I really hoped to have this wrapped up before the weekend, but alas I was foiled once again by my own compulsive behavior. As you'll see....

Reduction linocut in progress, Step 11

Oh these trees and this green! Argh. I swear my next piece will have no green in it whatsoever. But before that can happen I have to wrestle this one into submission. Or perhaps it has to wrestle me. Whatever. We have to come to some sort of conclusion. The Step 11 color pass was a transparent browny-gray over the entire block. Some of the texture is starting to resolve in the foreground tree trunks, and if you click to slightly embiggen the image you might see some of the needle texture in the greens of the trees.

At this point I had to face something I had been avoiding for a couple of color passes. There were a few of the middle-ground tree trunks that were reading as too green. I had hoped that the warmer color of Step 11 would bring them into line, but it didn't quite work. So... a mask and some spot inking were my best solution.

Mask in place... Step... 11B?

Luckily, this mask was far simpler than a lot of my efforts and the areas that needed to be inked were small, so this step was relatively quick. Let's just call it 11B... okay? Sort of a half step.

11B. You probably can't see much difference, but trust me. I am happier.

And THEN I thought I was ready for the last color pass before the details of the birds. Woohoo!

Reduction linocut in progress, Step 12

Oh.
Nope.
Not quite.

It took me a couple of tries to get this color right... again it's very transparent, and it's a warmish blue-gray, if you can imagine such a thing. And it's close... oh so close... to being the last one. But I think to really push the background into... well... the background... I need just a few more darks in the foreground trees. Not so dark that they will ultimately interfere with the birds... which will be almost black... but... something.

The good news is that this means I can wholesale take out the background. The bad news is that it is darn scary to remove this much material. I mean... look:

Eeek!

That little bird's got no more cover! Totally exposed! Eek! No going back now...

Printmaking gods permitting, I'm planning to have this all wrapped up by the middle of the coming week. Keep your fingers crossed for me. I need to keep mine UNcrossed so I can get the work done.

Friday, January 18, 2019

Linocut in Progress: Sneaking up on it

So much for my belief that things would be quiet in January and I'd be able to get consistent studio time. I've been so wrong about my schedule that I am actually looking forward to the blizzard we're expecting this weekend. PLEASE let me be snowed in so I can get some work done. (But not so snowed in that we lose power, which is a potential problem if the forecasts which include sleet in our future are correct.)

Still, things are moving ahead on the current linocut, if not as quickly or smoothly as I had hoped.

After all the mucking about with masks of the last few color passes, I really wanted a couple of straightforward steps. This is challenging because of course I'd like to keep too much green out of the tree trunks and too much brown out of the tree needles.

But my masks haven't been precise (they never are), and things were starting to look a bit scattered, so I wanted a color pass that would be unifying without destroying the color temperatures. Hmm. What about a nice transparent gray?

Reduction linocut in progress, Step 9

Yes! That will do nicely. Browns are still brown, greens are still green, and it all seems more coherent again.

Now what?

I would really like to resolve some of these trees better.. and soon... but I am on the fence about the background. Will I get a better effect from keeping the darkest darks in the far distance... or should I leave the distance sort of middle-value and the foreground trees darker? Decisions, decisions.

And since I still couldn't decide, I took a risk with the next overall color pass and mixed a lovely gray-green.

Transparent gray-green rollup

Purdy, isn't it? It looks alarming on the block, especially over the tree trunks, but it's very transparent and I crossed my fingers that basic color theory would be my friend. The existing trunk color is a sort of reddish-brown. Transparent green over that should become more brown... shouldn't it?

Reduction linocut in progress, Step 10

Oh, whew! That worked.

So now it's back to the carving table. I think the focus now will be on the trunks... to get some of their texture established. I'm on the fence (again) about what the next color pass should be. I really want to wrap this up soon, so I'm considering one transparent brown pass... or maybe gray? Or maybe blue-gray. Or....

Wednesday, January 2, 2019

Linocut in Progress: Begin as you intend to continue

Happy New Year! 

Begin as you intend to continue. I can't remember who first shared that idea with me, but it's always my mantra for the first day of a new year. So how did I spend January 1, 2019? Watching birds, enjoying the sparkling, windswept day and taking a walk along the coast with friends. Taking care of a little administrative work, answering a few emails. Bringing in more wood for the stove and tidying up...

And carving and printing lino, OF COURSE!

But let's back up a day or two first...

I'm at the stage when progress becomes a headscratching exercise, thinking inside out and wrongside 'round more than usual as I try to sort out questions of warm vs cool colors, transparency vs opacity.

I like to keep my inks as transparent as possible for as long as possible. It's a habit left over from my watercolor painting days, and I really enjoy the luminous quality one can achieve when light gets to bounce off paper. But in practice this makes for some headaches. To wit...

I was ready to put down a middle-value green, but didn't want it to exert too much influence in some areas, particularly the larger foreground tree trunks. So I cut a stack of masks that looked like this.

Masking for Step 7

Not the most intricate masks I've ever cut, but having to align four pieces of newsprint for every print pulled just adds time and tedium to the process. But what else are ya gonna do?

Here's Step 7 printed:

Reduction linocut in progress: Step 7 printed, embiggenable with a click

Okay. Not bad. Not orderly and harmonious anymore, but at least moving forward in a good way. But, ugh. What to do from here? Another green? That risks getting too dark too soon, and putting too much green in the background tree trunks. So. Of course I had to cut another set of masks... essentially the opposite of what I cut before.

Step 8 masks

This as actually a modified version of the masks at this stage. There were originally two more, but I decided that was overkill and was so near to the border of ridiculousness that it was only not ridiculous by virtue of... Well, let's face it. It was just plain ridiculous.

So there are five paper shapes instead of seven, and a semi-opaque light brown ink. Yes, I know it looks sort of... puce... but trust me, it's a brownish ink if ever I mixed one.

Step 8 printed

See? Told you so.

So where to go from here? That's a good question. I THINK the next color will be another green, and I THINK I will try to avoid masking, lest the whole thing becomes a visual train wreck. Well, I'll probably mask the birds. But that's all. Except maybe a couple of trunks. But nothing else. Except I do like some of this color in the background...

Yeah. You and I will both just have to wait and see what happens. Beginning 2019 the way I'd like it to continue? Let's just say that some things will change, but some things, like my work process, will remain absolutely the same.

Sunday, December 30, 2018

Post-Christmas secret reveal!

Not long before the Christmas holiday I teased a post with a Photoshop-warped image of a secret project I was working on. Now that the surprises have been delivered, I'm tickled to share them with you.

It started with a query from a friend who gifts a special ornament to her husband every year. The aforementioned husband is also a friend and colleague, and 2018 was a rough year for him with health issues. The red-eyed vireo was a memento of a happy time in the midst of challenges... could I perhaps come up with something?

Of course I loved the idea... but what to make, and how? Certainly it had to at least start with a lino... but printed on to what? I'd long wanted to play around with printing on fabric, but didn't have any good way to do anything with the fabric after I printed it. My sewing machine is a 1940s-vintage that hasn't been used in more than a decade... maybe two... it seemed risky.

But then, kismet! I was in an actual fabric store with a friend right after Thanksgiving (What? I NEVER go to stores during the holidays.)... lo and behold! Sewing machines... 40% off! I was able to get a brand new Singer... not fancy but totally functional... for $70. Yeah. Had to do it.

First experiment: Red-eyed vireo ornament for Ted

It took a few tries to get the ink and press pressure sorted out for a good impression on the slightly-knobbly fabric, but I was pleased with the results and so were my friends.

Flush with success I decided to make some others for my own holiday gifts. This led to quite a few late nights as the project got bigger and bigger. In the end I had to limit the number I made... If I tell you that next year (!!??!!) I'll design a simpler shape to sew, you'll know where the biggest time sink was.

Chickadee-dee-dee ornaments. Hand-colored with permanent ink brush pens.

But here they are... a flock of chickadees. Maine's state bird, and the darling of Colorado habitats, so appropriate for friends both here and there. I definitely learned a few things in the making... the kinds of things that make me caution people to not expect mass production any time soon, but perhaps some will turn up again later in the year. You just never know.

Now... back to that snowscape linocut!

Linocut in Progress: Theatrical Cut

Director's Cut: The movie the way the Director actually wanted it, but the studio said no. Extended Cut: Really the thing I ALWAYS wan...