If the contents of my inbox are any indication, one of the biggest challenges for new printmakers is the question of registration. For those readers for whom the question of registration is
What is it? rather than
How do I get it?, registration is the process of getting each color layer lined up exactly where it should be.
I think we're all familiar with registration that goes awry, even if we don't know what to call it. Probably most of us at some time or another have picked up the Sunday paper and found our favorite comic strip distorted... perhaps the blue ink is improperly aligned and all the images have an offset blue ghost. That's bad registration.
There are probably as many ways to approach registration as there are printmakers, with some techniques better suited to hand-burnishing and others to press printing. I thought it might be helpful to show you 1) what I've used for hand-printing, 3) what I now use for press-printing, and 3) some links to other techniques that you might find helpful.
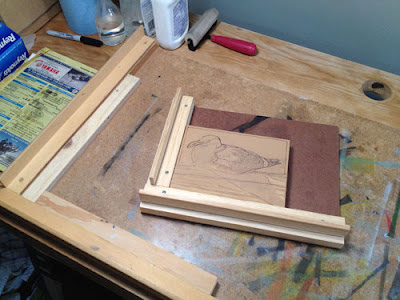
When I was hand-rubbing all my prints I worked on mounted blocks and over the years developed a jig system that worked really well for me. I wrote a post about it several years ago which you can find here:
The Linocut Jig.
 |
| Two sizes of registration jigs for hand-rubbed prints, mounted blocks |
But everything changed a year ago when I brought home Presston, an etching press. It is possible to print mounted blocks on an etching press, but I didn't really want to mess around with type-high rails and trying to figure out how to register a mounted block.
I tried a couple of different ideas before I hit on the pin-and-tab system I'm using now. It has its limits, but so far I'm content with it.
1) The jig: I cut a piece of matboard with an opening the size of my unmounted lino. The mat itself is wider on one end to accommodate the pins and still allow for a good paper margin.
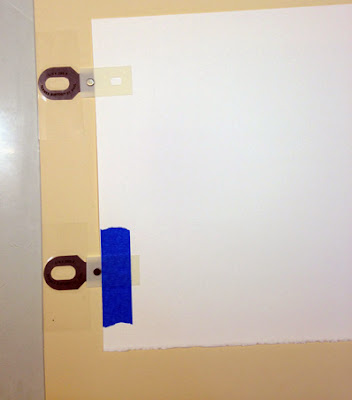
2) The pins: About a million years ago I worked in a commercial print shop. I set type and did layout via the
paste-up
method... yes, I am that old. My pasted-up layouts then went to the camera room, where the camera guy made film negatives of them and
then "
stripped them up" for exposure to metal lithographic plates. And guess what? He used pins and tabs just like these to do the job.
There are several references for pin-and-tab systems on the interwebs. Some will tell you to secure your lino to bookboard, but that seems like a clean-up headache to me. I also know of instances where printmakers
adhere the pins directly on to their lino. This works really well for
bleed prints (image goes over the edge of the paper), but at the moment I like making prints with nice, clean margins.
(Note:
Ternes-Burton sells pin-and-tab
sets, but I found that I wanted shallower pins than the ones included in sets. I'm using the 1/4" x .055 size)
3) The tabs: The slightly tedious bit in this system is setting up the paper (and then taking it all apart again when the prints are finished). Once I have all my paper trimmed to size I turn each sheet face down on the jig, snug up to the pins. I affix tabs to the pins, and then tape the tabs to the paper with blue painter's tape. So far the blue tape stays stuck through the entire print process... it does pull up some paper on the back when the prints are finished and the tabs are removed, but I allow for this with a wider margin on one edge of the paper.

And, voila! We're ready to go. I was worried at first about running the metal pins through the press, but I haven't had any problems because 1) I'm using the most shallow pins which, even attached to the mat, are not any higher than the lino block, 2) before I run the print through the press I place a stiff cutting mat over everything including the pins, and 3) I'm using the lightest possible pressure setting. I get NO embossing of the paper. But I'm keeping a watchful eye to make sure there are no problems over time.
Other techniques:
McClain's Printmaking Supplies has a very helpful one-page PDF describing the
Japanese kento technique here, and another page about using
their registration board here. The registration board is something you could easily make yourself with their description. (
McClain's has all SORTS of great instructions that they include with their products.)
Maurice Fykes III has an extensive description of a
pin-and-tab system available as a PDF here.
Three different techniques are described in Michael Merry's
Introduction to Printmaking blog here. The blog appears to be the website for an entire printmaking course, so there are lots of other useful links there as well.
Northwoods Trekker has an interesting modification for a pin-type system made from an inexpensive hold punch on
My Printmaking Journey, and there's another similar version in a thread on the
Wet Canvas Printmaking Forum.
If any readers have links to other systems that they'd like to share, I'd love to see them in the comments.


