
That said, the biggest issue so far seems to be drying time. After the previous (rather entertaining) bright-green-over-lavender-makes-yellow pass I immediately jumped in to a color pass I hoped would tone everything down. Naturally I forgot to take photos during this, but here's a swatch of the color I used:
 |
| Inky! |
It's a very transparent sage-y green... and in case you're wondering, in this photo the ink is sitting on a sheet of wax paper. I had already cleaned everything up and folded the leftover ink into a wax paper packet to keep it usable for later before I remembered, "D'oh! Photos!"
Here's the result. Light green now, and ochre, but less bright. I saved a few little lines of that bright yellow just because I could.
 |
| Reduction linocut in progress, Step 7 |
At this point I decided it was time to get more direct about greens, and to get some blended color going. I mixed a couple of lovely greens and again jumped in to print..
And immediately had to stop. Wet rejection! Argh! The prints were entirely too wet. Color wasn't adhering correctly, fine lines were filling in. Nothing to do but clean up and walk away.
When things were still really tacky the next day I did a little bit of gentle "stripping" by hand. I took a fresh sheet of newsprint, placed it over the top of each print, and rubbed it firmly with the palm of my hand. This pulled up a tiny bit of ink, but not even enough to transfer color to the newsprint*.
(*Stripping freshly-printed ink will remove a lot more color, and stripping through a press instead of by hand will be even more aggressive. I recommend judicious and careful use, especially the first time you try this technique! If your ink is too tacky and you apply too much pressure you can also make the newsprint stick to your prints. This is bad.)
By the next day I was ready to print again, so I pulled out the lovely greens I had mixed previously (and folded into wax paper to keep fresh) and set up for a blended roll.
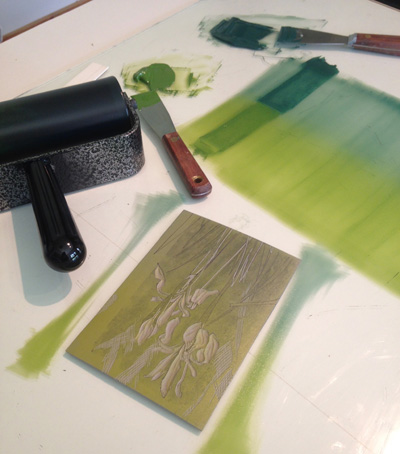
I'm trying to get some soft color in the upper background... sort of like the out-of-focus blur of photography, but not really. Just less hard edges. I carved some subtle texture in to some areas of the background, and a few less-subtle details in the stems and leaves of the flowers.
 |
| Step 8 |
Alrighty, then! Back on track. A little more fine texture in the upper background and then I think I'll be ready to eliminate it entirely. Three, maybe four passes left? It's a lot for such a small piece, but after six months away I'm not surprised I'm going a bit overboard.
Time to go downstairs and see how wet the prints are this morning!


can you get a dehumidifier to help with the drying?
ReplyDeletePossibly, although, for reasons rather complicated to explain, I am limited in how much electricity I can draw here and I think those things take a lot of juice. Come winter everything will dry out, so I expect I'll be a lot more productive then. Not much else to do when it's cold and dark out, anyway! ;-)
Deleteah ok :) hubby was an electrician so wouldn't be too complicated ;)
Delete