Monday, January 25, 2016

Linocut in Progress: Short, short, looooonnnnng

Short, short, looonnnnggggg.... that's a reference to the carving time for the first three steps of the new linocut. Although it also sounds a bit like dance steps.

Step 1: The bright white bits of the birds were carved out first. Satisfying to have a suggestion of the subject already on paper. This first blue is very transparent, you can see here the proportion of pigment to transparent base.


And the result on the paper:


Step 2: The next bit of carving went even faster... I'm leaving a wee bit of this blue in the whites on the birds, and to suggest some reflection in the water below the top-most male.

The inking gave me a few minor fits, which look exaggerated here because I beefed up the contrast on a photo taken in poor light.

I was having trouble getting even tone on the outside edges so put one torn sheet of newsprint under the block on the outside edges only. (Torn because I expected it to leave a little mark and I didn't want it to be a hard straight line.) It's amazing how much difference a single sheet of newsprint can make in the amount of pressure. The newsprint did leave an edge, but since most of this will be covered I'm not too worried. And, as I mentioned, it looks much more exaggerated in the photo than it does in real life.


So those were the two "short, short" steps. The next pass involves MUCH carving of water... Will be a looonnngggggish time before I'm ready to print again.

Thursday, January 21, 2016

Linocut in Progress: All the stuff that comes before

This evening I had a brief text message exchange with a friend who is working on a boat off the coast of Florida. It sounds so romantic, but even from his few short words it was clear that there was a bunch of decidedly UN-romantic drama going on out of the public eye.

Which of course made me think of linos. (Full disclosure: Most things make me think of linos.)

No, really. Because right now I'm in the decidedly un-romantic preliminary stages of a new piece. No carving. No ink. No lovely thick paper. And I realized I haven't shared this portion of my prep in a while, so lucky you! Here it is, from the beginning....


It starts with a walk. (A lot of things start with a walk.) This time of year our small Sands Lake is host to a much wider diversity of waterfowl than it is in the summer. Among our winter visitors are several pairs of buffleheads, which I love for the males' striking black-and-white plumage and their spunky attitudes. I have a fair number of photos and a few sketches of them... but I also remembered a great image my friend Tony took several years ago of a female with a little crab in her bill. Armed with this reference (and Tony's permission to dig through his photos), I fussed around until I came up with a design I liked. I showed you a corner of this preliminary drawing last week as a bit of a tease.

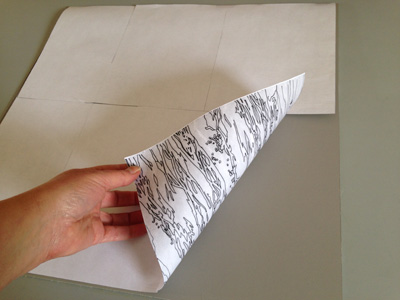
Once I had the drawing sorted out I scanned it to my computer and enlarged it to the 18 x 18 format I'm using for the image. I printed it out in sections on a laser (toner) printer, and pieced it together.


Here's a questionable photo of the trimming and taping together in progress.


And now for the stinky part. Because I printed this out on a laser printer I can transfer the image to the lino using a Chartpak blender marker. This is un-pigmented, straight-up xylene. Nasty stuff. Open windows required (or use it outside), don't inhale too much, and dispose of all the remnants IMMEDIATELY. I don't always use this method, but for an image this complicated it saves me having to draw and re-draw and re-draw. It goes like this:


Tape the toner-printed drawing face down on the lino.


Rub the back of the paper with the blender pen. I also stop from time to time and burnish the whole thing with something like a bone folder. The pen dissolves the toner and transfers it to the lino. Sometimes it works better than others... it depends on how dark the toner is, and sometimes how fresh it is. It's okay, I'm not going for perfect here.


Very bad photo of the finished transfer. It was better than it appears here... not perfect, but good enough for the re-draw. The nice thing is that the image is now reversed without me having to think about it. And the marker-soaked paper went directly to the outside trash.


And this is what I've been doing today. Going back over the image with Sharpie pen... refining some shapes. The toner transfer would probably hold up for at least the first color pass without doing the Sharpie bit, but I don't want to take the risk of losing it when I clean up.

After I get the drawing done I'll scrub the whole block down with mineral oil and probably a little green cleaner to avoid having the Sharpie lines transferring to my prints. It's going to be fun (I hope!)... you know me and complicated water... can't get enough of it. And four birds... that's a new one. I'm anxious to get the first ink layer down on paper, but ARGH! I have to do a boatload of framing the next couple of days, so it will likely be next week before I can get it underway.

Tuesday, January 19, 2016

Getting down to (art) business in the new year

We interrupt our regularly-scheduled linocut adventure to bring you the following announcement from Alyson Stanfield, the Art Biz Coach.

It was Alyson who first encouraged me to start blogging, and it's been a great experience for me, both personally and professionally. She's full of great, practical ideas for artists who are struggling to be business people, and she always shares them with a smile.

This week she's offering a FREE "must-have-checklist" for your art business. (And a 3-part video series.) She'll ask for your email address, and I encourage you to sign up for her weekly email message. I confess that I don't read ALL of them all the way through, but even after 9 years I still find useful nuggets and encouragement when the going gets tough.

And, yes...  we really will be back to linos tomorrow!

Thursday, January 14, 2016

Linocut in (semi) progress: A hint


I've squared-up a piece of lino 18" x 18," so I guess my next piece is going to be another large-ish one.

Here's a corner of the drawing-in progress. Gee... what do you think it will be? (Bonus points if you can tell me the species and sex of the featured fowl.)

It's gonna be another crazy one, but I'm looking forward to it. Aiming to get the drawing finished today, but probably won't get it committed to lino until next week since I'm headed out of town again for a few days. I'm being pulled in so many different directions right now that it's going to feel really good to sit down and just CARVE for a while.

Friday, January 8, 2016

Coors Western Art Show (and what comes after)

Well, it's been quite the week! First thing Monday morning I headed to Denver for the preview, Young Guns, and Red Carpet Gala openings of the Coors Western Art Show.

According to the show's website, the Coors Western Art Exhibit & Sale began as the joint inspiration of Coors Brewing Company and the National Western Stock Show. Since 1993, Coors and the National Western have worked together to develop what is now considered one of the finest western art exhibits in the United States. It was my first time in this major exhibition, which annually raises hundreds of thousands of dollars to provide college scholarships for students from rural areas.

And, wow! It was an excellent experience! By the time I left on Tuesday night I had sold all of my work on the wall and at least three additional pieces. I am so pleased to have my work headed to new homes, and to have that work support young scholars throughout the west. Many thanks to exhibition curator Rose Frederick, coordinator Krista Hanley, and the many kind and enthusiastic volunteers who worked so hard to make the event successful. Special thanks to Lynne and Carla, "my" personal volunteers, who helped keep me going and who handled the critical paperwork aspect!

The only photo I had time to take! Before the event began.

Between Monday night's Young Guns event and Tuesday night's Red Carpet Gala we also had a chance to take a behind-the-scenes tour of the Colorado History Center. Among the treasures brought out for us to examine up close were woodblocks and prints from the WPA era. Great fun!

Getting up close and personal with WPA-era prints.

The CHC also hosted a panel discussion, "Discerning Printed Works on Paper." YES! A program about prints and printmaking! The panel was moderated by Seth Hopkins of the Booth Western Art Museum, and included collector Doug Erion, woodcut printmaker Leon Loughridge, and gallerist Tam O'Neill. Fun and interesting, although I had to wince every few minutes. One of my pieces was included in the slide show that cycled behind the panelists and the top few inches were cut off! That evening at the show I had several people tell me they were happy to see the piece in person, since they couldn't figure out what it was in the slide! Oops.


I returned home Wednesday evening and spent yesterday catching up and following up. Today will be more of the same.

But next week it will be back to the studio! Spring exhibition deadlines are looming, both applications and events. While I was away I learned I will have two pieces included in the "Animalia" exhibit at the Loveland Museum this summer, but before that I need to be sure I'm ready for the Colorado Governor's Show, which opens at that same venue in April. April may seem a long way off, but for a printmaker that's practically tomorrow! Time to stop messing about online and get back to work.

Wednesday, December 30, 2015

Linocut in Progress: Finishing the owl

Wahoo! (Or perhaps that should be wa-WHOOO, given that this is an owl...) Either way, it's finished before the new year, and that makes me a happy camper.

The final stages were all fairly subtle: more transparent gray layers!

Reduction linocut in progress: Step 9

It was getting so close here, but I wanted to give a little more emphasis to the foreground branches and the bird...soooo.....

Reduction linocut in progress: Step 10

I really thought that this would be the end, but the owl felt a tiny bit flat to me. I cleared out the branches immediately around the owl and also took some material out of the bird's back and wing, then inked up the owl only and did one last run of transparent gray.

Reduction linocut, Step 11, final

Taking a decent photo of this image is, as I feared it might be, really challenging. The camera wants to make everything more contrasty-y than it actually is and either too warm or too cool. This shot is close, but not perfect.

Now what it needs is a title. This little owl appeared in a tree next to a restaurant in downtown Salida in early May. Flammulated owls are creatures of coniferous forest (which we have all around us, but not in town), but they are secretive. Its blatant presence in the middle of the day was quite a surprise.

The day was overcast and gray. As I worked on this piece I imagined this little fellow out for a spring stretch and, confused by the overcast light, caught away from his usual perch as the day progressed.

I don't remember if it snowed later that day or not, but it wouldn't have been unusual. The non-feathered bipeds in the area, anxious for warmer days, might have responded to those tentative flakes with a grumble: "Not again," or, "Enough with the snow already!"

I'm not sure that a viewer would understand the reference if I called this piece, "Not again," so I'm still looking for a title. Suggestions, anyone?

Saturday, December 26, 2015

Linocut in Progress: Just a little color

Linocut in progress, Step 6

It's a good thing I made a big pile of transparent gray early in this process, since it saves me time both in thinking and in mixing new color. I added the tiniest bit of blue at this stage, and the printing was quite straightforward.

But for the next step all that changed. These branches sport leaf buds in an early spring stage: Still rusty red, although a few are starting to open. There's also a little "flame" to be added to the wing of the flammulated owl (Psiloscops flammeolus). Two slightly different colors, but they can be printed in one pass with spot inking.


Spot inking. Sorry it's upside down. The light was better from this direction.

Spot inking is a lovely approach when one only needs color in small areas, but it does pose some interesting challenges sometimes. 

All of these color areas are small and much of the un-inked block will come in contact with the prints. I've shown the disastrous consequences of this before, but if you missed it just know that whole layers can be pulled off of slightly tacky prints with a dry block. 

Soooooooo.... Time for another ridiculous mask.


Overkill?

It took a good chunk of the morning to cut multiple masks like this one, but once I had it ready to go the printing itself went smoothly.


Linocut in progress, Step 7 (2 colors)

It looks a little clunky here... the rusty color in the owl's wing looks particularly harsh. Time to whip out that transparent gray. Again.


Linocut in progress, Step 8

I love this pass. So much has happened with another transparent gray. The leaf buds are now two colors of rusty red, but I didn't mix another red! The owl is darker and the branches have a little more depth. The orangey color in the bird's wing is still a little harsh, but with one or two more gray passes I think it will fall back nicely.

Feeling pretty good about this now... methinks it will be done before the new year!

Monday, December 21, 2015

Linocut in Progress: The owl emerges. Kinda.

Linocut in progress, Step 5

On the previous pass I warmed the image with a light transparent brown, and now I'm trying to subtly swing the whole piece back the other way. This pass was a transparent gray... just straight-up black in a big pile of transparent base.

It still looks quite brown, but except for the details of the leaf buds and some rusty bits in the owl I think everything from here on out will be layers of transparent gray. I might try sticking a hint of blue in it, but not much. I want the overall mood to remain overcast and quiet.

Thursday, December 17, 2015

Linocut in Progress: Small beginning steps, and then a big leap!

It's amazing how long I can avoid committing to a new linocut when I don't have a deadline looming. Ridiculous, really, since I am totally happy to be working once I begin. But becoming brave enough to make that first cut can sometimes take a while.

I wish I could remember who it was who said, "I begin when the pain of NOT working becomes greater than the pain of working." (Or some words to that effect.) I tried to Google it but just got a bunch of references to ibuprofen and morphine. Draw your own connections if you wish.

Sure enough... the pain of not working hit me last week, but I haven't made any posts because the first couple of passes didn't really show much. And, to be honest, I wasn't sure my idea was even going to work. But now I'm four passes along and fairly confident that I'm headed in the right direction, so....

Step 1:
Detail, first step of new linocut

See? I told you there wasn't much to show. But this is the reason I paced along the edge of the cliff for so long. The first marks are random white dots in a pale gray background. These dots will be there now for the entire print. Geez, I hope this works.

Step 2:

I carved a few more random dots and printed a slightly darker gray. I'm not sure now that the first gray was dark enough to make a difference, but okay... onward.

If you have a bright monitor you might be able to see the outlines of the subject. On a few of the prints in the run I had some bleed out from the Sharpie marker with which I drew the image on the block. I'm not worried about it because this will all get covered in subsequent steps, and the worst offenders get rotated to the front of the line as "test" prints.

Step 3: 

I decided that I didn't like the flat gray background, so added a slightly darker gray-blending-to-nothing in the top half of the print. This is a wretched photo! The bottom of the print is NOT blue, it's all gray. Which you'll see a little better in.....

Step 4:

NOW we are getting somewhere. The bones of the entire image are now in place... which for me is pretty surprising after only 4 color passes. At the moment I think the white dots might read a little bit like stars until one realizes that some of them are in the foreground.. carved in front of branches and bird. It's the beginning of a snow storm! Just the first few flakes.

I was afraid of putting in too many snowflakes, but now I think I should have done a few more. Oh well, next time!

It was kind of a scary commitment for me to remove so much material from the block at this point, but it was a great opportunity to fall in love with the widest "sweep" gouge in my new Pfeil tool set. I am really, really happy with these new gouges. There are a couple that will take time to find regular use for, but so far I am smitten with 4 of the 6 in the "B" set.

There will be a pause of a couple of days now: Friday to deliver work to an exhibition and Saturday to chase around for our annual Christmas Bird Count. But I should be back to work on Sunday and... fingers crossed... I am hopeful that I can wrap this one up before the end of the year!

Tuesday, December 8, 2015

Return from the dark side. Almost.

I'm still deep in the mysterious zone known as "I-printed-a-lot-for-a-long-time-now-I'm-not-sure-what-to-do-with-myself." But there are signs I am emerging.


Yep. Them there be fancy schmancy new tools what just arrived yesterday. (Clearly my usual habit of crafting articulate English sentences is still on walkabout.)

And this might or might not be a photo
of a copy
of a photo
that I might or might not be using as reference
whilst I might or might not be drawing up a new lino.


You just never know.

Wednesday, December 2, 2015

Process notes: Registration

If the contents of my inbox are any indication, one of the biggest challenges for new printmakers is the question of registration. For those readers for whom the question of registration is What is it? rather than How do I get it?, registration is the process of getting each color layer lined up exactly where it should be.

I think we're all familiar with registration that goes awry, even if we don't know what to call it. Probably most of us at some time or another have picked up the Sunday paper and found our favorite comic strip distorted... perhaps the blue ink is improperly aligned and all the images have an offset blue ghost. That's bad registration.

There are probably as many ways to approach registration as there are printmakers, with some techniques better suited to hand-burnishing and others to press printing. I thought it might be helpful to show you 1) what I've used for hand-printing, 3) what I now use for press-printing, and 3) some links to other techniques that you might find helpful.

When I was hand-rubbing all my prints I worked on mounted blocks and over the years developed a jig system that worked really well for me. I wrote a post about it several years ago which you can find here: The Linocut Jig.
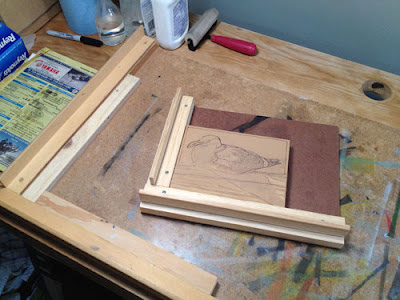
Two sizes of registration jigs for hand-rubbed prints, mounted blocks

But everything changed a year ago when I brought home Presston, an etching press. It is possible to print mounted blocks on an etching press, but I didn't really want to mess around with type-high rails and trying to figure out how to register a mounted block.

I tried a couple of different ideas before I hit on the pin-and-tab system I'm using now. It has its limits, but so far I'm content with it.

1) The jig: I cut a piece of matboard with an opening the size of my unmounted lino. The mat itself is wider on one end to accommodate the pins and still allow for a good paper margin.


2) The pins: About a million years ago I worked in a commercial print shop. I set type and did layout via the paste-up method... yes, I am that old. My pasted-up layouts then went to the camera room, where the camera guy made film negatives of them and then "stripped them up" for exposure to metal lithographic plates. And guess what? He used pins and tabs just like these to do the job.


There are several references for pin-and-tab systems on the interwebs. Some will tell you to secure your lino to bookboard, but that seems like a clean-up headache to me. I also know of instances where printmakers adhere the pins directly on to their lino. This works really well for bleed prints (image goes over the edge of the paper), but at the moment I like making prints with nice, clean margins.

(Note: Ternes-Burton sells pin-and-tab sets, but I found that I wanted shallower pins than the ones included in sets. I'm using the 1/4" x .055 size)

3) The tabs: The slightly tedious bit in this system is setting up the paper (and then taking it all apart again when the prints are finished). Once I have all my paper trimmed to size I turn each sheet face down on the jig, snug up to the pins. I affix tabs to the pins, and then tape the tabs to the paper with blue painter's tape. So far the blue tape stays stuck through the entire print process... it does pull up some paper on the back when the prints are finished and the tabs are removed, but I allow for this with a wider margin on one edge of the paper.
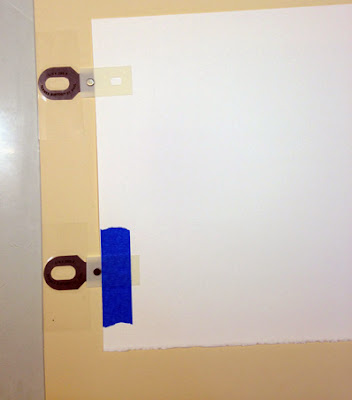

And, voila! We're ready to go. I was worried at first about running the metal pins through the press, but I haven't had any problems because 1) I'm using the most shallow pins which, even attached to the mat, are not any higher than the lino block, 2) before I run the print through the press I place a stiff cutting mat over everything including the pins, and 3) I'm using the lightest possible pressure setting. I get NO embossing of the paper. But I'm keeping a watchful eye to make sure there are no problems over time.

Other techniques:

McClain's Printmaking Supplies has a very helpful one-page PDF describing the Japanese kento technique here, and another page about using their registration board here. The registration board is something you could easily make yourself with their description. (McClain's has all SORTS of great instructions that they include with their products.)

Maurice Fykes III has an extensive description of a pin-and-tab system available as a PDF here.

Three different techniques are described in Michael Merry's Introduction to Printmaking blog here. The blog appears to be the website for an entire printmaking course, so there are lots of other useful links there as well.

Northwoods Trekker has an interesting modification for a pin-type system made from an inexpensive hold punch on My Printmaking Journey, and there's another similar version in a thread on the Wet Canvas Printmaking Forum.

If any readers have links to other systems that they'd like to share, I'd love to see them in the comments.

Linocut in Progress: Did You See That?

Put on your deerstalkers and get out your magnifying glasses, because we're back to trying to sleuth out the order of operations on this...